

How to Set Up & Use Windscribe on a Google Nest & Google Mesh Router


A Note on Google Mesh Hardware
Google Nest Wifi (all generations), Google Wifi, and Nest Wifi Pro run Google's proprietary firmware and do not support running a VPN client directly on the device. Windscribe does not support flashing Google mesh hardware as a setup path.
There are two practical approaches for routing traffic through Windscribe on a Google mesh network:
- Method A: Upstream VPN Router. Place a separate VPN-capable router between your modem and the Google mesh system. Most regular internet traffic from devices on the Google network will route through the VPN router automatically.
- Method B: Per-Device Apps. Install Windscribe on each individual device. No router changes are required, but each device must be configured separately.
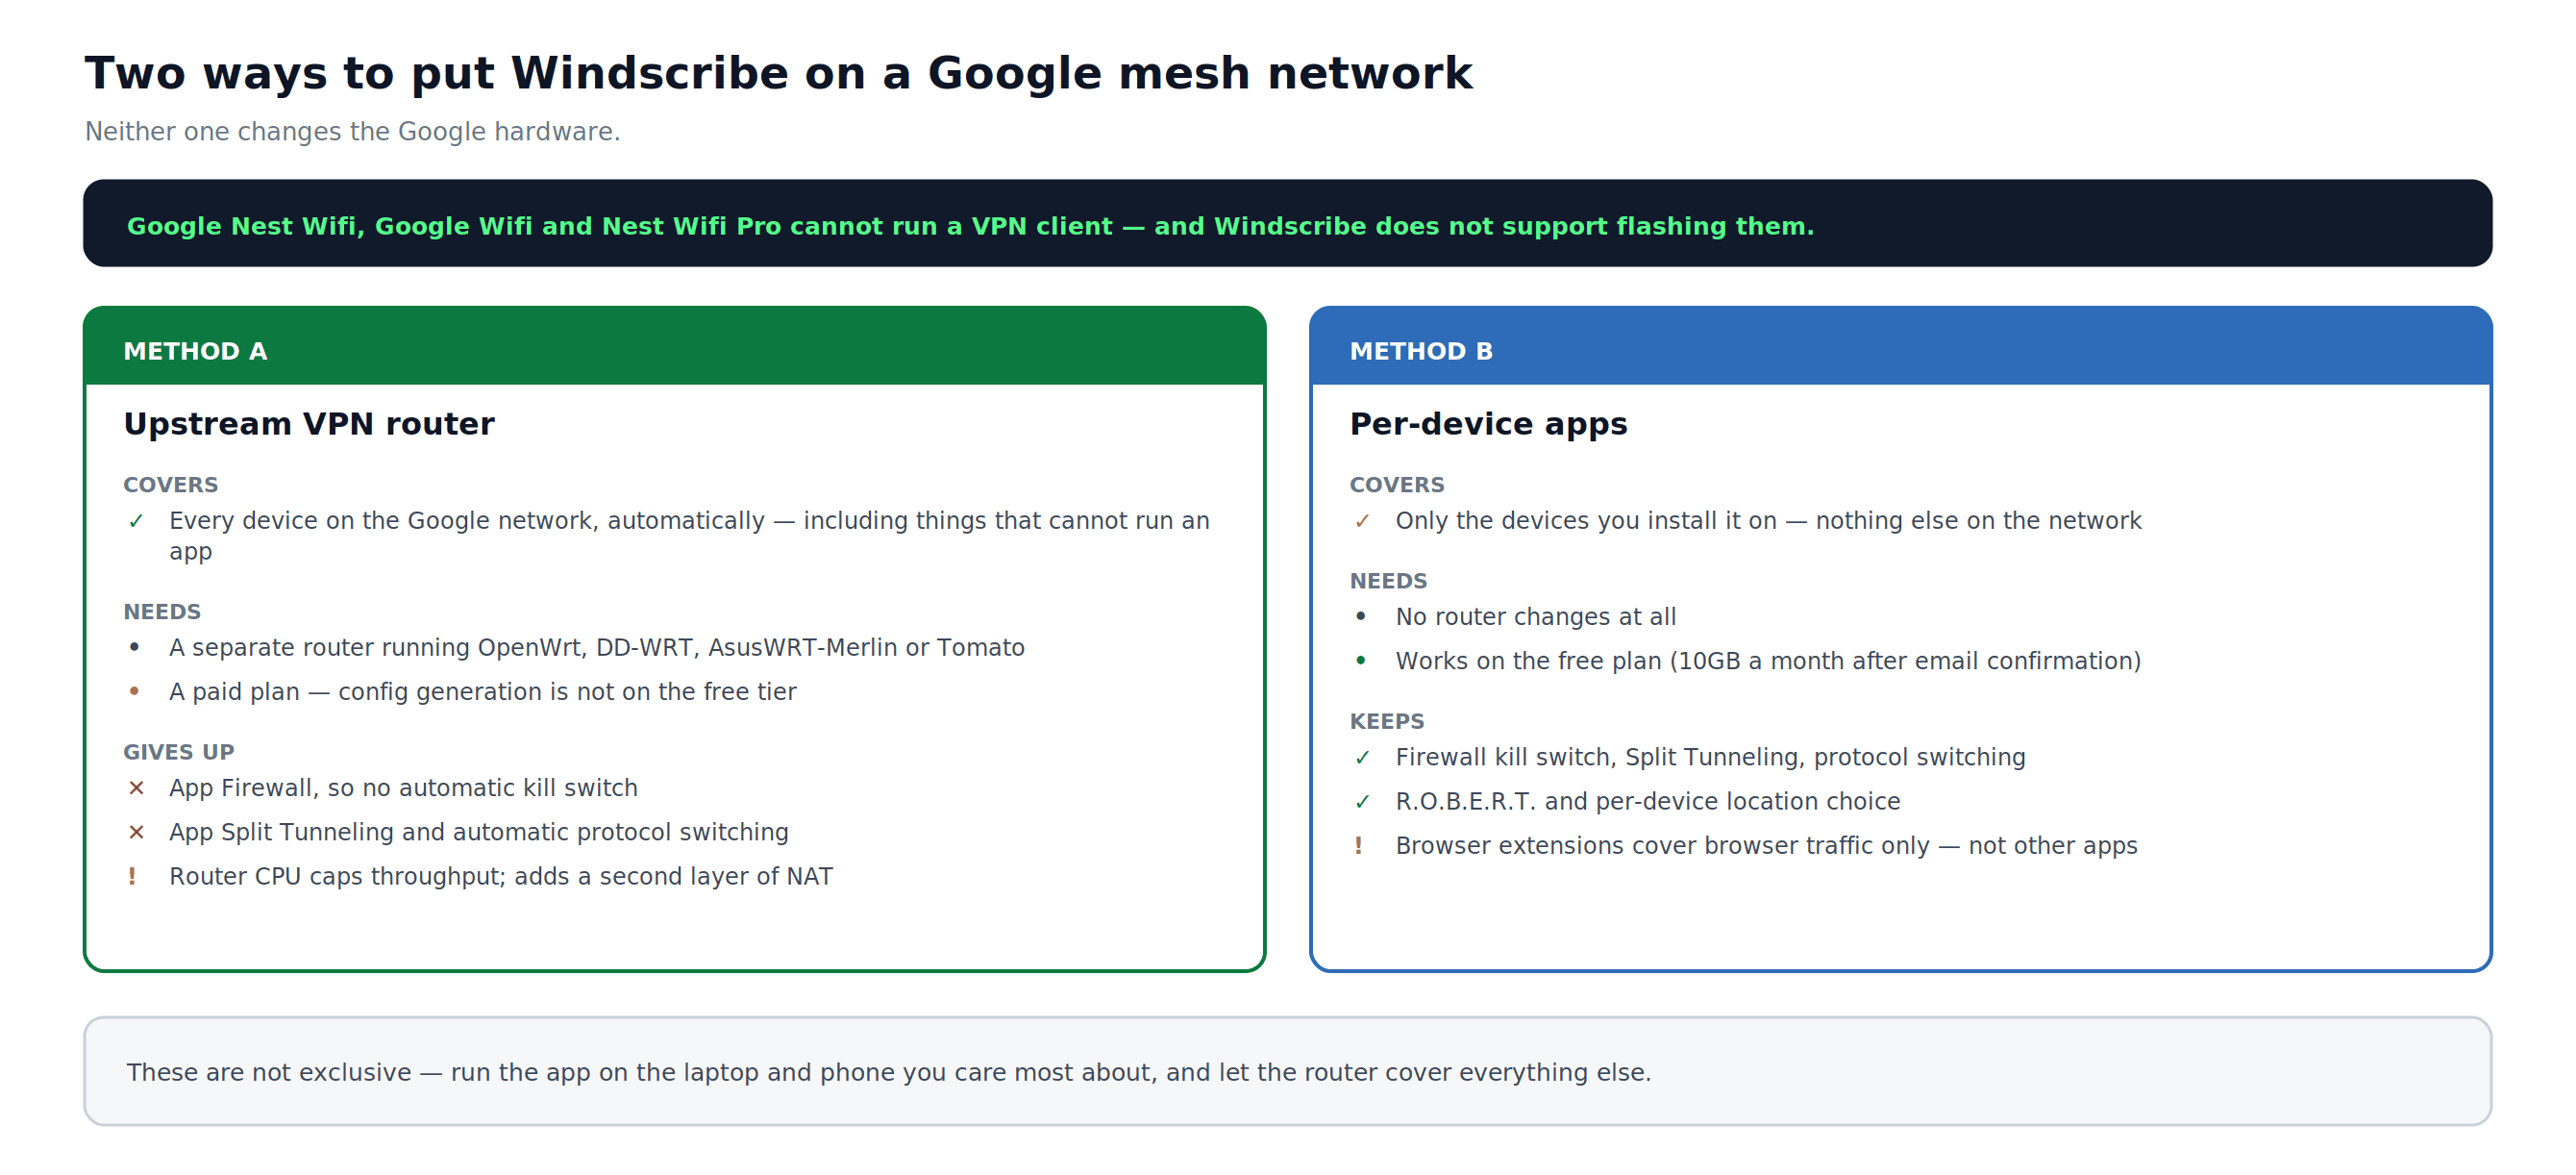
Figure 1: The two approaches side by side — what each one covers, and what it costs you.
Method A: Upstream VPN Router
How It Works
The VPN router sits between your modem and the Google mesh system. Traffic flows in this order:
Device → Google mesh node → VPN router → Windscribe server → Internet
What You Lose with Router-Level Configs
Manual OpenVPN and WireGuard configs do not include the Windscribe app's built-in protections. Before proceeding, be aware:
- No Windscribe app Firewall (no automatic kill switch)
- No app-level Split Tunneling
- No automatic protocol switching
- Router CPU limits throughput: some consumer routers cannot sustain fast VPN speeds
If the VPN tunnel drops and your router is not configured to block non-VPN traffic, your traffic will fall back to the regular WAN connection without any warning. See the Kill Switch section in Troubleshooting.
Requirements
- A router that supports OpenVPN or WireGuard client mode: any device running OpenWrt, DD-WRT, AsusWRT-Merlin, or Tomato firmware
- A paid Windscribe account. Pro includes all Pro server locations. Build-A-Plan includes only the paid locations added to that account. Manual config generation is not available on the free plan.
- Your modem or ISP gateway
- Your existing Google mesh system
Part 1: Physical Setup
- Connect your modem's LAN port to the WAN port of the VPN-capable router.
- Connect one of the VPN router's LAN ports to the WAN port of the Google mesh primary node.
- Power on the modem first, then the VPN router, then the Google mesh primary node. Wait 30 to 60 seconds between each device before powering on the next.
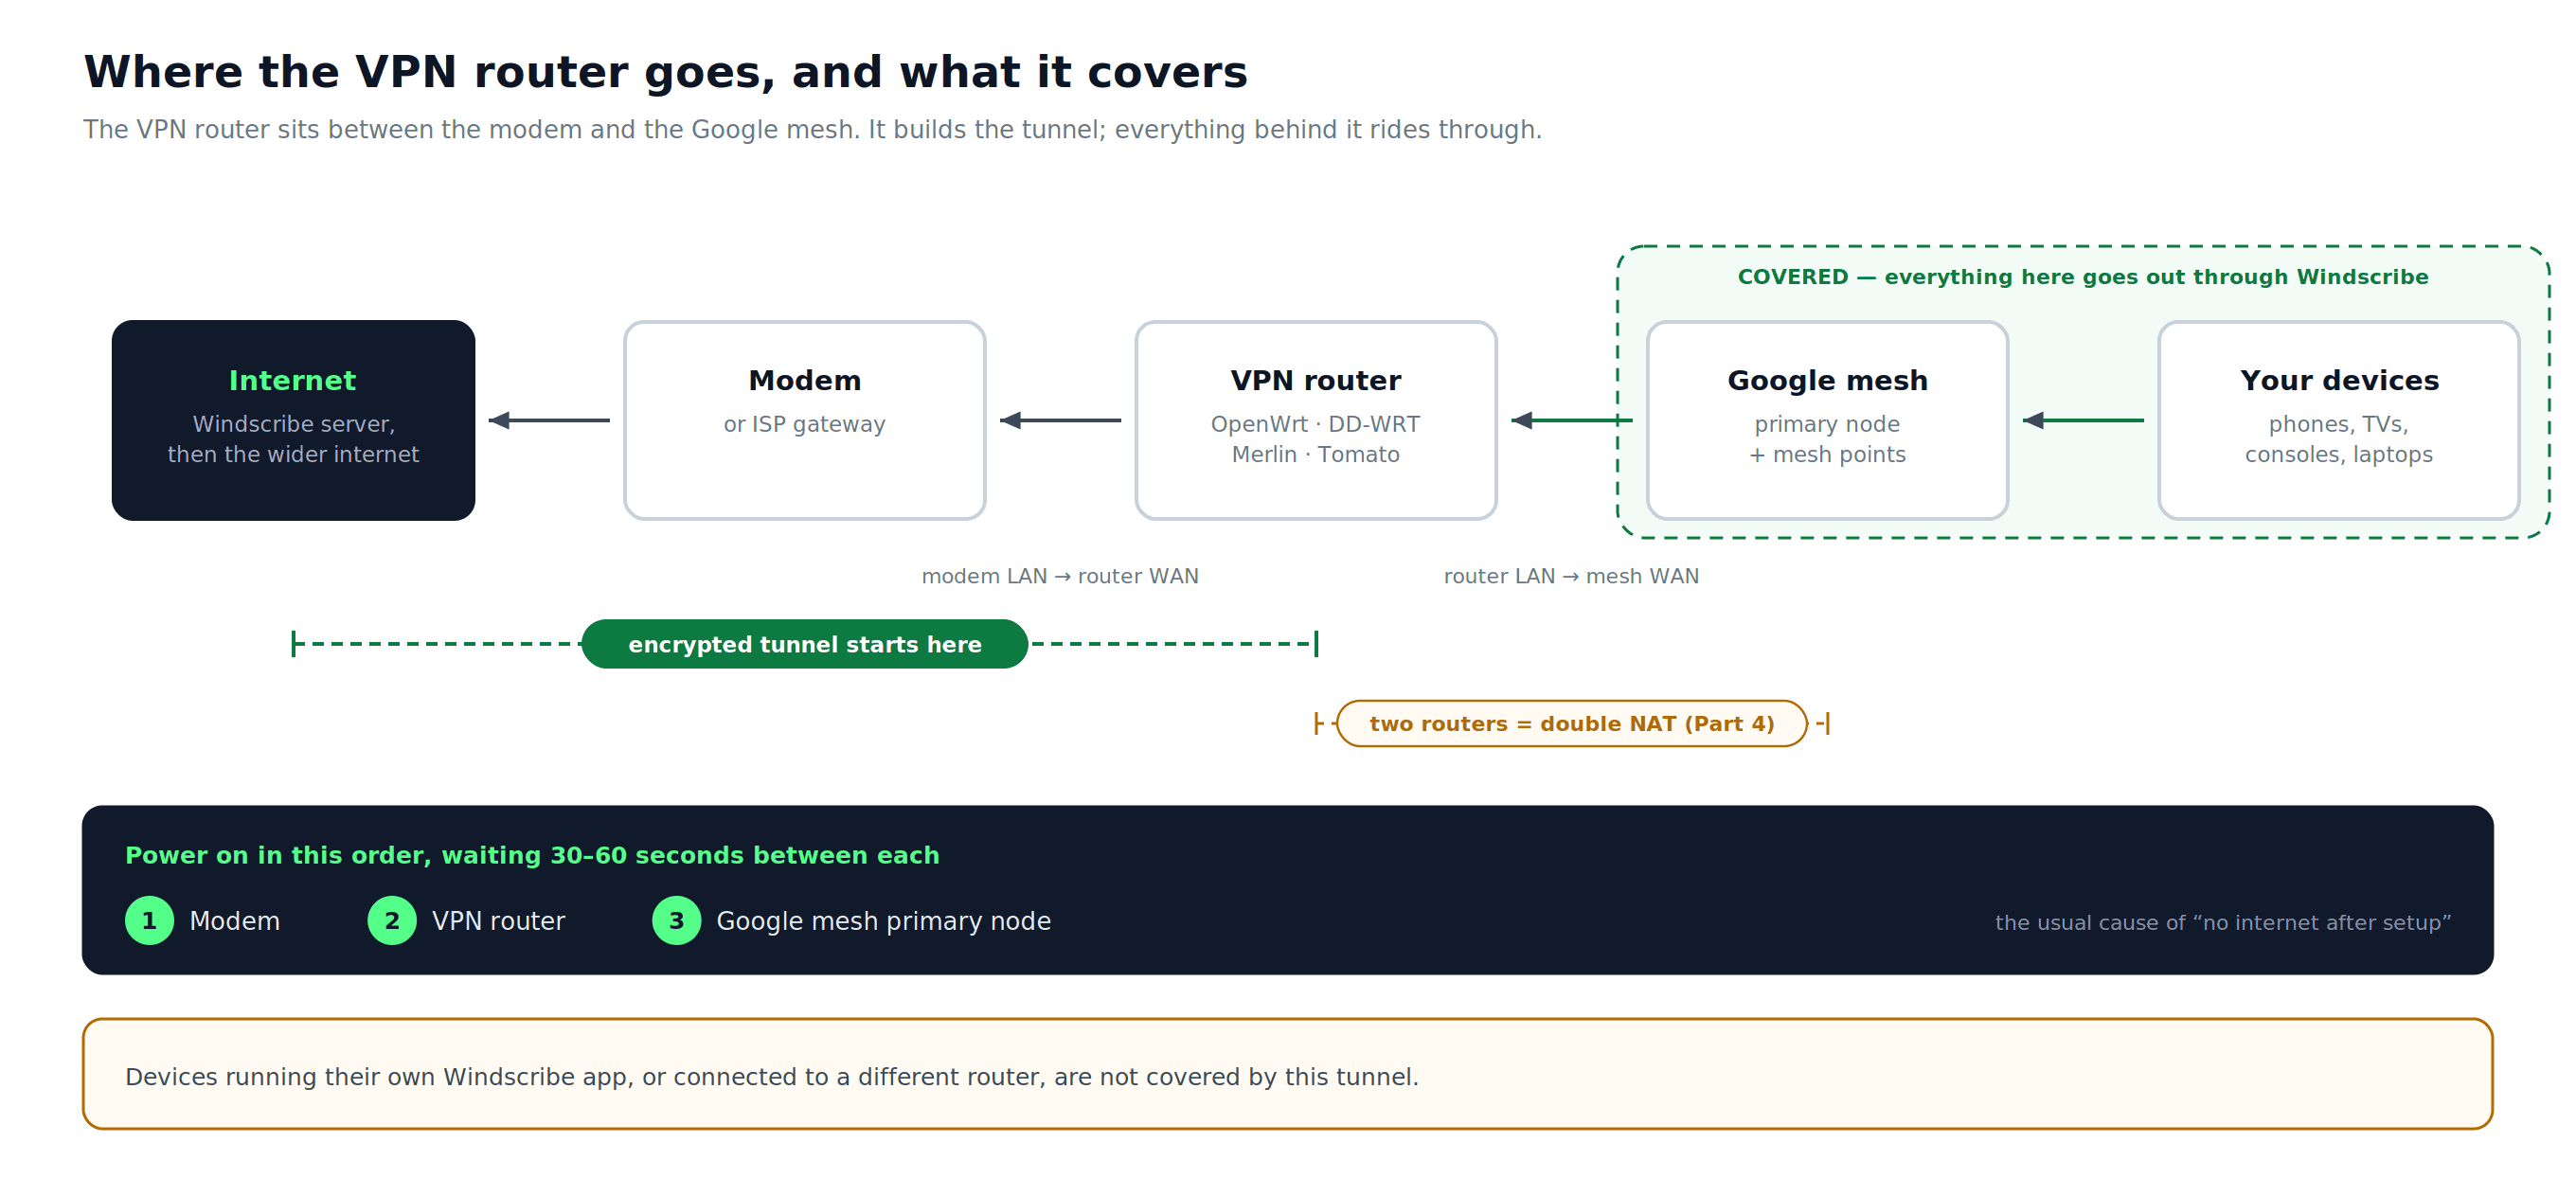
Figure 2: Where the VPN router sits, which devices end up inside the tunnel, and the order to power everything on.
Part 2: Download Windscribe Config Files
- Open the config generator for your protocol and sign in if prompted:
- WireGuard (recommended): WireGuard Config Generator
- OpenVPN: OpenVPN Config Generator
- Configure the required fields:
- WireGuard: Choose a Location, Port (use 443 if unsure), and Key Pair. Leave New Key Pair selected unless you need to reuse an existing key pair.
- OpenVPN: Choose a Location / IP, Protocol, Port (use 443 if unsure), and OpenVPN Version that matches your router's OpenVPN client. Use UDP where possible. TCP can help on restricted networks but may reduce speeds.
- Download the config:
- WireGuard: Select Download Config to download the
.conffile. - OpenVPN: Select Download Config to download the
.ovpnfile. Then select Get Credentials separately and note the generated OpenVPN username and password. These are separate from your main Windscribe login.
- WireGuard: Select Download Config to download the
Part 3: Configure the VPN Router
OpenWrt with WireGuard
Install WireGuard packages
- Open the OpenWrt admin panel at
192.168.1.1. - Go to System > Software and install WireGuard support packages as needed for your OpenWrt version:
luci-proto-wireguard,wireguard-tools, andkmod-wireguard. Reboot after installation.
Create the interface
- Go to Network > Interfaces and click Add New Interface.
- Name the interface (for example,
windscribe) and set the protocol to WireGuard VPN. Click Create Interface.
Read the config file
Open the downloaded .conf file in a plain text editor. It will contain values in this form:
[Interface] PrivateKey = <your_private_key> Address = <your_vpn_tunnel_ip> DNS = <dns_server>[Peer] PublicKey = <server_public_key> PresharedKey = <preshared_key> AllowedIPs = <allowed_ip_ranges> Endpoint = <server_hostname>:<port>
PresharedKey is present in some Windscribe configs and absent in others. Paste it if it appears in your file; leave the field blank if it does not. Treat every generated value, including AllowedIPs, as authoritative for that config.
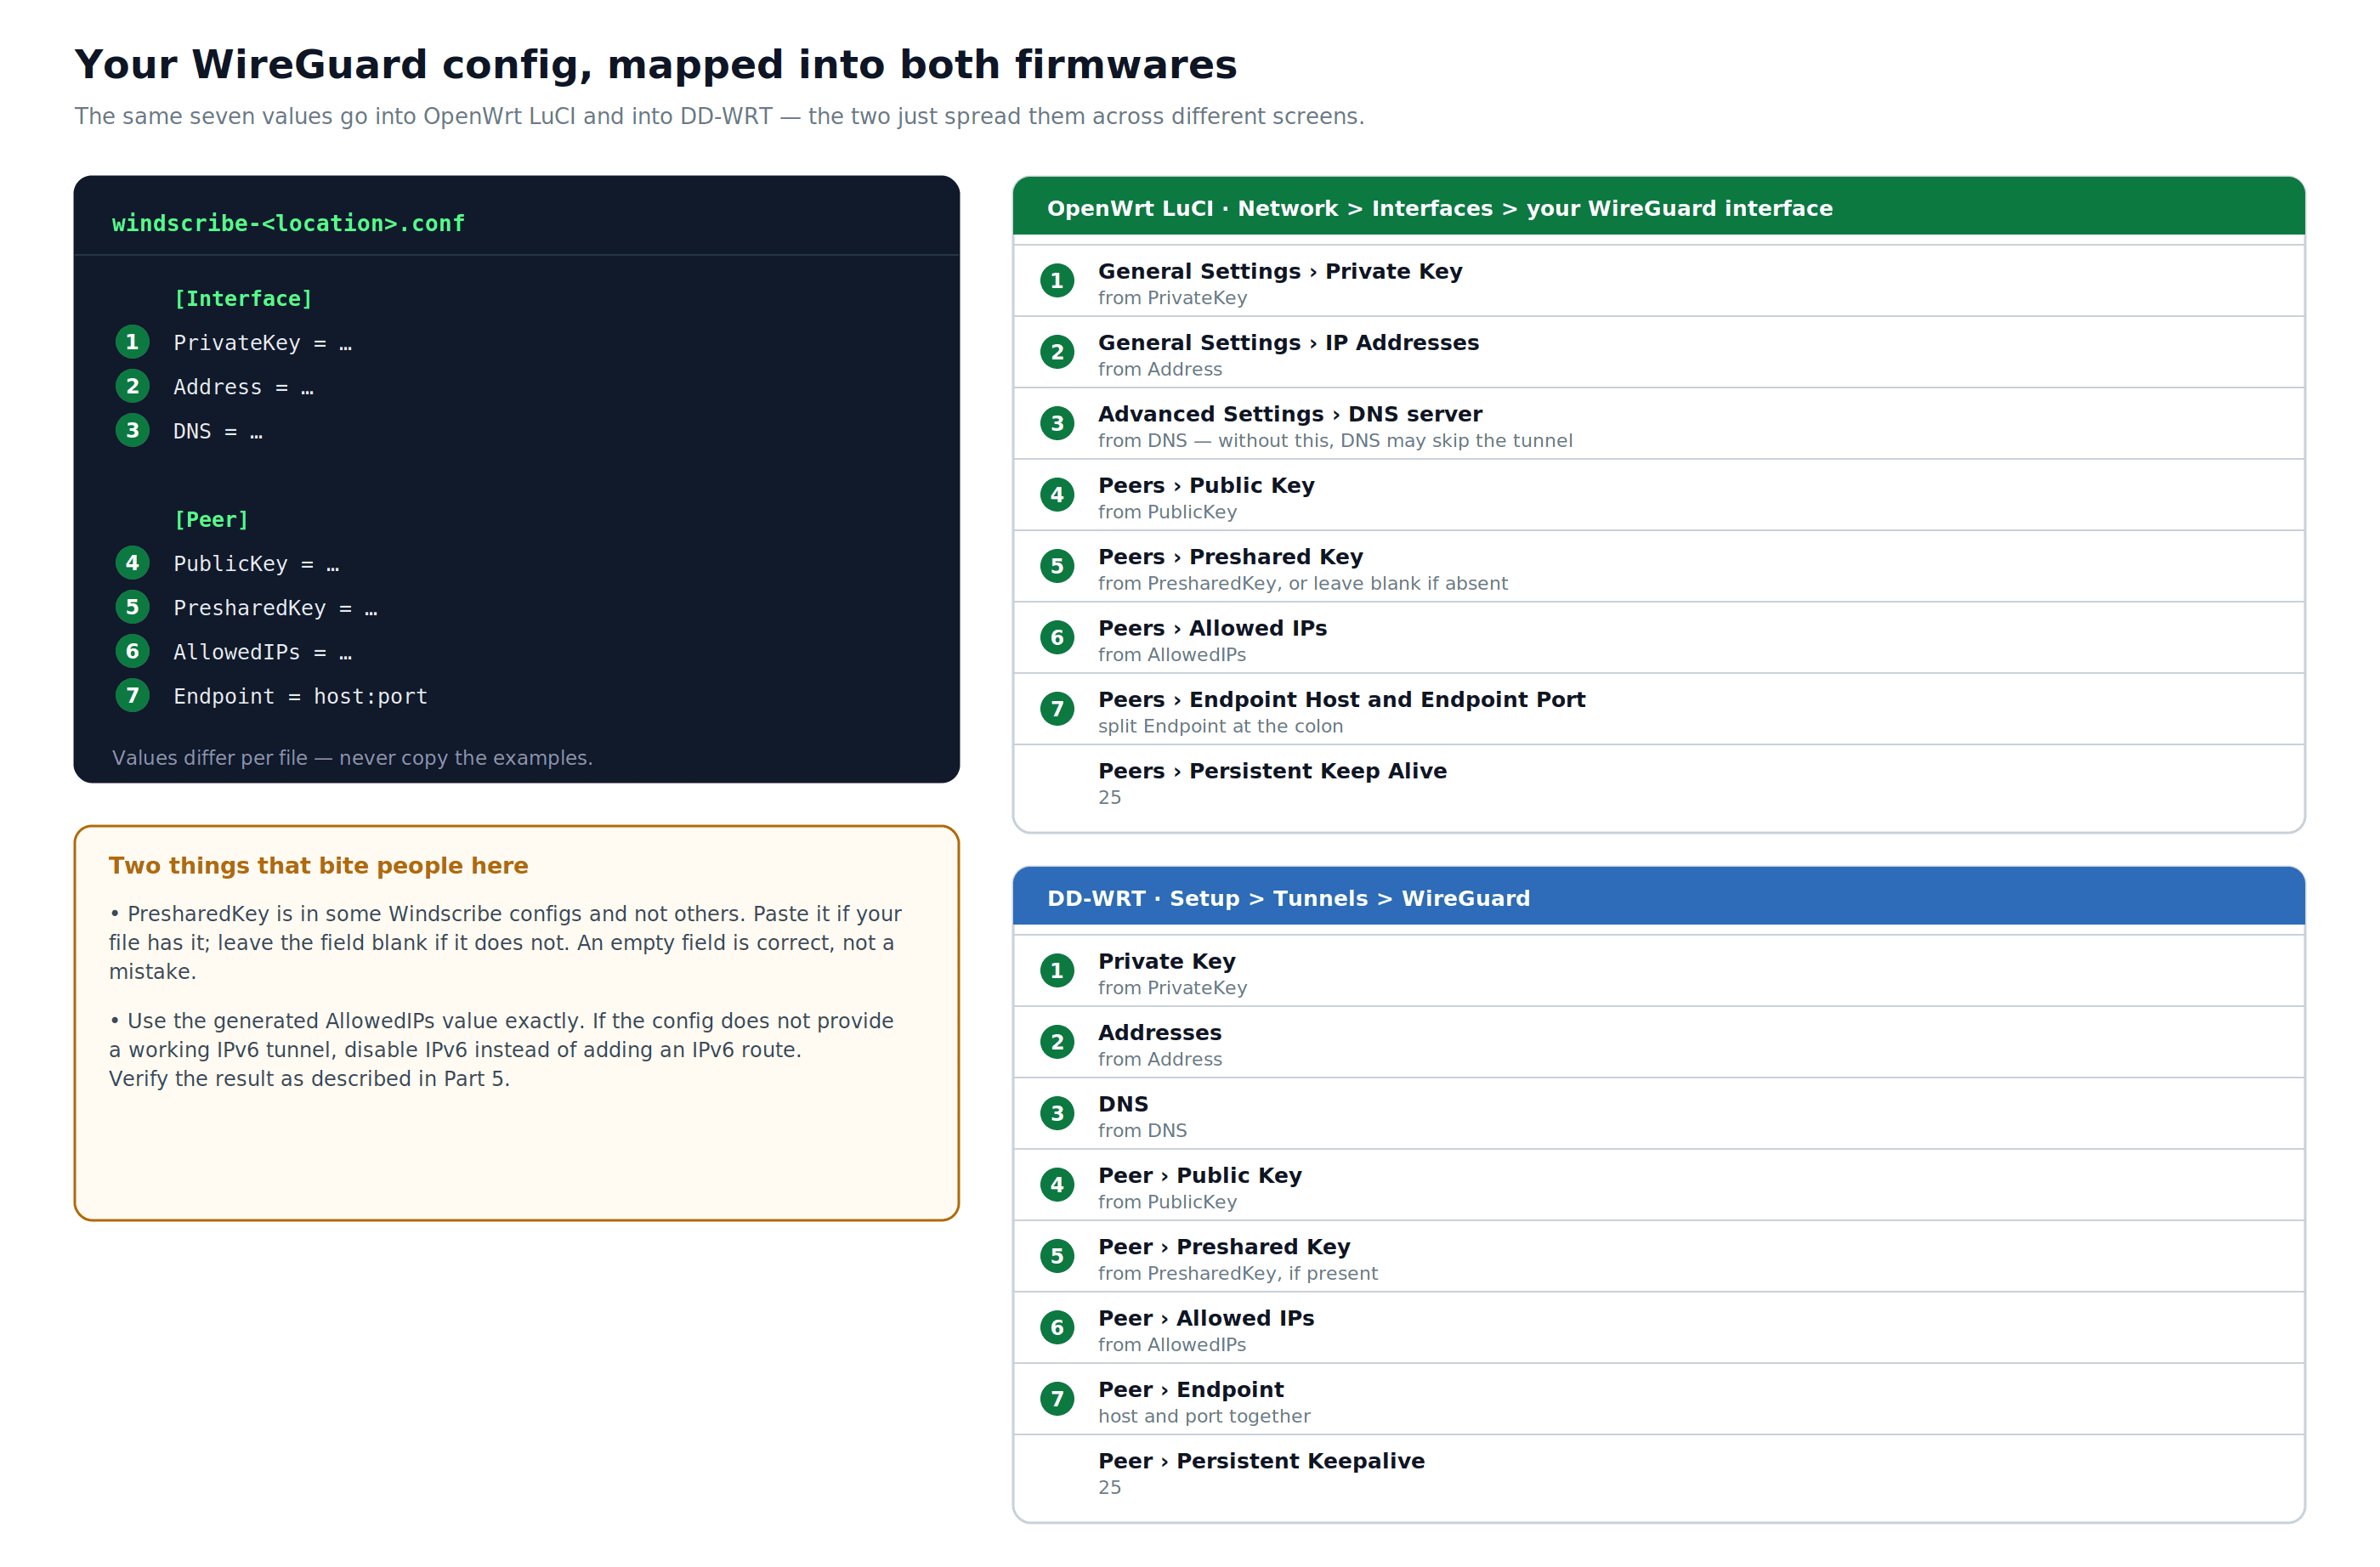
Figure 3: The same seven generated config values mapped into OpenWrt LuCI and DD-WRT. Copy AllowedIPs exactly from your file, and do not add an IPv6 route unless the config provides a working IPv6 tunnel.
General Settings tab
- Private Key: paste the value from
PrivateKey - IP Addresses: enter the value from
Address
Advanced Settings tab
- DNS server: enter the value from
DNS. Without this, DNS queries may not route through the VPN tunnel.
Peers tab
Click Add Peer and enter:
- Public Key: value from
PublicKeyunder[Peer] - Preshared Key: value from
PresharedKeyif present in the config file; leave blank if absent - Allowed IPs: copy the complete value from
AllowedIPs - Endpoint Host: the hostname portion of
Endpoint - Endpoint Port: the port portion of
Endpoint - Persistent Keep Alive:
25
Click Save.
Firewall and routing
Go to Network > Firewall and configure the WireGuard interface so that LAN traffic can forward to it and masquerading is enabled on the VPN egress. The cleanest approach is a dedicated VPN firewall zone. Assigning the interface to the existing WAN zone can also work, but behavior varies by OpenWrt version and configuration.
On most OpenWrt versions, WireGuard handles routing automatically via route_allowed_ips. Check Network > Routing to confirm routes matching the generated AllowedIPs values are present on the WireGuard interface. If they are absent and you add routes manually, confirm they do not conflict with an existing default WAN route.
Click Save & Apply.
DD-WRT with WireGuard
Windscribe has two current DD-WRT WireGuard guides. Use the recommended guide if your DD-WRT build supports config import; use the manual guide for older builds or if you prefer entering values by hand:
The steps below reflect the general flow of the manual method.
- Open the DD-WRT admin panel at
192.168.1.1. - Go to Setup > Tunnels and select the WireGuard tab.
- Enable the WireGuard client.
- Import the Windscribe
.conffile using the import option if your build supports it, or enter values manually from the config:- Private Key: from
PrivateKey - Addresses: from
Address - DNS: from
DNS
- Private Key: from
- Under the Peer section, enter values from
[Peer]:- Public Key: from
PublicKey - Preshared Key: from
PresharedKeyif present - Endpoint: from
Endpoint - Allowed IPs: copy the complete value from
AllowedIPs - Persistent Keepalive:
25
- Public Key: from
- Apply settings and reboot.
If your DD-WRT build does not include WireGuard support, use OpenVPN and consult the Windscribe Help Center rather than following an outdated DD-WRT OpenVPN guide.
Part 4: Double NAT & Bridge Mode
Placing the Google mesh system behind another router creates double NAT: two layers of Network Address Translation. For most activities, this causes no issues. It can cause problems with games, VoIP, and services that require port forwarding.
If you are using a single Google Wifi device with no additional mesh points:
Bridge mode is available but not recommended by Google as a first-choice configuration. To enable it:
- Open the Google Home app.
- Go to Home > Wifi > Settings.
- Tap Advanced Networking > Network mode.
- Select your device, then tap Bridge mode.
- Tap Save.
With bridge mode active, the Google unit acts as a pass-through access point. NAT and DHCP for the downstream Google network are handled by the upstream VPN router.
If you are using multiple Google mesh points:
Do not put the primary node in bridge mode. Enabling bridge mode on the primary point in a multi-node setup disables mesh functionality and drops several Google Nest Wifi features. Instead:
- Leave the Google mesh system in router mode behind the VPN router.
- Accept double NAT. For web browsing, streaming, and most applications, it will not cause problems.
- If a specific application requires port forwarding, configure it on both the VPN router and the Google mesh router. If you also need inbound traffic through the VPN tunnel, two local router forwards alone will not be sufficient: Windscribe-side port forwarding must also be configured. Ephemeral port forwarding is Pro-only; permanent port forwarding requires a purchased Static IP. See the port forwarding entry in Troubleshooting.
- If your ISP modem or gateway is also doing NAT, bridge the ISP device rather than the Google system. This removes one NAT layer without affecting mesh operation.
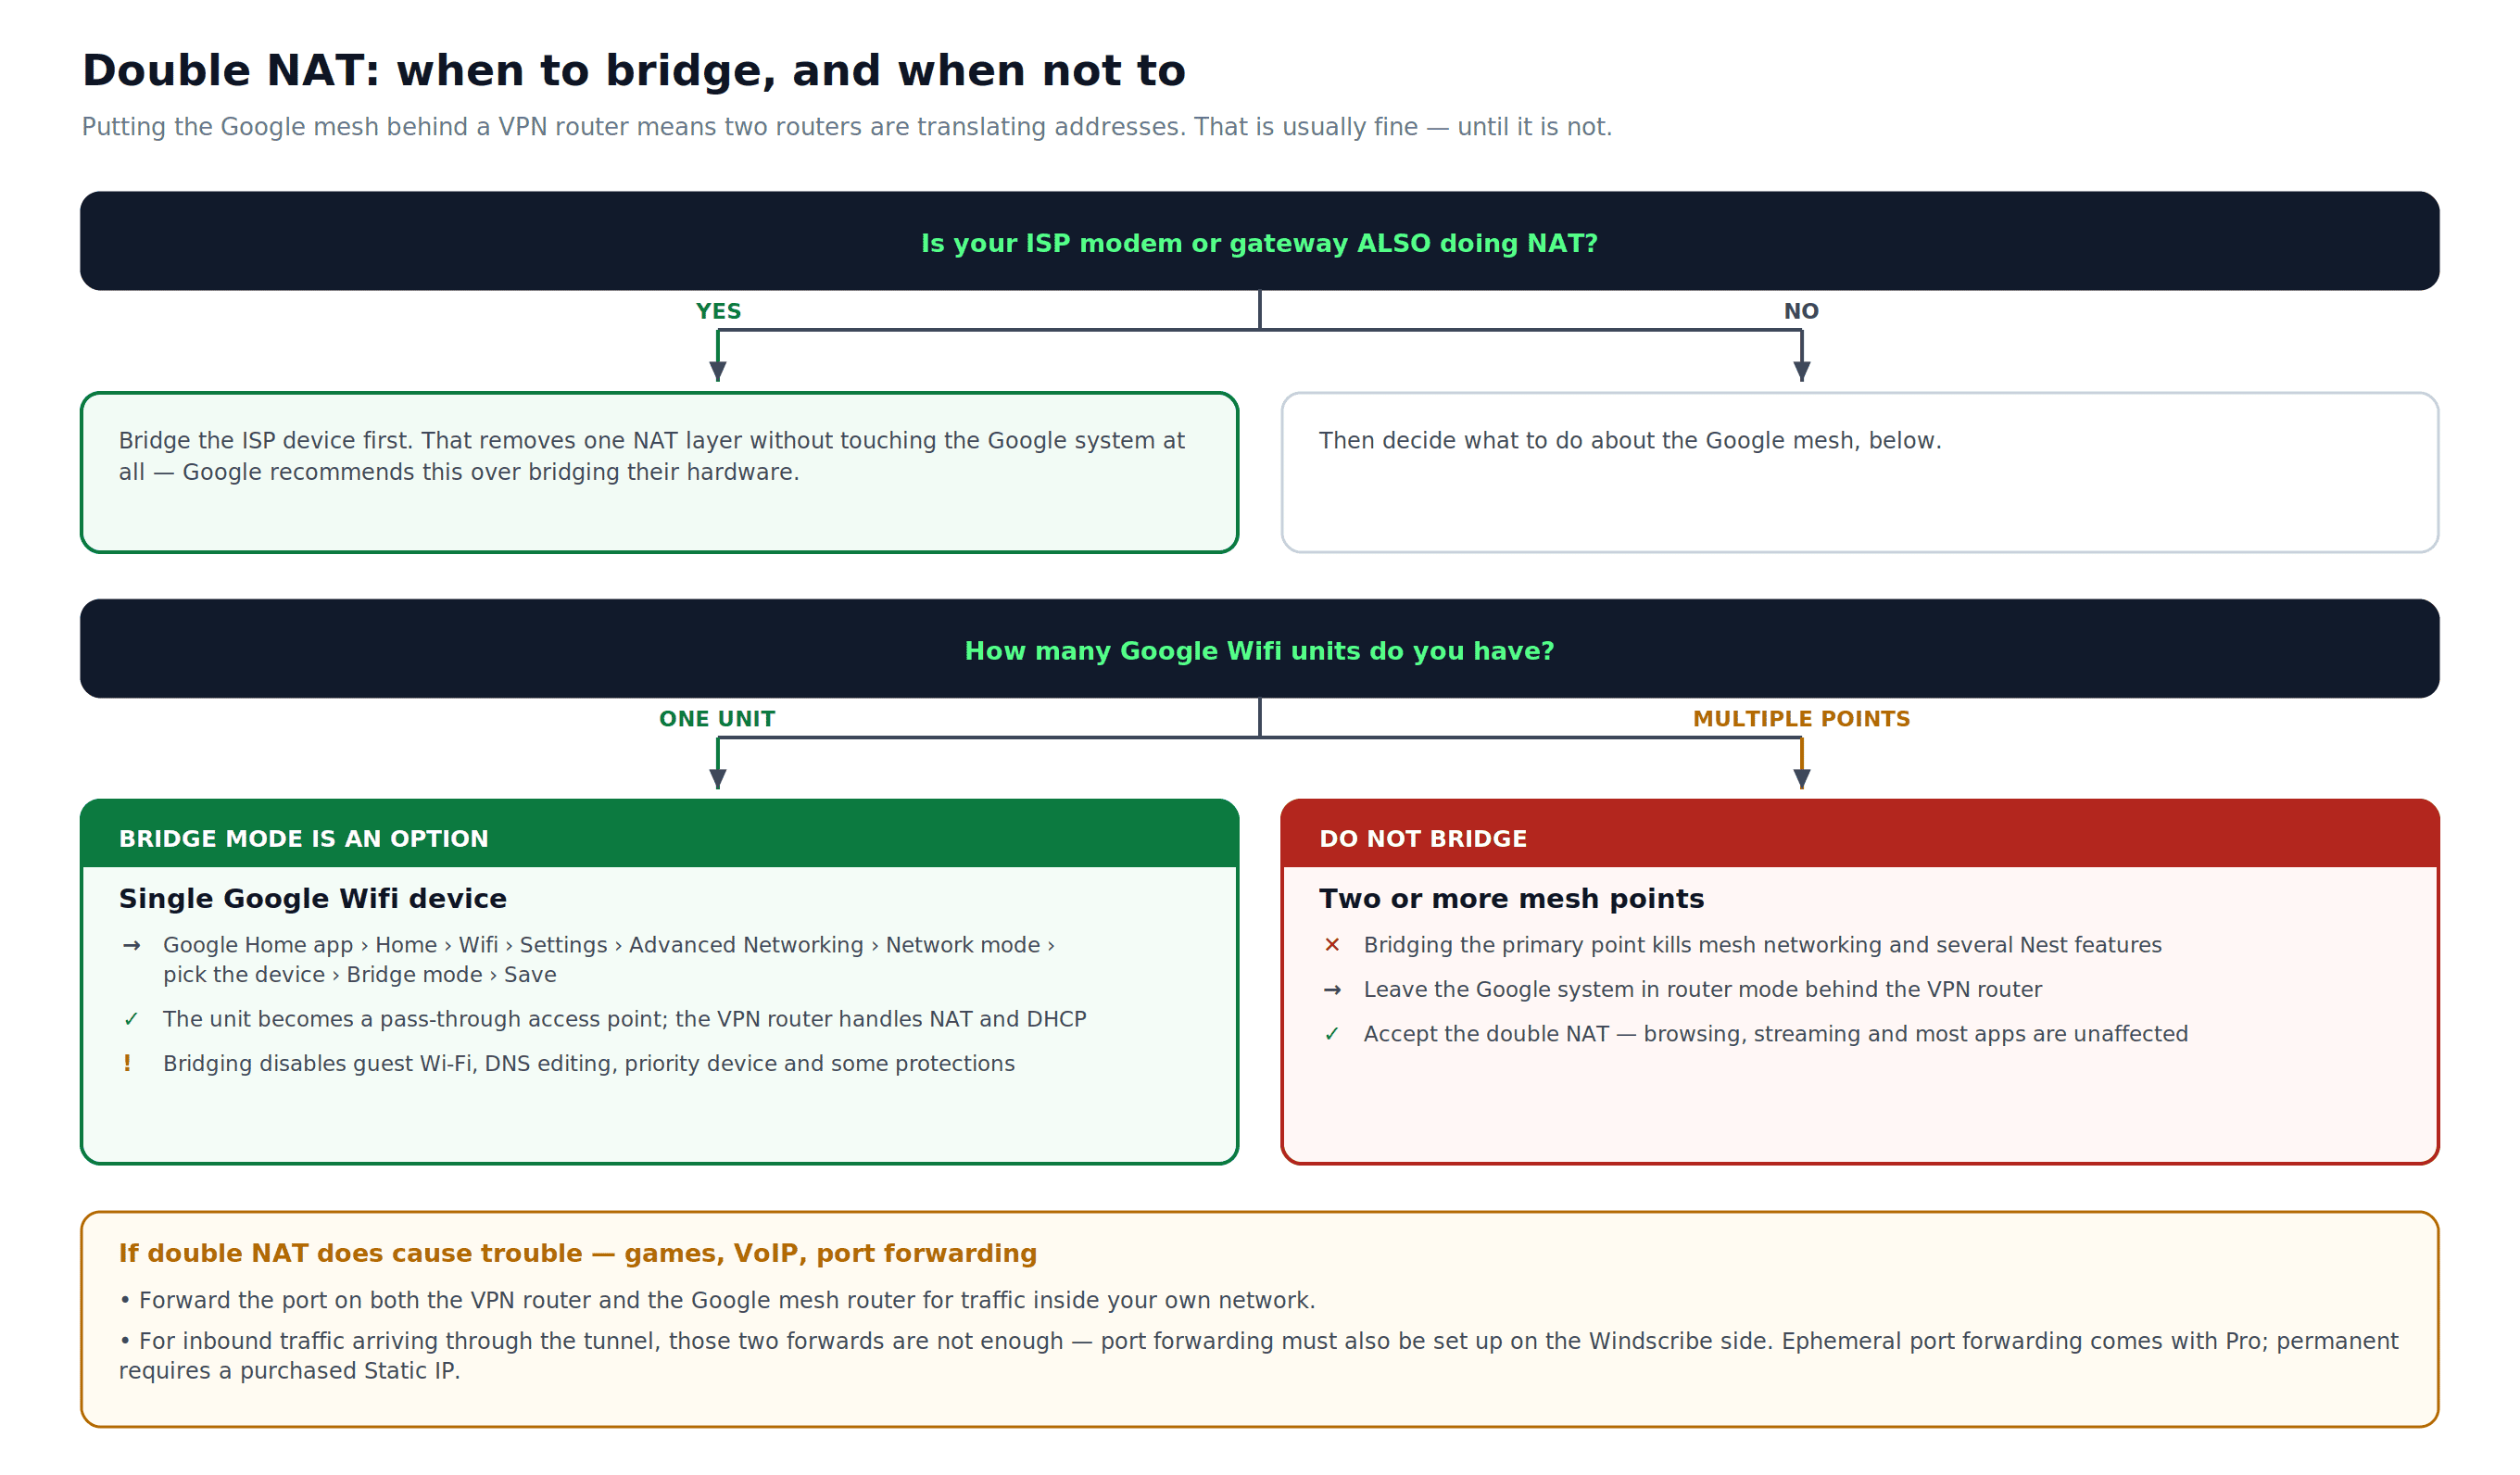
Figure 4: Whether to use bridge mode depends on how many Google Wifi devices you have and whether your ISP device is also doing NAT. The diagram includes the final Save step and the Pro-only and Static IP port-forwarding boundaries.
Part 5: IPv6 Leaks
This guide configures IPv4 routing through Windscribe. If your router or Google network is also passing IPv6 traffic and that traffic is not routed through the tunnel, it will bypass the VPN and reveal your real IP address on IPv6-capable sites.
To prevent this:
- Check the generated Windscribe config. Use only the addresses and routes it supplies; do not manufacture an IPv6 route.
- If the generated config does not provide a working IPv6 tunnel, disable IPv6 on the VPN router's WAN and LAN interfaces. This is the simplest approach for most home setups.
- Confirm there are no leaks by running the verification steps in Part 6.
Part 6: Verify the Connection
Run all three checks after setup is complete.
- IP check: Visit windscribe.com/what-is-my-ip from a device on the Google network. The IP address shown should match the Windscribe server location in your config file, not your ISP's IP.
- DNS leak test: Visit dnsleaktest.com and run the extended test. Your ISP or home router DNS should not appear. Leak-test providers label resolvers differently, but any result showing your ISP's nameservers means DNS is not routing through the VPN. If that happens, revisit the DNS setting on the VPN interface.
- IPv6 leak test: Visit ipv6leak.com or review IPv6 results on the DNS leak test page. If your ISP's IPv6 address appears, disable IPv6 on the VPN router unless the generated config provides a working IPv6 tunnel, then retest.
Method B: Per-Device Windscribe Apps
Install Windscribe directly on each device. This requires no router changes but must be set up individually on every device.
Supported Platforms
- Windows, macOS, Linux: full-device VPN coverage
- iOS and Android: full-device VPN coverage
- Chrome, Firefox, Edge (browser extension): browser traffic only. The extension does not protect traffic from other apps on the same device and is not equivalent to the desktop or mobile app.
Download at windscribe.com/download.
Setup Steps
- Download and install the Windscribe app for your platform.
- Launch the app and log in.
- Select a server location from the list.
- Click or tap Connect.
The desktop and mobile apps include Windscribe's built-in Firewall, which blocks all traffic if the VPN tunnel drops unexpectedly. This protection is not available in the browser extension.
Notable Features
- Split Tunneling: Route specific apps or domains outside the VPN while keeping others inside. Available under Preferences > Split Tunneling in the desktop app.
- R.O.B.E.R.T.: Windscribe's DNS-level filtering system. Blocks ads, trackers, and malware domains. Configure it on the Blocking Categories and Custom Rules pages under Security in My Account.
- Static IP: If your plan includes a purchased Static IP, you can connect through the same Windscribe IP address each session. This is a shared datacenter or residential address used by a small pool of users, not a dedicated single-user IP. Build-A-Plan eligibility requires the Unlimited Bandwidth and R.O.B.E.R.T. add-on.
Troubleshooting
Method A: Upstream VPN Router
VPN is active but the IP address has not changed: Confirm the VPN tunnel is active and routing traffic. On OpenWrt, check Network > Routing for routes matching the generated AllowedIPs values on the WireGuard interface; WireGuard usually adds them automatically via route_allowed_ips. On DD-WRT, check the connection status under Status > WireGuard or Status > OpenVPN.
Kill switch: configuring fail-closed behavior: Without the Windscribe app's Firewall, the VPN router must be manually configured to block non-tunnel traffic. The exact approach varies by firmware and is outside the scope of this guide. Consult your router platform's documentation for fail-closed VPN firewall configuration. If Windscribe publishes a kill switch guide for your firmware, follow that instead of generic firewall rules.
Slow speeds: WireGuard delivers faster throughput than OpenVPN in most cases and is preferred where supported. If using OpenVPN over TCP, switch to UDP. Choose a Windscribe server geographically close to your location. Also check the VPN router's CPU usage: older consumer hardware can bottleneck VPN throughput regardless of connection speed.
DNS leaks: Set the DNS server on the VPN interface to the value in the DNS field of the Windscribe config file. If ISP DNS servers still appear in a leak test, confirm the VPN router is pushing Windscribe DNS through the tunnel and that the Google mesh system is using the VPN router as its upstream DNS, not your ISP's gateway. If the generated config does not provide a working IPv6 tunnel, disable IPv6 because IPv6 DNS requests may still reach your ISP.
Double NAT causes problems with games, VoIP, or port forwarding: Configure port forwarding on both the VPN router and the Google mesh router for local network traffic. If you also need inbound traffic to reach a service through the VPN tunnel itself, local router forwards alone will not accomplish this: you must also configure port forwarding within Windscribe. Ephemeral port forwarding is Pro-only. Permanent port forwarding requires a purchased Static IP. See the port forwarding section in your Windscribe account or documentation for setup details. If using a single Google Wifi device, consider enabling bridge mode as described in Part 4. If your ISP modem is also doing NAT, bridge the ISP device first.
WireGuard tunnel drops during idle periods: Confirm Persistent Keep Alive is set to 25 seconds in the peer configuration.
OpenVPN authentication failure: Confirm you are using the Windscribe OpenVPN credentials obtained with Get Credentials from the OpenVPN Config Generator, not your main account login. Re-download the .ovpn config file if the issue persists.
Devices on the Google network cannot reach the internet after setup: Reboot in order: modem first, VPN router second, Google mesh primary node third. Wait 30 to 60 seconds between each device before powering on the next. On OpenWrt, verify the WireGuard interface firewall zone is correctly configured for VPN forwarding and masquerading. Re-download the config file from the Windscribe Config Generator to rule out a stale or malformed config.
Method B: Per-Device Apps
App connects but speeds are slow: Switch to a Windscribe server geographically closer to your location. On mobile, switch from a cellular connection to Wi-Fi or vice versa to rule out network-side throttling. On desktop, check whether another application is consuming bandwidth in the background.
Windscribe Firewall is blocking all traffic after disconnecting: The Windscribe app's Firewall is designed to block all traffic when the VPN is not active. To restore normal connectivity, reconnect to Windscribe or disable the Firewall under Preferences > Firewall before disconnecting.
Browser extension is not protecting all traffic: The Chrome, Firefox, and Edge extensions cover browser traffic only. Traffic from other apps on the same device bypasses the extension entirely. Install the full Windscribe desktop or mobile app for device-wide coverage.
R.O.B.E.R.T. blocking a site you need: Open the Blocking Categories page under Security in My Account and turn off the blocklist that is catching the site, or add an Allow rule for that domain on the Custom Rules page.
Frequently Asked Questions
Do I need a paid Windscribe account to use the upstream router method?


Which VPN-capable router works best with a Google Nest Wifi or Google Wifi setup?
Will adding a VPN router upstream slow down my network speeds?
Does this guide apply to Nest Wifi Pro?
How do I change my Windscribe server location after completing the setup?
Get Windscribe
The per-device app method (Method B) works with Windscribe's free plan. It provides up to 10GB of data per month after email confirmation, and requires no credit card to sign up.
The upstream router method (Method A) requires a paid account to generate OpenVPN or WireGuard config files. Two paid options are available:
- Pro: Access to all server locations in 69+ countries, unlimited data, R.O.B.E.R.T., and custom config generation. $9/month on a monthly plan, or $69/year ($5.75/month) on an annual plan. Ephemeral port forwarding is Pro-only. Permanent port forwarding requires a purchased Static IP.
- Build-A-Plan: Choose only the server locations you need. Each location costs $1/month. Unlimited Bandwidth and R.O.B.E.R.T. is an additional $1/month. Minimum spend is $3/month. Static IP eligibility requires the Unlimited Bandwidth and R.O.B.E.R.T. add-on.
Confirm current pricing at windscribe.com/upgrade before purchasing.