

How to Set Up & Use Windscribe on a Netgear Router


Before you start – VPN server vs. VPN client: Most Netgear routers on stock firmware include a "VPN Service" feature. This is a VPN server that lets your devices connect back into your home network remotely. It is not a VPN client, and it cannot send your traffic through Windscribe. To connect a Netgear router to Windscribe, you need VPN client capability. This guide covers the three paths that provide it.
⚠ Advanced setup. A misconfigured router VPN cuts internet access for every device on the network. Back up your router settings before proceeding: if something breaks, a factory reset and restore from backup is the recovery path.
Step 0: Find Your Path
Locate your model number
Your model number is printed on the label on the underside or back panel of the router. It will read something like R7000, R7800, XR500, or XR700. Some models also list a hardware version (e.g., R7000 v1.1): note this as well, since some revisions use different chipsets.
You can also find it by logging into the router admin page at routerlogin.net and checking the firmware version page.
Which path applies to your router
| Path | Supported Models | Firmware Flashing Required | Warranty Impact |
|---|---|---|---|
| Path A: DumaOS Hybrid VPN | XR450, XR500, XR700 | No | None |
| Path B: DD-WRT | Many Nighthawk AC models: confirm your specific model and hardware revision at dd-wrt.com/support/router-database | Yes | May affect warranty coverage and Netgear support |
| Path C: Voxel Firmware | R7800, R8900, R9000 | Yes | May affect warranty coverage and Netgear support |
A note on specific models that do not fit neatly into the table above:
- XR1000 and XR1000v2 (DumaOS 3.0): Hybrid VPN is not available on these models as of current firmware. Check the DD-WRT Router Database for third-party firmware support.
- XR300: Has DumaOS but does not include Hybrid VPN. Check the DD-WRT Router Database for third-party firmware support.
- Orbi RBK50/RBK53 (RBR50, RBS50) and Orbi LBR20: Stock Orbi firmware does not include a VPN client. Voxel firmware has active builds for these models. RBK50/RBK53 can use the Path C USB method below. LBR20 uses a different Circle overlay path, so follow the LBR20-specific steps in Path C and consult Voxel's QuickStart for your build.
- All other Orbi mesh models: Stock firmware has no VPN client, and Voxel support has not been confirmed for these models.
- Nighthawk AC/AX Wi-Fi 5 and Wi-Fi 6 models (e.g., R6700, RAX series): Stock firmware has VPN server only. Check the DD-WRT Router Database to confirm whether VPN client support exists for your specific model and hardware revision.
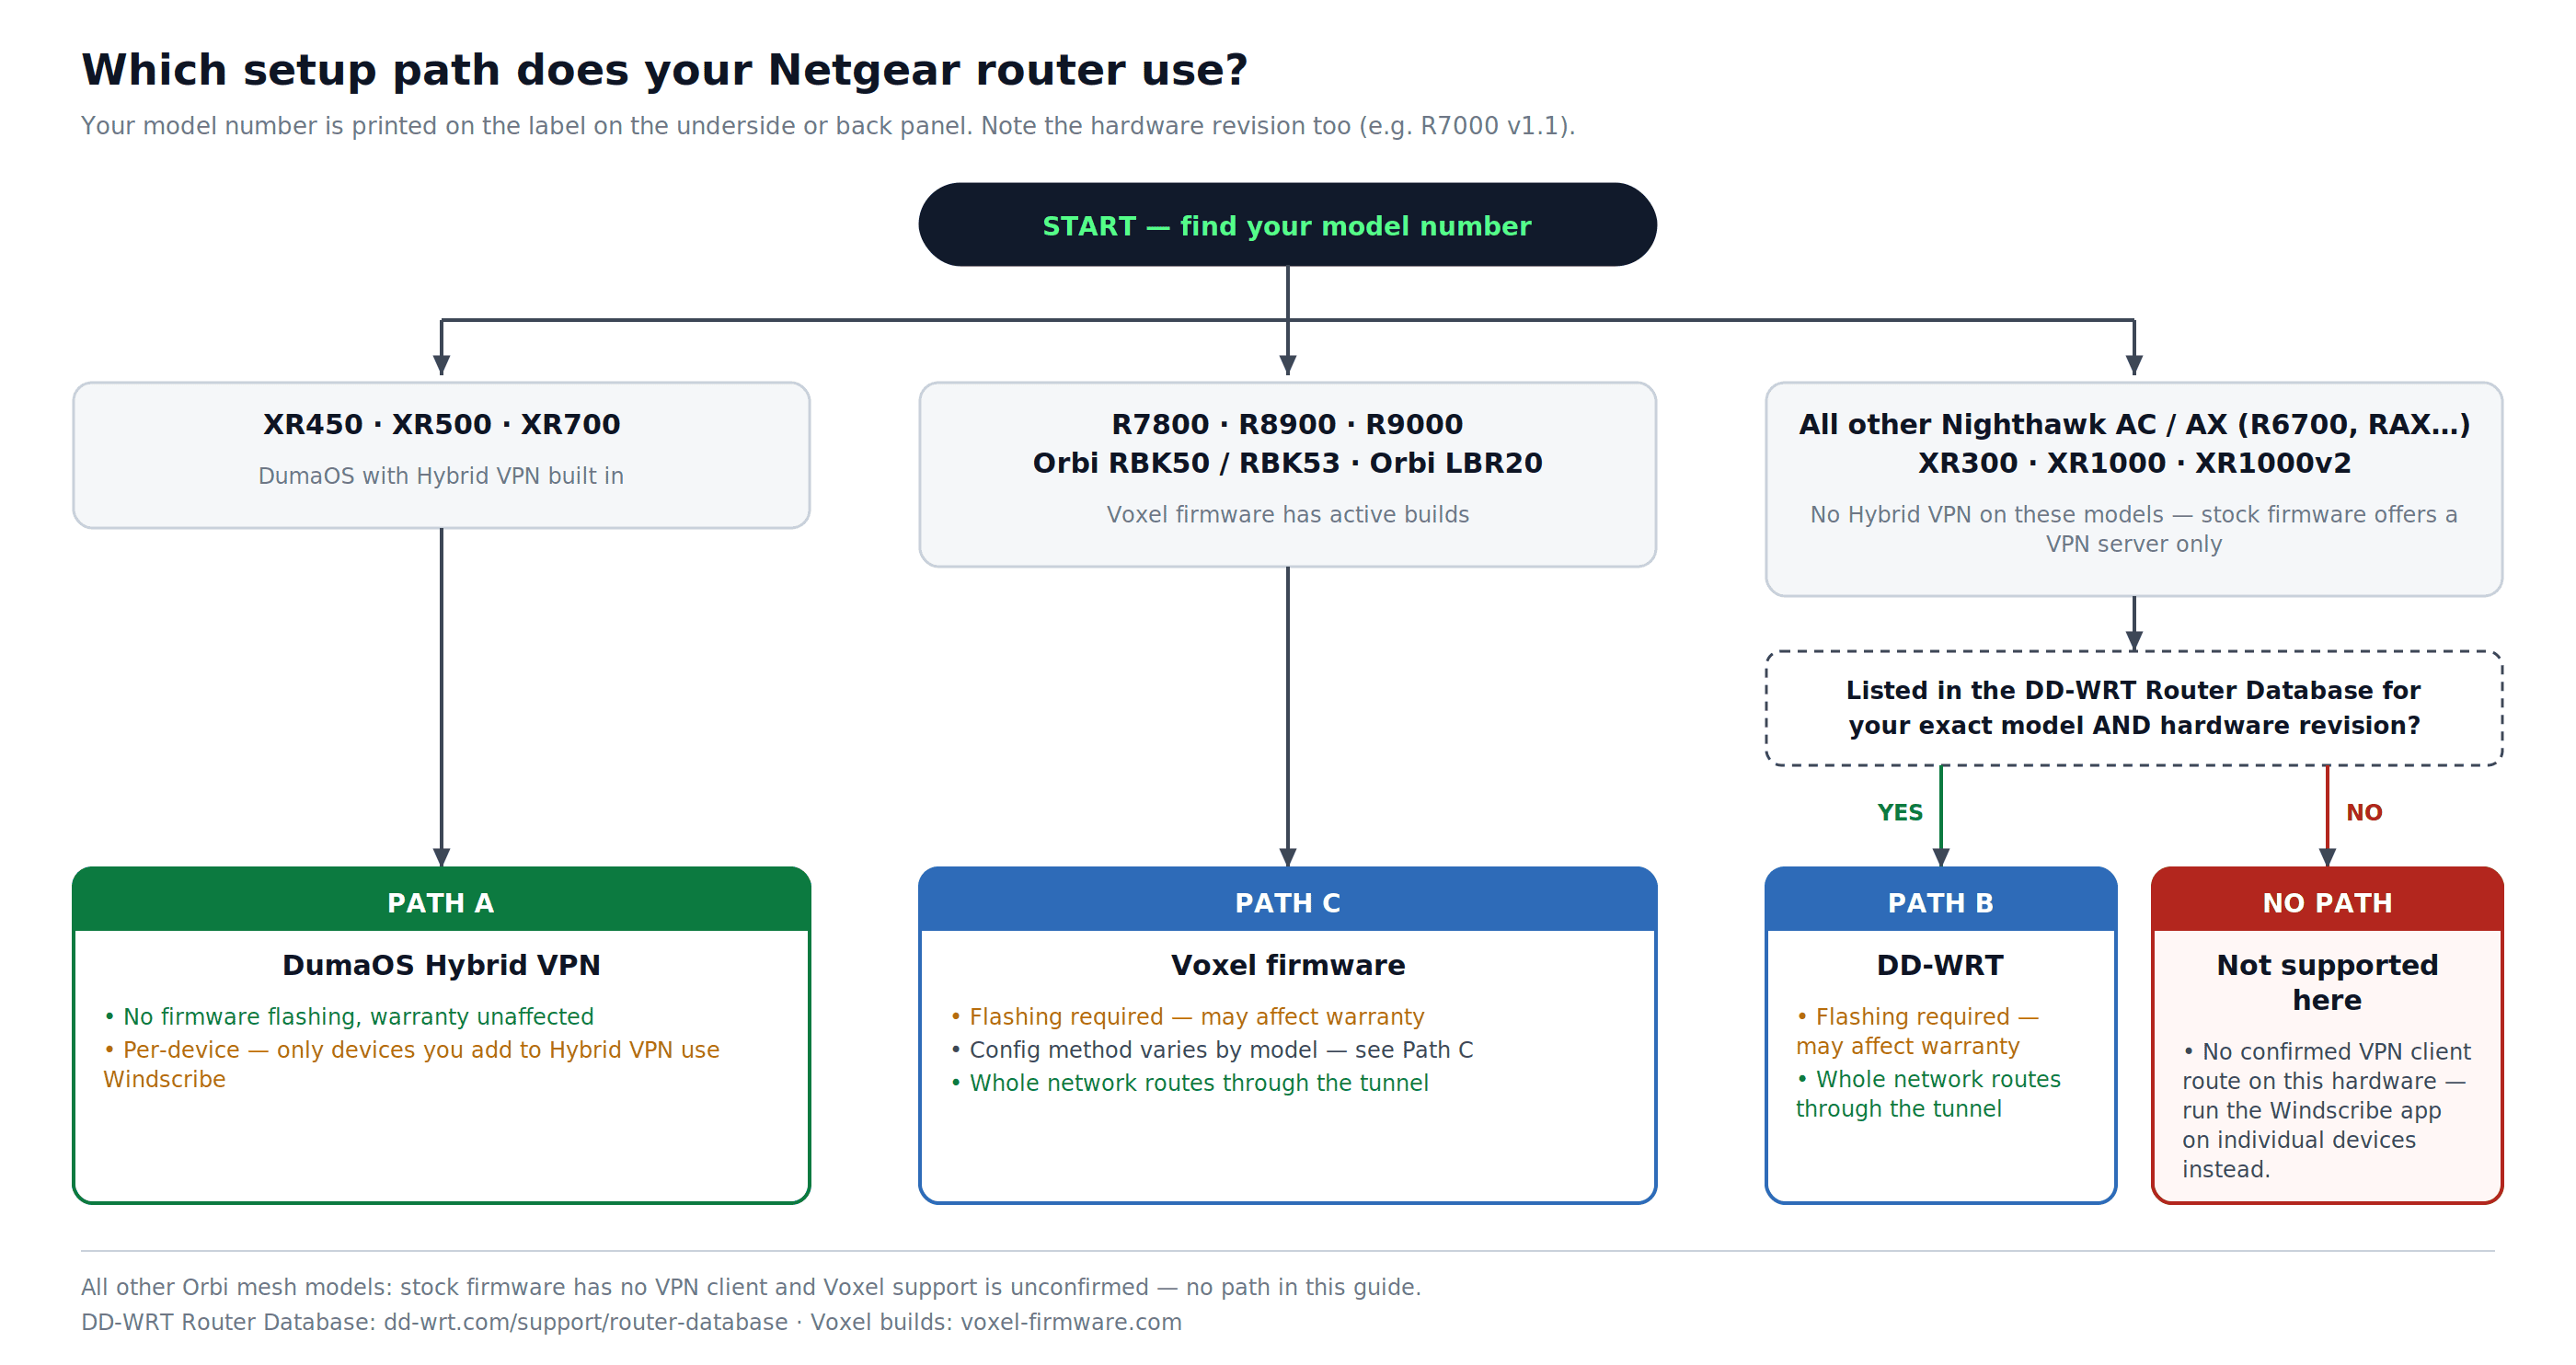
Figure 1: Choosing a setup path by model number, including the models that fall outside the three main paths.
Before Any Path: Get Your Windscribe Credentials
These steps apply regardless of which path you follow.
Account requirement: Downloading configuration files requires a Pro or Build-A-Plan subscription: the config generators are a paid feature.
- Log in at windscribe.com and go to the OpenVPN config generator: windscribe.com/myaccount/config-generator#openvpn
- Set these options:
- Location: Your target server (e.g., US East, Canada, UK)
- Protocol: UDP (preferred) or TCP
- Port and OpenVPN version: Select port 443 if you are unsure, and select the newest OpenVPN version your router firmware supports.
- Click Generate Config and save the .ovpn file. Open it in a plain-text editor: you will need values from it.
- On the same page, click Get Credentials. Copy your OpenVPN Username and OpenVPN Password. These are different from your main Windscribe login credentials.
Path A: DumaOS Hybrid VPN (XR450, XR500, XR700)
No firmware flashing is needed. Hybrid VPN is built into DumaOS on these three models.
A1 – Confirm your firmware is current
- Log in at routerlogin.net. The DumaOS interface will load in place of the standard Netgear Genie panel.
- Go to
Settings > Administration > Firmware Update. - Click Check. If an update is available, install it before proceeding. Hybrid VPN requires the latest DumaOS firmware.
A2 – Open Hybrid VPN
- In the DumaOS sidebar, click Hybrid VPN.
- If the Enable toggle is active (shown as red), click it to disable Hybrid VPN temporarily. This gives you access to the setup controls.
- Click VPN Setup.
A3 – Add Windscribe as a VPN provider
- In VPN Setup, select the Advanced tab. (Basic is for PureVPN and HideMyAss presets only.)
- Open your Windscribe .ovpn file in a text editor. Copy the full contents of the file.
- Paste the entire .ovpn contents into the Advanced config text field.
- Enter your Windscribe OpenVPN Username and Password in the provided fields.
- Click Save or Apply.
A4 – Enable the VPN and assign devices
- Click the Enable toggle. The status should change to "Applying Settings," then to Connected in the Information panel.
- If the status does not reach Connected, check that your .ovpn contents were pasted without truncation, and that your OpenVPN credentials are correct.
- Once connected, click Add Device on the right side of the Hybrid VPN panel.
- Select each device on your network that should route through Windscribe.
Important: Hybrid VPN is per-device. Only the devices you add here will use Windscribe. Devices you do not add will continue to use your standard internet connection.
A5 – Verify the connection
On a device you assigned to Hybrid VPN:
- Visit windscribe.com/dns-leak-test or ipleak.net.
- Confirm your visible IP is a Windscribe server IP and DNS belongs to Windscribe.
Path B: DD-WRT (Nighthawk Models with DD-WRT Support)
This path requires flashing DD-WRT firmware onto your router. Flashing third-party firmware constitutes a product modification. Under Netgear's published warranty terms, modified products may not be eligible for warranty coverage or Netgear technical support.
Prerequisite: Confirm your exact router model and hardware revision support DD-WRT before proceeding. Search your model number in the DD-WRT Router Database at dd-wrt.com/support/router-database. Download the recommended build file from there: do not use a build intended for a different model or revision, as this can brick the router.
B1 – Flash DD-WRT
- Log in to your router at routerlogin.net with your admin credentials. The default username is admin. The default password is password on most older Netgear models. Newer models require a custom password to be set during initial setup: if you have not changed yours, use the password you entered when you first configured the router. The admin password is not the same as the Wi-Fi password printed on the router's label.
- Go to
ADVANCED > Administration. - Click Router Update, Firmware Update, or Firmware Upgrade (the label varies by model). All three options lead to the same manual upload screen.
- Click Browse and select the DD-WRT .chk file for your model.
- Click Upload. The router will flash and reboot. Do not interrupt power during this process.
- After the reboot, the DD-WRT admin panel will be accessible at http://192.168.1.1. Set a new admin password when prompted.
B2 – Enable the OpenVPN client
- In DD-WRT, go to
Services > VPN. - Under OpenVPN Client, set Start OpenVPN Client to Enable.
B3 – Enter the Windscribe server and tunnel settings
Verify each field against your downloaded .ovpn file before entering values. The cipher, port, and auth directive in your file are what matter: forcing values that differ from the file causes connection failure.
| Field | Value |
|---|---|
| Server IP/Name | Hostname from the remote line in your .ovpn file (e.g., us-east.windscribe.com) |
| Port | Port from the same remote line: use this exact value |
| Tunnel Device | TUN |
| Tunnel Protocol | UDP or TCP: match what you selected in the config generator |
| Encryption Cipher | Match your .ovpn file: look for the cipher directive (typically AES-256-GCM) |
| Hash Algorithm | Match your .ovpn file: look for the auth directive (typically SHA512) |
| Advanced Options | Enable |
| TLS Cipher | None |
| LZO Compression | Disabled (Windscribe does not use compression: enabling it causes connection errors) |
| NAT | Enable |
| Firewall Protection | Enable |
| User Pass Authentication | Enable |
| Username | Your Windscribe OpenVPN Username |
| Password | Your Windscribe OpenVPN Password |
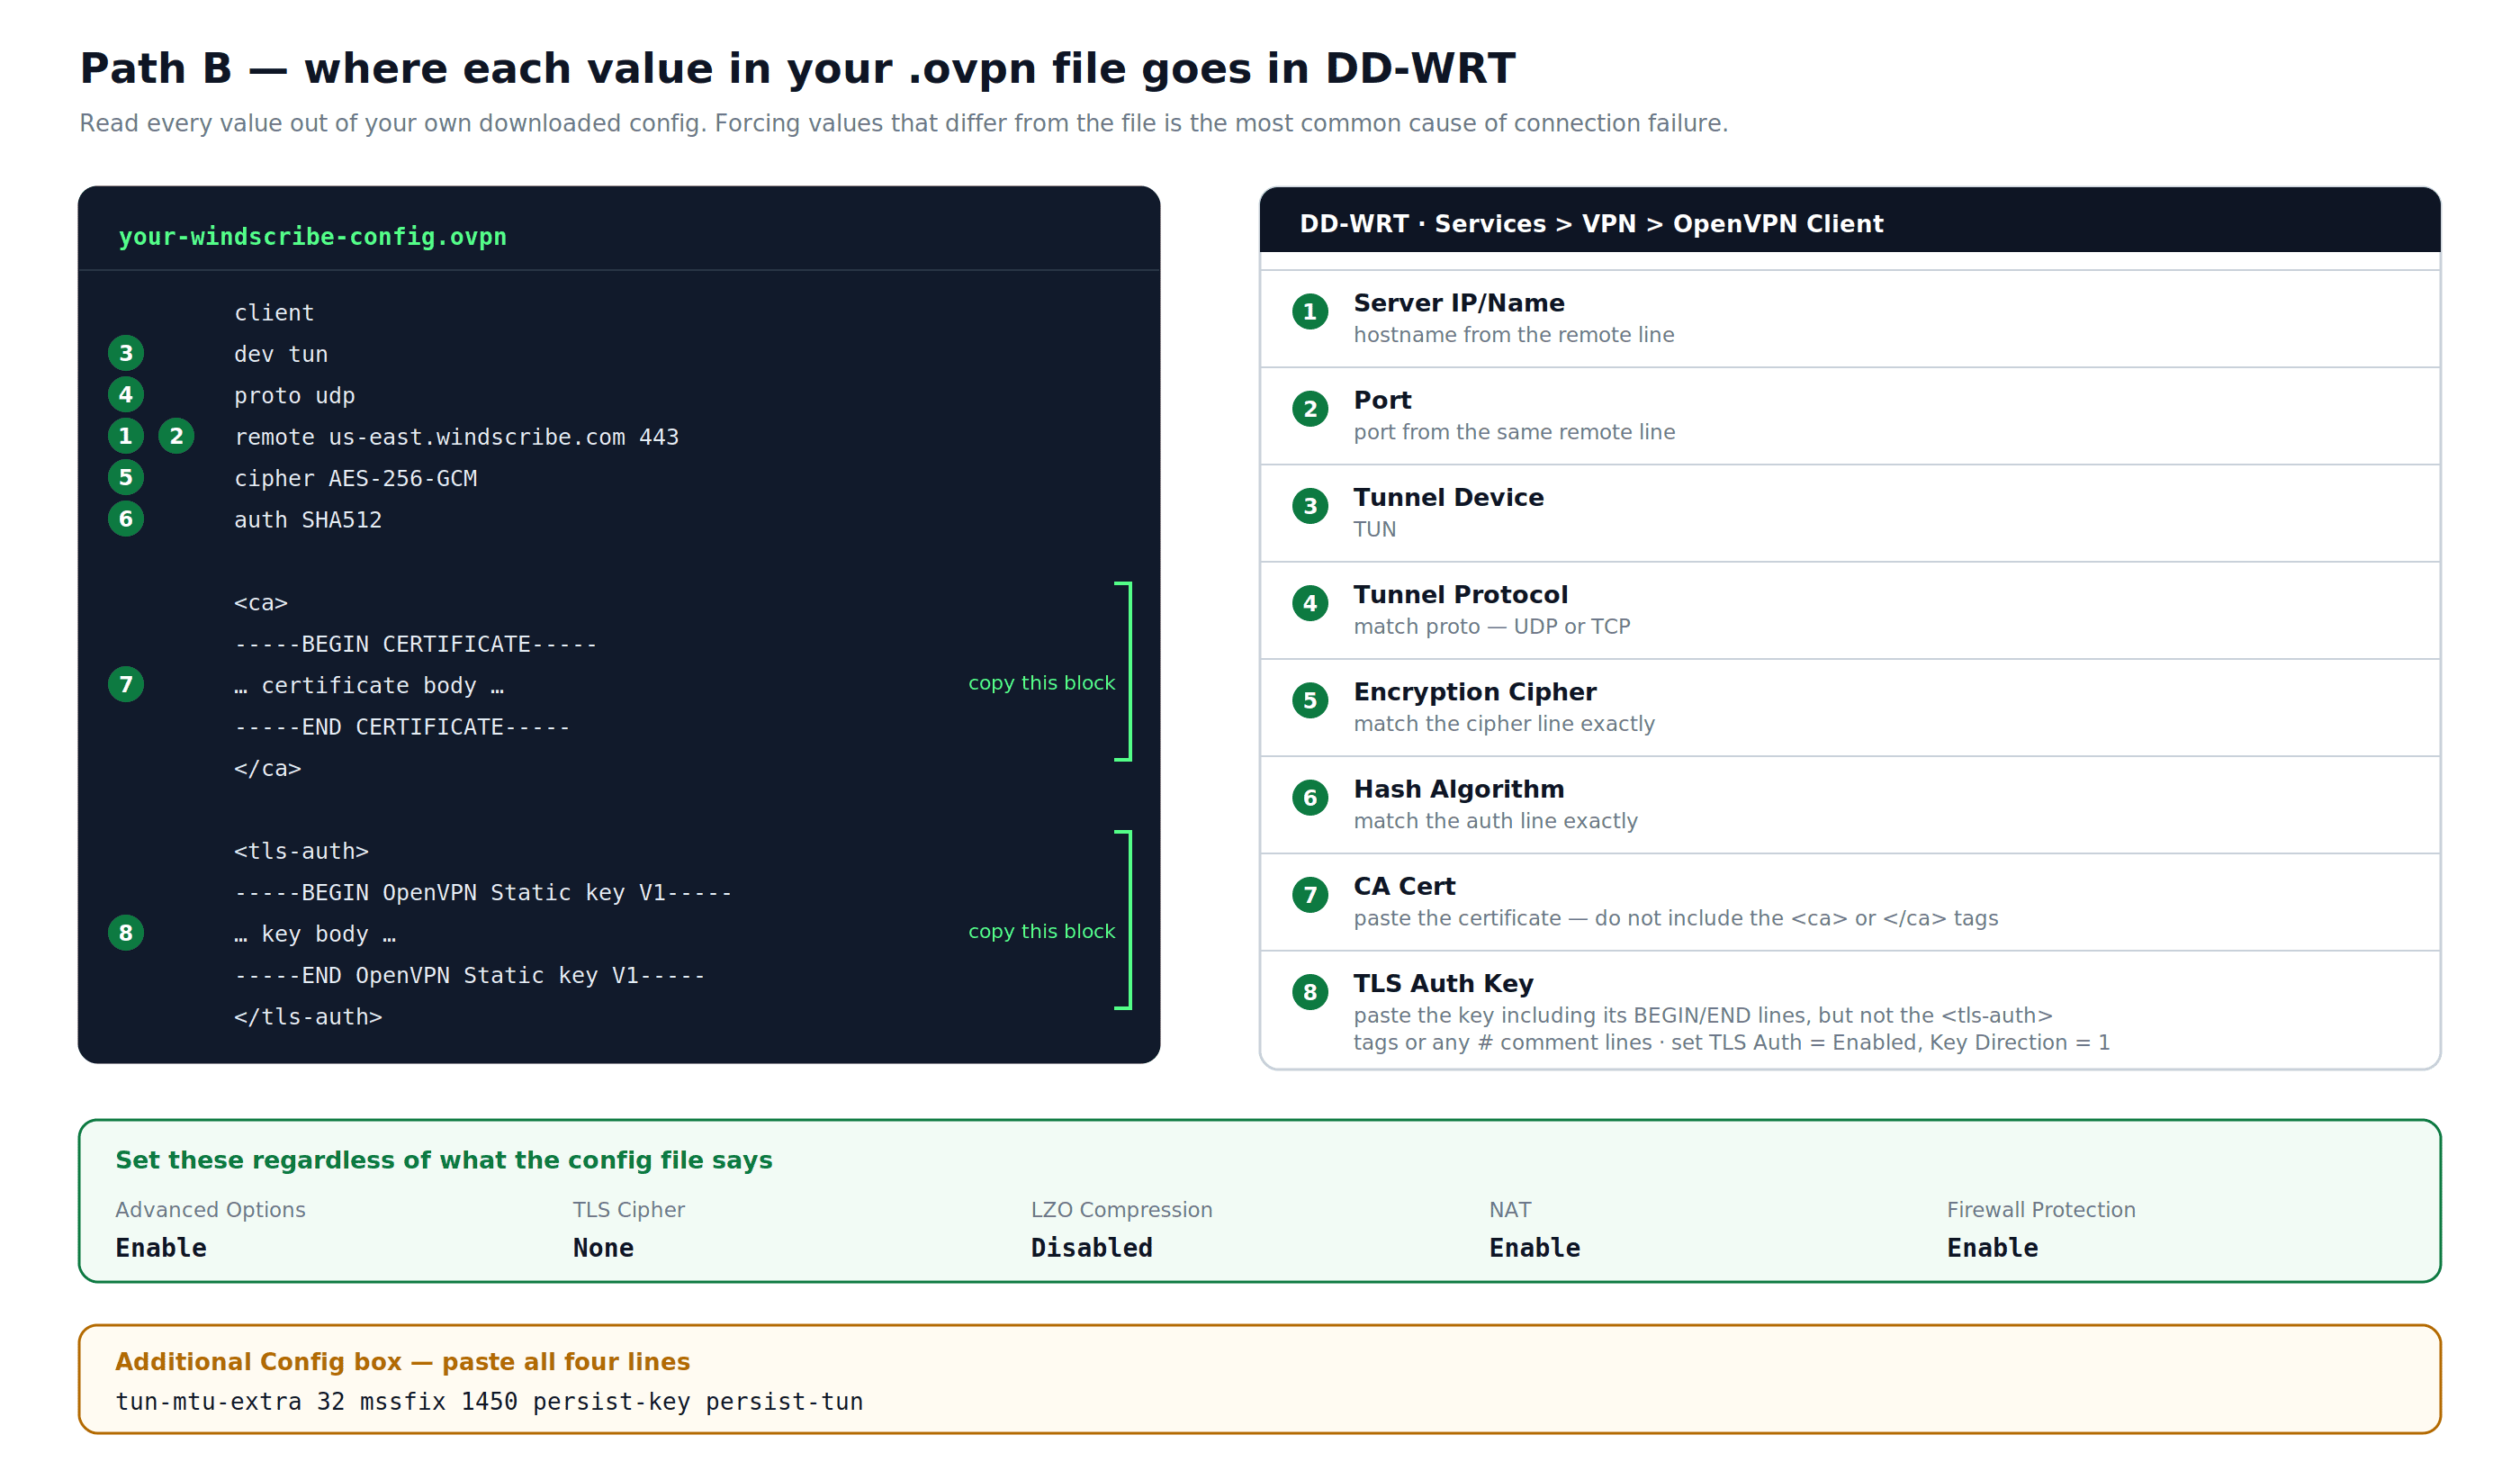
Figure 2: Where each value in your Windscribe .ovpn file goes in the DD-WRT OpenVPN Client panel.
B4 – Add the CA certificate
- In your .ovpn file, locate the block between
<ca>and</ca>. - Copy the certificate text only (not the
<ca>or</ca>tags themselves). - Paste it into the CA Cert field in DD-WRT.
B5 – Add the TLS Auth Key
- In your .ovpn file, locate the block between
<tls-auth>and</tls-auth>. - Copy the full key text, including the -----BEGIN OpenVPN Static key V1----- and -----END OpenVPN Static key V1----- lines. Do not include the
<tls-auth>or</tls-auth>tags or any # comment lines. - Paste it into the TLS Auth Key field.
- Set TLS Auth to Enabled and Key Direction to 1.
B6 – Add Additional Config directives
In the Additional Config text box, paste:
tun-mtu-extra 32
mssfix 1450
persist-key
persist-tun
B7 – Save and apply
Click Save, then Apply Settings.
B8 – Configure DNS to prevent leaks
- Go to
Setup > Basic Setup. - Under Network Address Server Settings (DHCP), set Static DNS 1 to 10.255.255.1. This is Windscribe's internal DNS, reachable only through an active tunnel.
- Check both Use DNSMasq for DHCP and Use DNSMasq for DNS.
- Click Save, then Apply Settings.
Note: Because 10.255.255.1 only resolves through the Windscribe tunnel, DNS will stop working if the VPN disconnects. This is intentional and prevents DNS queries from leaking to your ISP.
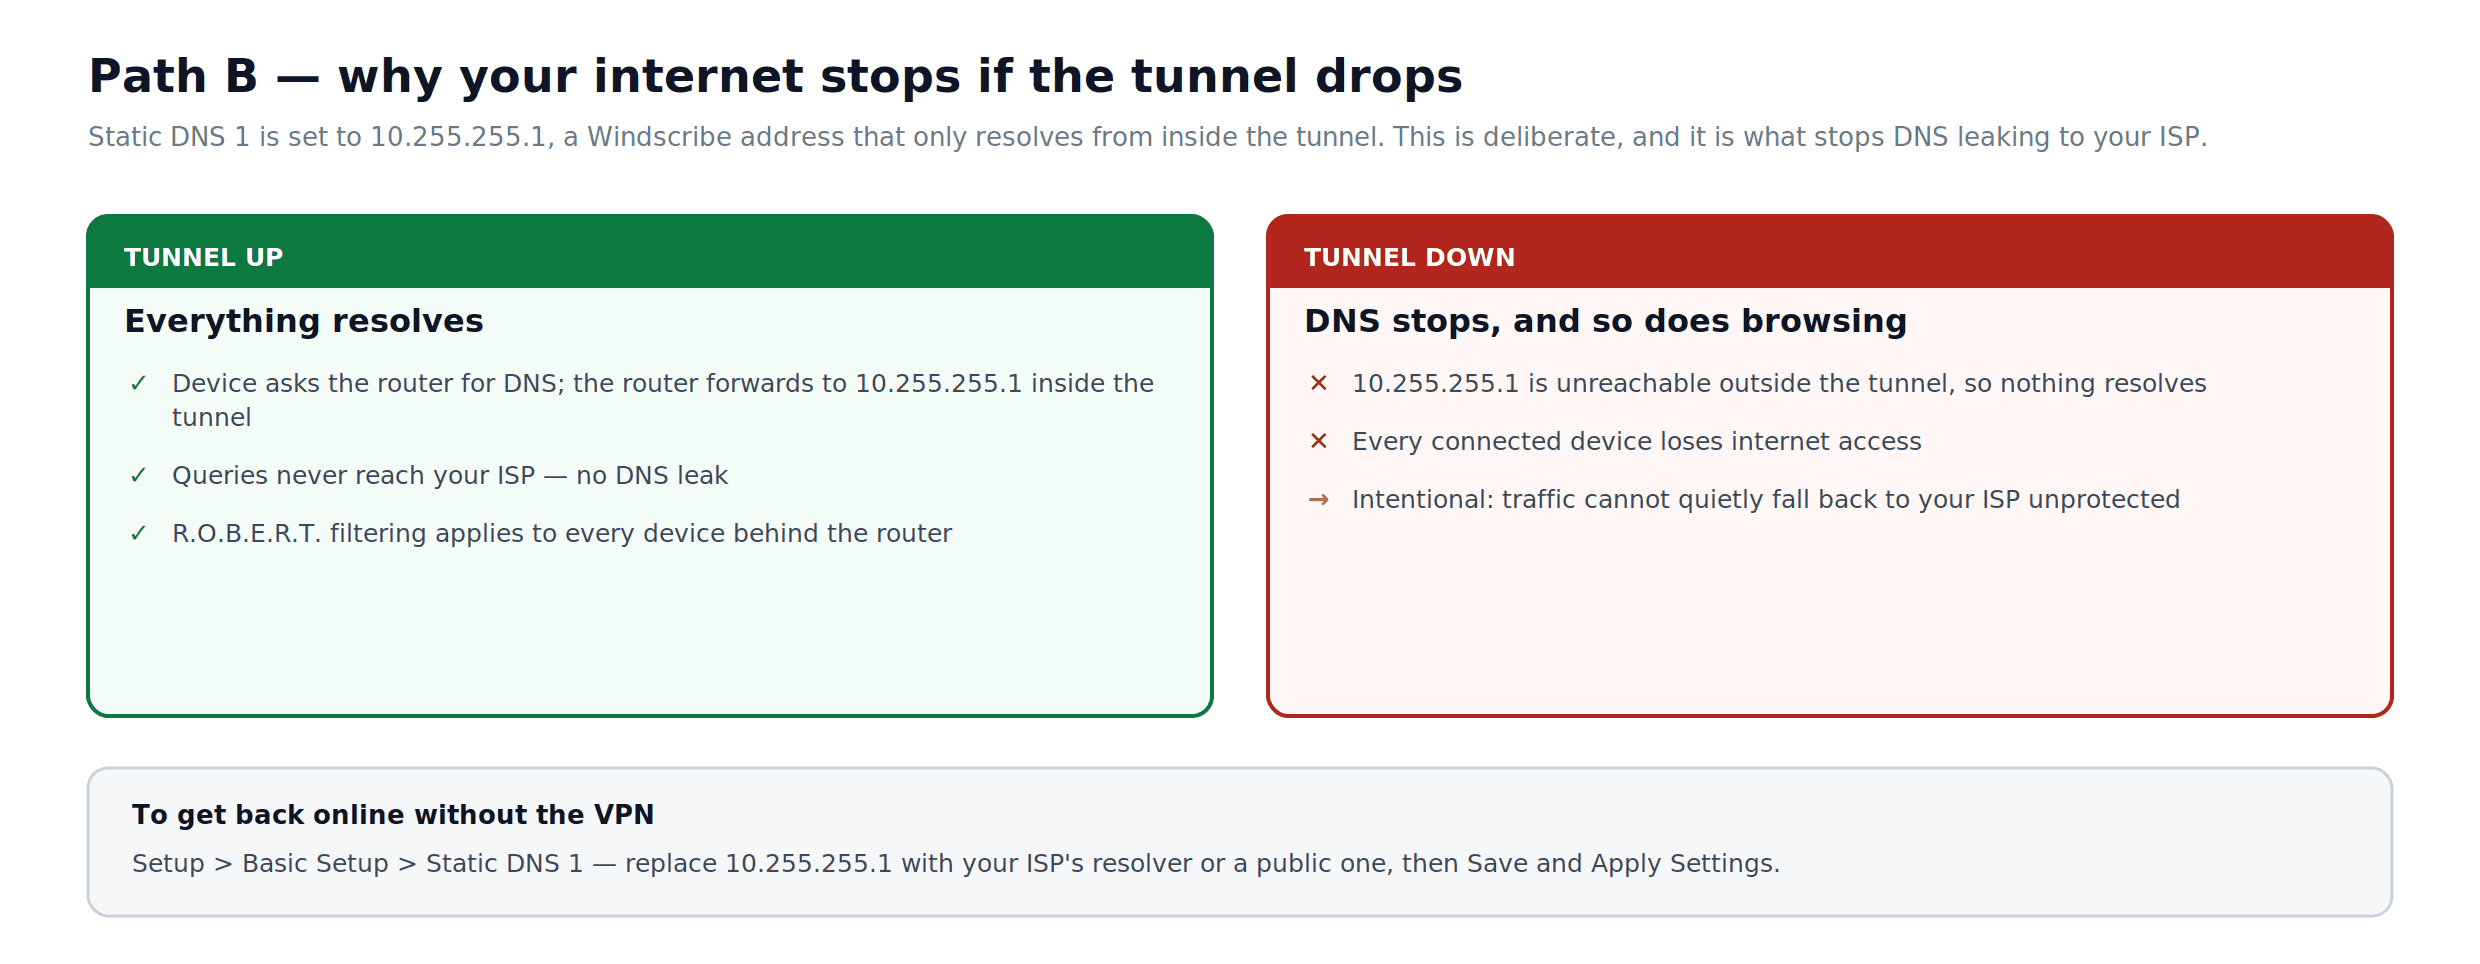
Figure 3: How the 10.255.255.1 DNS setting behaves while the tunnel is up, and what happens when it drops.
B9 – Back up your settings
- Go to
Administration > Backup. - Click Backup. Save the resulting nvrambak.bin file. This allows you to restore your configuration after a factory reset.
B10 – Verify the connection
- Go to
Status > OpenVPN. The State field should read CONNECTED SUCCESS. - On any connected device, visit windscribe.com/dns-leak-test or ipleak.net and confirm the public IP is a Windscribe server IP and that DNS belongs to Windscribe.
Path C: Voxel Firmware (R7800, R8900, R9000)
Voxel is a community-maintained firmware for the Nighthawk X4S R7800, the Nighthawk X8S R8900, and the Nighthawk X10 R9000. It is based on the stock Netgear firmware but adds OpenVPN client support and other features not present in standard firmware. Voxel also has active builds for the Orbi RBK50/RBK53 and Orbi LBR20. Flashing Voxel constitutes a product modification. Under Netgear's published warranty terms, modified products may not be eligible for warranty coverage or Netgear technical support.
Note: Voxel includes a README with each firmware download that covers setup details specific to that build. The steps below reflect the confirmed general method, but file paths and procedures can change between releases: check the README in your downloaded package before proceeding.
C1 – Download and flash Voxel firmware
- Go to voxel-firmware.com and download the latest build for your model. Voxel provides separate builds for R7800, R9000/R8900, RBK50/RBK53, and LBR20. Download the archive for your exact model, extract it, and use the included .img file.
- Log in to your router at routerlogin.net.
- Go to
ADVANCED > Administration, then click Router Update, Firmware Update, or Firmware Upgrade (the label varies by model). All three options lead to the same manual upload screen. - Click Browse, select the Voxel .img file, and click Upload.
- The router will flash and reboot. The standard Netgear Genie admin interface will remain, with Voxel branding.
C2 – Prepare the USB drive (R7800, R8900, R9000, RBK50/RBK53)
For these models, Voxel's OpenVPN client can load configuration from a USB drive connected to the router. LBR20 does not use this USB procedure; follow the separate LBR20 steps below.
- Format a USB drive to FAT32.
- Create a folder on the drive named
openvpn-client(no leading slash, no quotes). - Inside that folder, place two files:
- Your Windscribe
.ovpnconfig file, downloaded from windscribe.com/myaccount/config-generator#openvpn. - A plain-text file named
auth.txt, containing your Windscribe OpenVPN Username on the first line and your Windscribe OpenVPN Password on the second line, with nothing else in the file.
- Your Windscribe
- Open your
.ovpnfile in a text editor. Find the line that readsauth-user-pass. Change it to:auth-user-pass /etc/openvpn/config/client/auth.txt
- Save the file.
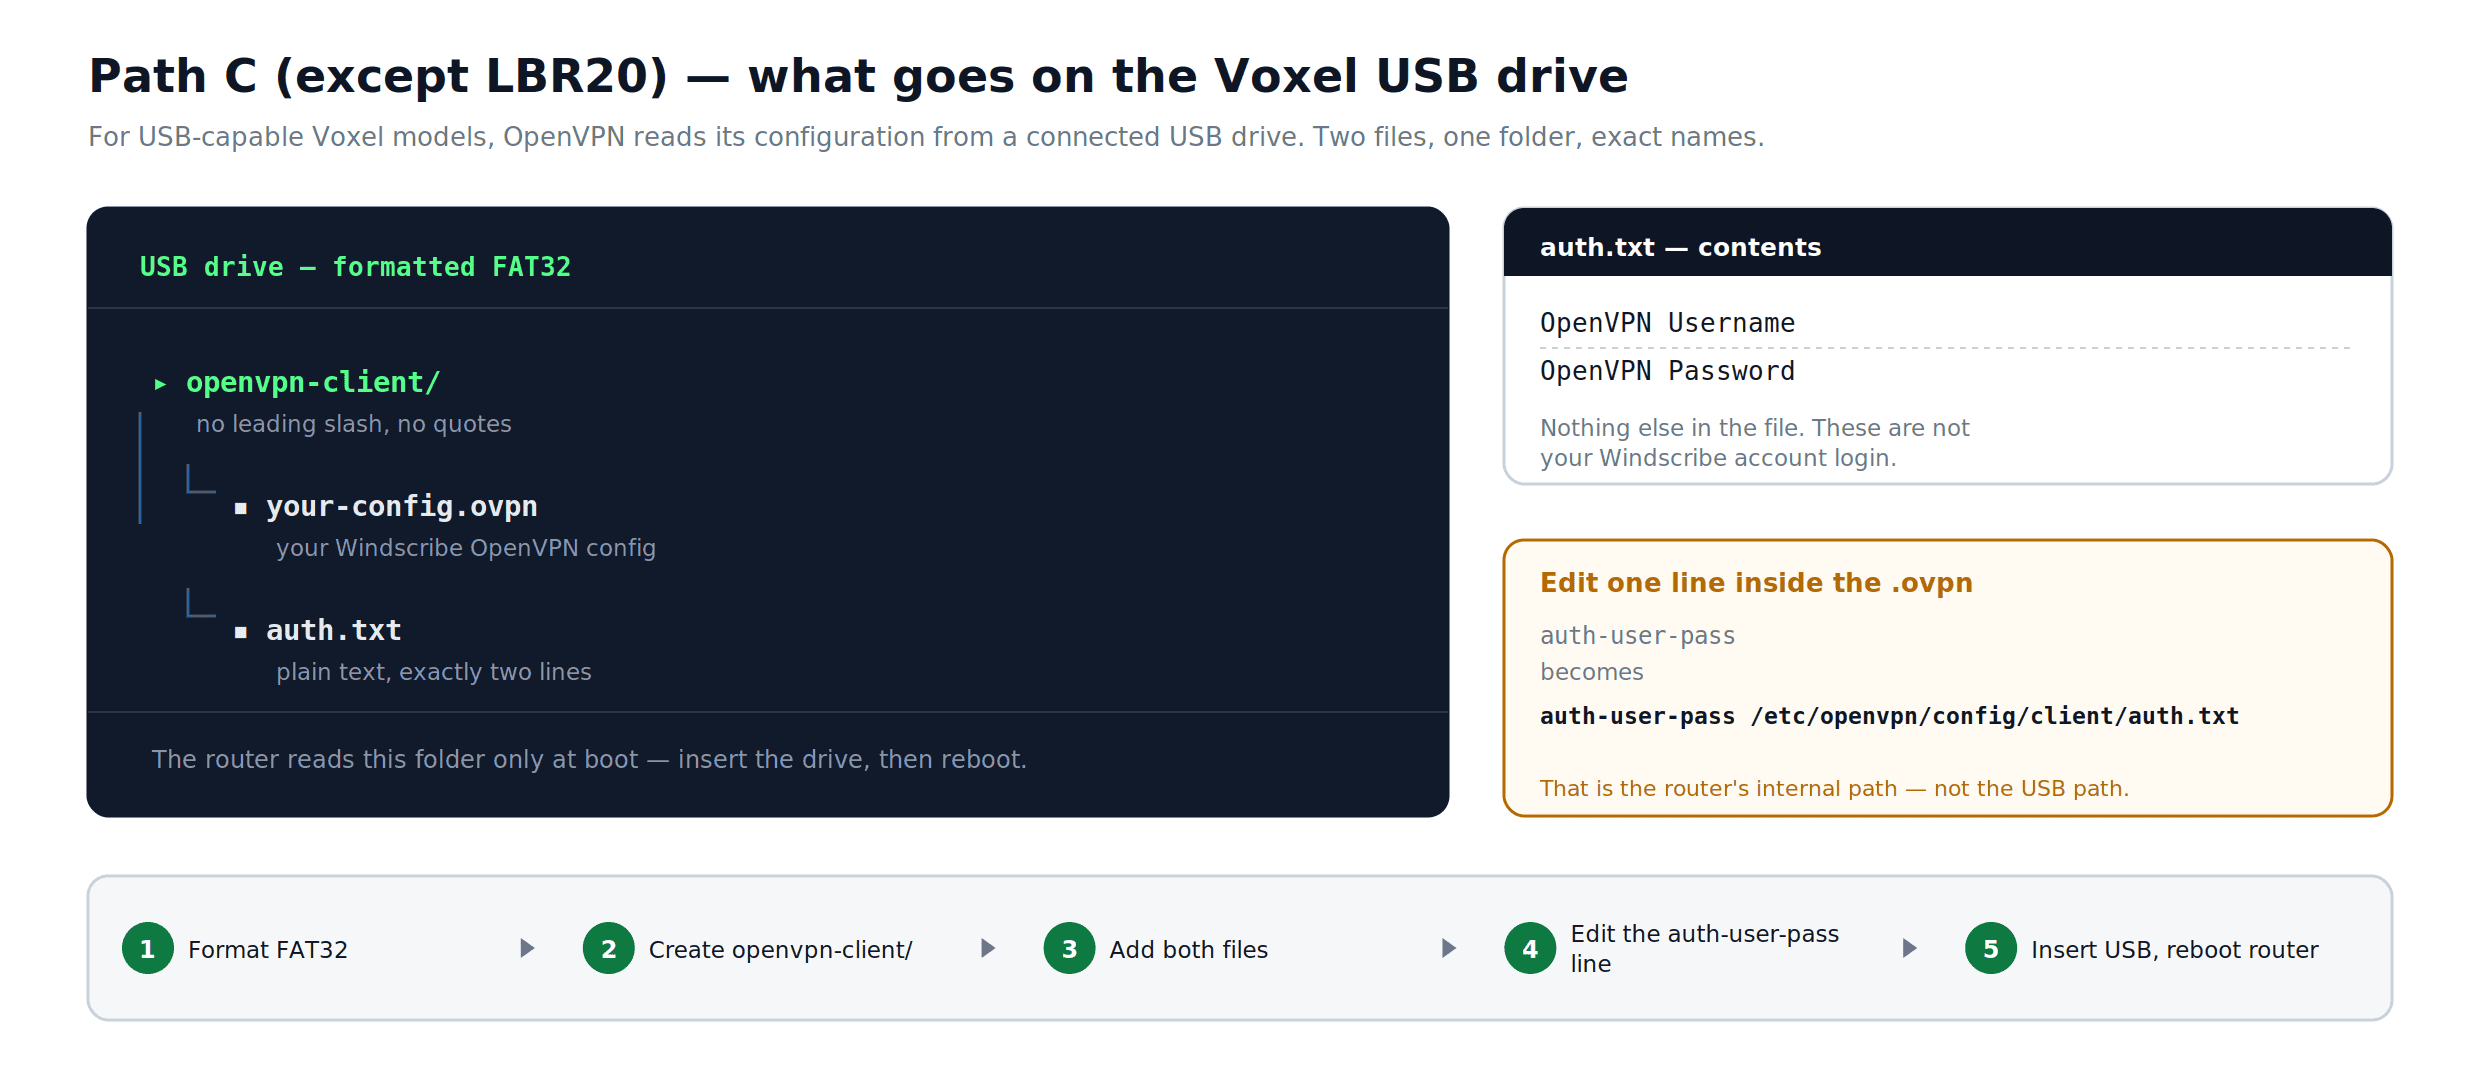
Figure 4: The folder and file layout used by the USB-based Voxel setup, and the one line to change inside the .ovpn file. This USB layout does not apply to LBR20.
C3 – LBR20: use the Circle overlay path
LBR20 does not use the USB openvpn-client procedure above. Its current Voxel QuickStart stores persistent files under the Circle overlay path.
- Follow the SSH or telnet access instructions in the QuickStart included with your exact LBR20 Voxel build.
- Create
/mnt/circle/overlay/etc/openvpn/config/client. - Place your Windscribe
.ovpnfile andauth.txtin that directory. Keep the OpenVPN username on the first line ofauth.txtand the OpenVPN password on the second line. - In the
.ovpnfile, changeauth-user-passtoauth-user-pass /etc/openvpn/config/client/auth.txt. - Start the client with
/etc/init.d/openvpn-client startfor testing, or reboot after following the QuickStart. Check/var/log/openvpn-client.logif it does not connect.
C4 – Connect the USB drive and start the client
- With the router running, insert the USB drive into one of the router's USB ports.
- Keep the USB drive inserted. The OpenVPN client will attempt to start after the drive is attached and will start again after a reboot while the drive remains connected.
- Check your public IP address from a connected device to confirm the tunnel is active.
If the connection does not come up, consult Voxel's README or QuickStart and the SNBForums thread for your model. Common issues include incorrect file paths in the .ovpn file and unsupported drive formatting.
Verify the Connection (All Paths)
Regardless of which path you followed:
- On a device that is routed through Windscribe, visit windscribe.com/dns-leak-test or ipleak.net.
- Confirm:
- The public IP shown is a Windscribe server IP, not your ISP-assigned IP.
- The DNS servers shown belong to Windscribe.
- No WebRTC leak displays your real IP address.
If the IP has changed but DNS still shows your ISP, revisit the DNS configuration steps for your path.
Troubleshooting
VPN does not connect (all paths)
- Confirm the server hostname and port match the remote line in your .ovpn file exactly.
- Try switching from UDP to TCP. Re-generate the config at windscribe.com/myaccount/config-generator#openvpn with TCP selected.
- Confirm you are using the credentials from the Get Credentials section of the config generator page, not your main Windscribe account login.
DNS leaks detected (Path B)
- Confirm Static DNS 1 is set to 10.255.255.1 in
Setup > Basic Setupand that the VPN tunnel is active. - Disable IPv6: go to
Setup > IPV6, set it to Disabled, click Save and Apply Settings.
Connected devices have no internet access (Path B)
- Confirm NAT is set to Enable in the OpenVPN client settings. This setting routes all LAN traffic through the tunnel. No additional firewall rules are required.
- Reboot the router and check
Status > OpenVPNto confirm the tunnel is active.
VPN drops intermittently (Path B)
- Add keepalive 10 60 to the Additional Config field, then click Save and Apply Settings.
- Switch to a stable DD-WRT build confirmed for your model rather than the newest available: "latest" in DD-WRT releases does not always mean most stable. Check the DD-WRT Router Database at dd-wrt.com/support/router-database and look for community-confirmed builds for your specific hardware.
Speed is significantly lower than expected (all paths)
- These routers handle VPN encryption in software. Real-world throughput varies significantly by build, load, and ISP conditions: rough ballpark figures are 20–50 Mbps on older Nighthawk hardware and somewhat higher on the R7800/R9000 under Voxel or DD-WRT. These are not guarantees. If your ISP plan exceeds these figures, router-level OpenVPN will likely be the bottleneck regardless of conditions.
- WireGuard is typically faster than OpenVPN at the router level. If your firmware supports it, Windscribe's WireGuard config generator (available at windscribe.com/myaccount/config-generator#wireguard and subject to the same Pro or Build-A-Plan requirement as the OpenVPN generator) produces configs compatible with Voxel firmware. DumaOS 3 Hybrid VPN also supports WireGuard config files on some firmware versions; consult Netduma's knowledge base at support.netduma.com to confirm whether your XR model's installed firmware includes it.
Windscribe Features at the Router Level
R.O.B.E.R.T. (ad and tracker blocking): R.O.B.E.R.T. is a server-side DNS feature. It applies automatically to any connection made with your Windscribe credentials, including router-level setups. All DNS queries routing through the Windscribe tunnel are subject to your R.O.B.E.R.T. settings. Configure and manage R.O.B.E.R.T. rules at windscribe.com/myaccount/security/blocking-categories: the router itself has no R.O.B.E.R.T. controls.
Static IP: Static IP works on any router with a compatible OpenVPN or WireGuard client. When generating your config at windscribe.com/myaccount/config-generator#openvpn, select your Static IP location from the Location dropdown rather than a standard server location. In most cases, no other changes are needed.
Split Tunneling: Split Tunneling routes specific applications through the VPN while leaving others on the regular internet connection. This requires software running at the device level and is not available through any of the manual router configurations in this guide. On DumaOS (Path A), the per-device selection in Hybrid VPN provides a router-level equivalent: devices not added to Hybrid VPN continue to use the regular connection while assigned devices route through Windscribe.
For all other Windscribe app features, install the Windscribe app on individual devices. This is also the recommended approach for devices where VPN coverage is optional or where you need per-application routing control.
Frequently Asked Questions
Do I need a paid Windscribe account to follow this guide?
Downloading configuration files requires a compatible paid plan: the config generators are a paid feature. Windscribe offers a monthly Pro plan, a yearly Pro plan, and Build-A-Plan, which lets you pay per server location at $1 per location per month with a $3 per month minimum. See current pricing at windscribe.com/upgrade.
Does connecting my router to Windscribe count against a device limit?
Windscribe does not enforce a hard simultaneous-device limit for personal use. The router establishes one connection to Windscribe's servers, and all devices behind it benefit from that single tunnel. Windscribe's terms prohibit commercial use and extreme abuse, but normal household use across multiple devices is explicitly covered.
Will every device on my network be protected automatically?
It depends on the path. Under Path B (DD-WRT) and Path C (Voxel), all devices connected to the router route through Windscribe by default, including smart TVs, game consoles, and any device that cannot run a VPN app. Under Path A (DumaOS Hybrid VPN), protection is per-device: only devices you explicitly add to Hybrid VPN use the tunnel. Devices you do not add continue on the regular internet connection.
What happens to my internet if the Windscribe tunnel drops?
For Path B, the DNS configuration in this guide sets your router's DNS to 10.255.255.1, an internal Windscribe address that only resolves through an active tunnel. If the tunnel drops, DNS stops resolving and internet access stops for connected devices. This is intentional: it prevents traffic from quietly bypassing the VPN. To restore access without the VPN, set your DNS back to your ISP's DNS or your preferred public resolver. Path C follows the DNS behavior documented by the Voxel build for your model; this guide does not apply the DD-WRT DNS setting to Path C.
Does R.O.B.E.R.T. block ads for devices connected through the router?
Yes. R.O.B.E.R.T. is a server-side DNS feature that applies to any traffic routed through the Windscribe tunnel, regardless of how the connection was established. Devices connected through your router receive the same DNS-level blocking as devices running the Windscribe app. Configure your R.O.B.E.R.T. rules at windscribe.com/myaccount/security/blocking-categories.
Can I switch to a different Windscribe server without repeating the full setup?
For Path B (DD-WRT), generate a new config for the location you want and open it in a text editor. Update the location-specific fields in the DD-WRT panel to match (at minimum the Server IP/Name and Port from the new remote line), then click Apply Settings. Other fields such as the CA certificate and TLS Auth Key are typically the same across locations, but verify against the new file before assuming. For Path A (DumaOS Hybrid VPN), add a new VPN entry in the Advanced tab with the new .ovpn file. For the USB-based Path C models, replace the .ovpn file in openvpn-client and restart the client as described by the model's QuickStart. For LBR20, replace the file under /mnt/circle/overlay/etc/openvpn/config/client and start the client or reboot according to its QuickStart.
What are my OpenVPN credentials and where do I find them?
Windscribe generates a separate set of OpenVPN credentials that are different from your main account email and password. Find them by logging in at windscribe.com, going to the OpenVPN config generator at windscribe.com/myaccount/config-generator#openvpn, and clicking Get Credentials. Do not use your account login credentials in the router's username and password fields: the connection will fail.
Get Started with Windscribe
Router-level VPN protection covers every device on your network, including smart TVs, game consoles, and IoT devices that cannot run a VPN app on their own. The setup paths in this guide work assuming your plan includes config file access and your router supports a compatible VPN client.
To get started:
- Upgrade or manage your plan: windscribe.com/upgrade
- Generate your OpenVPN config: windscribe.com/myaccount/config-generator#openvpn