

How to Set Up & Use Windscribe on a TP-Link Router


Compatibility & Requirements
Not every TP-Link router supports a built-in VPN client on stock firmware. Before following this guide, confirm your router meets the following conditions.
Supported hardware: VPN Client support on TP-Link stock firmware is specific to the router model, hardware revision, and firmware version. Do not assume your router is supported based on product series alone. Confirm that Advanced > VPN Client exists in your admin panel, or check your exact model number and hardware version on TP-Link's support site before proceeding. Deco mesh systems are not covered here; VPN client support varies significantly across Deco hardware and firmware versions.
Firmware: Update your router to the latest available firmware before proceeding. WireGuard support was introduced in later firmware releases on select models. If a WireGuard option does not appear in your admin panel after updating, your router does not support it on stock firmware; use OpenVPN instead.
What you will need:
- A Windscribe Pro or Build-A-Plan subscription with access to manual config generation. Build-A-Plan accounts can generate configs only for the locations included in their plan, while Pro accounts can generate configs for all available locations.
- A TP-Link router running stock firmware with VPN Client support for your exact model and hardware revision.
- The router admin password you set during router setup, or your TP-Link ID if your model and firmware prompt for it.
- Access to your router admin panel, typically at
http://192.168.0.1orhttps://tplinkwifi.net. - A computer or device connected to the router.
Part 1: OpenVPN Setup
Step 1 – Generate Your OpenVPN Credentials & Config File
Windscribe's OpenVPN feature uses a separate set of credentials from your main account login. You also need a server-specific .ovpn config file.
- Go to the Windscribe OpenVPN Config Generator and log in if prompted.
- Under Location / IP, choose the server region you want to route traffic through, such as U.S. East, Netherlands, or Japan.
- Under Protocol, select UDP unless you specifically need TCP. UDP is usually faster. If UDP is blocked or unstable on your network, generate a TCP config instead.
- Under Port, select 443 if you are unsure which port to use.
- Under OpenVPN Version, choose the version supported by your router. If you are unsure, select the oldest compatible option shown by the generator.
- Click Download Config to save the
.ovpnfile to your computer. - On the same page, click Get Credentials and copy your OpenVPN username and password. These credentials are distinct from your Windscribe account email and password. You will need them in Step 3.
Step 2 – Access the VPN Client Section
- Open a browser and navigate to
http://192.168.0.1orhttps://tplinkwifi.net. - Enter the router admin password you set during router setup, or sign in with your TP-Link ID if your model and firmware prompt for it.
- Click Advanced in the top navigation bar.
- Go to VPN Client, usually listed under Advanced in the left-hand sidebar.
- If a global Enable VPN Client control is displayed at the top of the page, turn it on. This control must be enabled before any profiles can be added or connected.

Figure 1: The Enable VPN Client control at the top of Advanced > VPN Client. No profile will connect until this is on. Screenshot: TP-Link.
If the VPN Client option is absent, your current firmware does not support it. Check TP-Link's support site for your model and update accordingly.
Step 3 – Add the OpenVPN Profile
- In the VPN Client section, click Add.
- Fill in the following fields in the dialog that appears:
- VPN Type: Select OpenVPN.
- Description: Enter a descriptive name, such as “Windscribe US East” or “Windscribe Netherlands”.
- Config File: Click Browse, then select the
.ovpnfile you downloaded in Step 1. Windscribe's generated OpenVPN configs are provided as single.ovpnfiles. TP-Link requires the uploaded OpenVPN config file to be under 20 KB. If TP-Link rejects the upload, regenerate the file and try another protocol, port, or OpenVPN version. - Username: Enter your Windscribe OpenVPN username.
- Password: Enter your Windscribe OpenVPN password.
- Click Save.
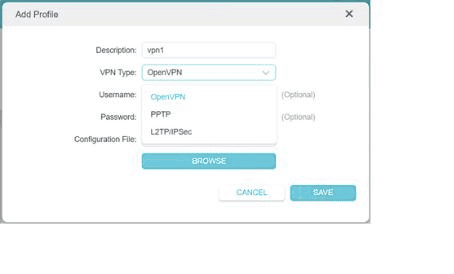
Figure 2: The Add Profile dialog with the VPN Type list open and OpenVPN selected. Windscribe does not support the PPTP or L2TP/IPSec options shown here. Screenshot: TP-Link.
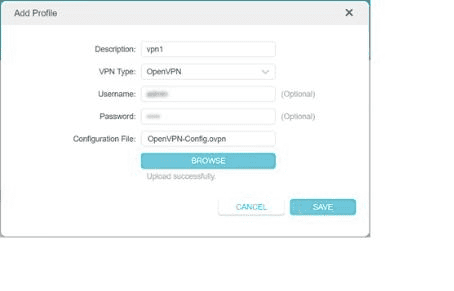
Figure 3: A completed OpenVPN profile form before it is saved. “Upload successfully” confirms the .ovpn file was accepted; click Save to finish. Screenshot: TP-Link.
Step 4 – Connect & Assign Devices
- The new profile now appears in the VPN Client list. Turn on the profile's ENABLE control.
- To route specific devices through the VPN tunnel, locate the Device List or Client Binding section within the VPN Client interface. The label varies by model and firmware version.
- Add each device by its IP address or MAC address.
- Click Save.
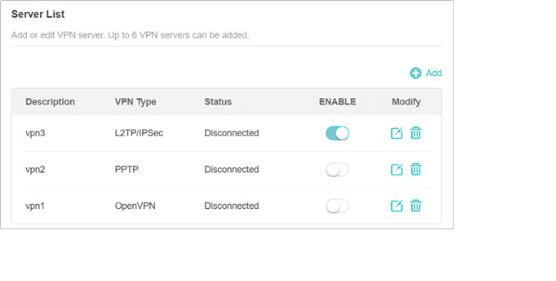
Figure 4: The Server List. Use the ENABLE control to enable a profile. This example has one profile enabled, although every profile shown is disconnected. Only one profile can be enabled at a time. Screenshot: TP-Link.
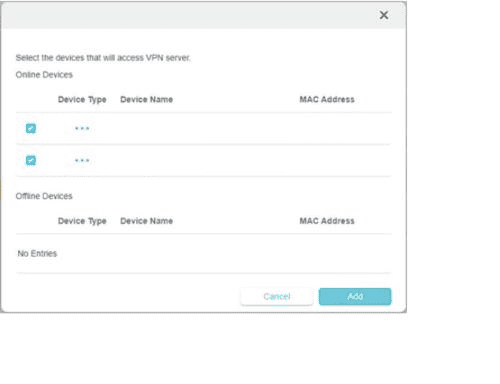
Figure 5: Selecting the devices that will use the VPN server. Device identifiers have been redacted. Devices you do not select continue using your regular ISP connection. Screenshot: TP-Link.
Devices not added to the binding list will continue routing traffic through your regular ISP connection.
Note: TP-Link's stock VPN Client can store up to six VPN profiles, but only one profile can be enabled at a time. Disable the current profile before switching locations or protocols.
Part 2: WireGuard Setup
WireGuard is available on select TP-Link models running sufficiently recent stock firmware. If WireGuard does not appear as a VPN type option, update your firmware first.
Step 5 – Generate Your WireGuard Config File
- Go to the Windscribe WireGuard Config Generator and log in if prompted.
- Under Location, choose the server region you want to use.
- Under Port, select 443 if you are unsure which port to use.
- Under Key Pair, select New Key Pair unless you have already generated one for this router and want to reuse it.
- Click Download Config to save the WireGuard config file in
.confformat to your computer.
The primary method in Step 7 is to import this file directly. TP-Link supports a specific set of WireGuard client parameters. Before importing, open the file in a plain text editor and remove unsupported IPv6 address entries and the MTU line if they are present, as shown in Figure 8. The file contains two sections:
[Interface]:PrivateKey,Address,DNS, and sometimesMTU.[Peer]:PublicKey,PresharedKey,AllowedIPs, andEndpoint.
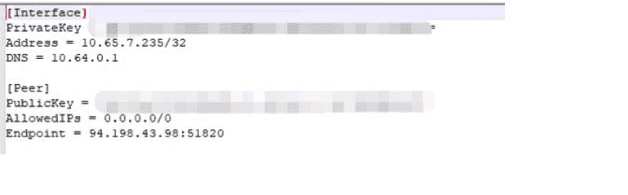
Figure 6: A WireGuard config containing the parameters used for TP-Link setup. Key values are redacted. Screenshot: TP-Link.
Step 6 – Access the VPN Client Section
Follow the same path as in Step 2:
- Log in to the router admin panel.
- Go to Advanced > VPN Client.
Step 7 – Import the WireGuard Profile
- Click Add.
- Fill in the following fields:
- VPN Type: Select WireGuard.
- Description: Enter a name, such as “Windscribe Japan” or “Windscribe CA Central”.
- Config File: Click Browse, then select the
.conffile you downloaded in Step 5.
- Click Save.
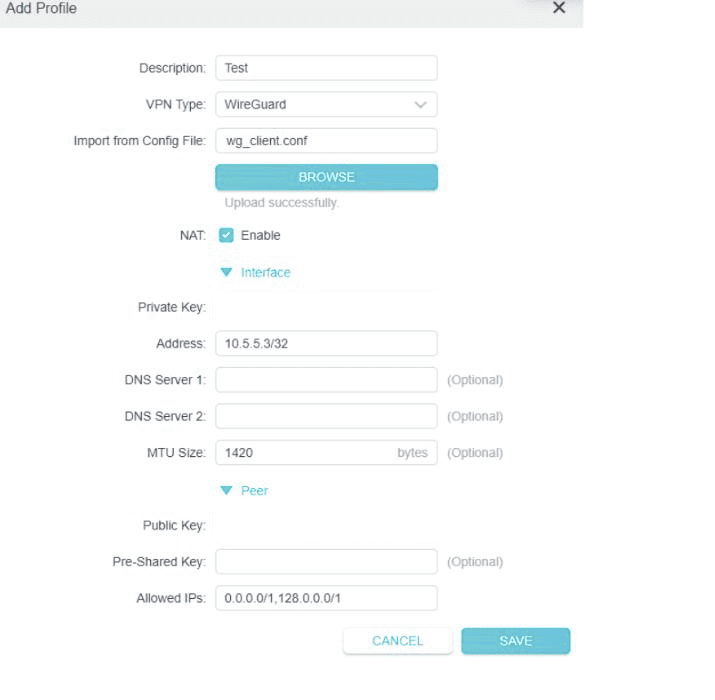
Figure 7: An imported WireGuard profile before it is saved. The Interface and Peer values populate from the .conf file. Key values have been redacted. Screenshot: TP-Link.
If the router rejects the config file, remove only the unsupported IPv6 address, the IPv6 ::/0 entry in AllowedIPs, and the MTU line shown by TP-Link. Do not remove PrivateKey, PublicKey, PresharedKey, the IPv4 0.0.0.0/0 entry in AllowedIPs, or Endpoint. If it still fails, use OpenVPN or check for newer firmware.
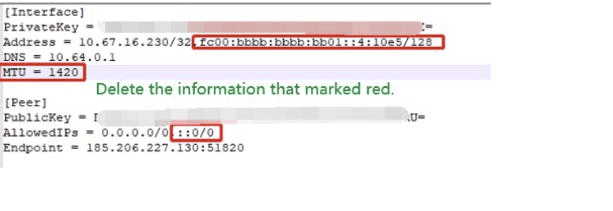
Figure 8: TP-Link's annotated config example marks the IPv6 address, MTU line, and IPv6 AllowedIPs entry for removal before import. Screenshot: TP-Link.
Step 8 – Connect & Assign Devices
- Turn on the WireGuard profile's ENABLE control.
- Assign devices to the tunnel following the same procedure as in Step 4.
Step 9 – Verify the Connection
Once the VPN profile is enabled and devices are assigned, confirm the tunnel is working correctly.
- On an assigned device, open a browser and go to a third-party IP checker such as ipleak.net or dnsleaktest.com.
- Your displayed public IP address should correspond to the Windscribe server region you selected, not your ISP-assigned address.
- Run a DNS leak test on the same page or at dnsleaktest.com. If the tunnel is working correctly, your ISP's DNS servers should not appear in the results.
- In the router admin panel, the VPN Client list will show the profile status as Connected when the tunnel is active.

Figure 9: The enabled WireGuard profile shows a Connecting status while the connection is being established. It will read Connected once the tunnel is up. Screenshot: TP-Link.
Troubleshooting
The VPN Client option does not appear in the admin panel
Your current firmware version does not include the VPN Client feature. Visit TP-Link's official support site, search for your model, and install the latest firmware. If the feature remains absent after updating, your current stock firmware for that model does not provide it. Installing third-party firmware such as OpenWrt is an option on some hardware and supports both OpenVPN and WireGuard, but it is outside the scope of this guide and may affect warranty or support coverage on some models.
The OpenVPN connection fails immediately
Confirm you are entering the Windscribe OpenVPN credentials from the Config Generator page, not your Windscribe account email and password. If the credentials are correct, download a new .ovpn file using TCP instead of UDP and update the profile.
The OpenVPN connection connects but then drops
This is often a keepalive or timeout issue. Try a different server location in the Windscribe Config Generator and replace the existing profile with the new .ovpn file.
The WireGuard option is not available as a VPN type
WireGuard support requires a firmware version that introduced it for your model. Update to the latest firmware from TP-Link's support site. If no firmware update adds it, OpenVPN is the available alternative on that hardware.
Speed on OpenVPN is noticeably slow
OpenVPN performs encryption in software and is CPU-intensive. On routers with modest processors, throughput will be limited. WireGuard uses a leaner cryptographic implementation and is often faster on the same hardware. Switch to WireGuard if your router supports it.
Some devices are not routing through the VPN
Review the device binding list configured in Step 4 or Step 8. On models that use device binding, each device must be explicitly added by IP address or MAC address. Confirm that the device's IP address has not changed. Assign a static local IP to the device in the router's DHCP settings to prevent this.
An IP or DNS leak is detected
If your public IP still shows your ISP address, the VPN profile may not be active. Check the status in the VPN Client list and reconnect if needed. For WireGuard, confirm the IPv4 AllowedIPs value still matches the value Windscribe generated. If a DNS leak is detected specifically, check that the DNS field in the WireGuard config was not altered during manual editing. For OpenVPN, verify the .ovpn file was not corrupted during download by regenerating it from the Windscribe Config Generator and uploading it again.
Frequently Asked Questions
Do I need a paid Windscribe account to follow this guide?
Yes. Manual config generation for both OpenVPN and WireGuard requires a Pro or Build-A-Plan subscription. Build-A-Plan accounts can generate configs only for the locations included in their plan, while Pro accounts can generate configs for all available locations. See current plans and pricing.
Will every device on my network be protected once the VPN is active?
Only devices you assign to the VPN tunnel through the router's device binding interface. Devices not added to the binding list continue routing traffic through your regular ISP connection. On routers that route all traffic through the VPN by default and do not show a device binding interface, all connected devices are covered automatically.
Can I run OpenVPN and WireGuard at the same time?
No. TP-Link's stock VPN Client stores up to six profiles but allows only one to be enabled at a time. You can store both profile types on the router and switch between them, but the enabled profile must be disabled before enabling another.
What is the practical difference between OpenVPN and WireGuard on a router?
WireGuard uses a leaner cryptographic design and is generally faster, particularly on routers with modest processors. OpenVPN is more broadly supported across TP-Link hardware. If your model supports WireGuard and your firmware is current, it is the better option for most users. If not, OpenVPN is a reliable alternative.
Will the VPN reconnect automatically after the router restarts?
On many TP-Link models, a previously enabled VPN profile reconnects after a reboot. Confirm this after your first restart by checking the profile status in the VPN Client section and running a quick leak test on an assigned device at ipleak.net.
Does running a VPN on the router slow down my internet connection?
Yes, to some degree. The router's CPU handles the encryption for all tunneled traffic, and throughput is capped by its processing capacity. WireGuard imposes less overhead than OpenVPN and performs better on lower-powered hardware. Higher-end Archer models handle VPN traffic more efficiently than entry-level ones.
Does a router VPN replace the Windscribe app on individual devices?
No, not entirely. Router-level VPN protects all assigned devices at the network level. However, using router configs instead of the Windscribe app means you lose access to Split Tunneling, Firewall protection, and easy in-app protocol switching. R.O.B.E.R.T. still applies to traffic routed through the Windscribe tunnel and can be managed under Security in My Account. For devices where those app features matter, you can also install the Windscribe app directly.
Does Windscribe log my activity?
Windscribe states that it keeps no logs that identify what users do online. The company runs RAM-only servers, publishes transparency reports, and has completed third-party audits. Read the full Windscribe privacy policy.
What do I do if my router model is not compatible with Windscribe configs?
If stock firmware does not support the VPN Client feature, or if WireGuard config import consistently fails, the practical options are to install a newer firmware update if one exists for your model or use the Windscribe app directly on individual devices instead of routing through the router.
Get More from Windscribe: The App & Your Account
Router-level VPN covers your whole network, but it routes traffic without access to several features that are only available in the Windscribe app. When you use router configs instead of the app, Split Tunneling, Firewall protection, and easy in-app protocol switching are not available at the device level. R.O.B.E.R.T. still applies to traffic routed through the Windscribe tunnel and can be managed under Security in My Account.
For devices where those features matter—a work laptop, a phone used on public Wi-Fi, or any device you use outside the home network—installing the Windscribe app gives you complete control alongside your router setup.
Compatible paid plans include access to manual config generation, locations in 69+ countries, no hard simultaneous-device limit for normal personal use, and R.O.B.E.R.T.