

How to Use Windscribe with BitTorrent Classic


A Windscribe setup guide for BitTorrent Classic on Windows. This is not a guide for BitTorrent Web, which runs in the browser and does not expose the settings below.
The Short Version (for First-Timers)
If you just want the safe setup and would rather not learn every networking term on the first read, follow these seven steps. The rest of the guide explains each one in more detail and adds optional extras you can ignore for now.
- Get Full Pro, or a Build-a-Plan that includes the peer-to-peer-enabled locations you need.
- Open Windscribe and set Firewall Mode to Always On.
- Connect to a peer-to-peer-enabled location.
- Open BitTorrent Classic only after Windscribe says CONNECTED.
- Leave the BitTorrent Classic proxy settings set to (none).
- Run the torrent IP check (see Verifying the Secure Connection) before downloading anything real.
- Quit BitTorrent Classic before you disconnect Windscribe.
That is the whole safe path. Everything below is detail and optional refinement.
Before You Begin
A few facts that will save you a trip to support:
- Peer-to-peer traffic is a paid-plan feature. It works on Full Pro, and on Build-a-Plan for the server locations included in your plan. It is disabled on free servers.
- Connect to a peer-to-peer-enabled location. Most paid locations allow it. Inside the Windscribe app, any location that does not allow peer-to-peer is marked with a crossed-out P2P icon, use that icon to steer clear of those servers. A handful of locations are excluded due to local restrictions or provider rules. The exact list can change over time, so the in-app icons are the most current guide.
- Do not use a Windscribe Residential Static IP for this. Residential Static IPs are not peer-to-peer enabled, so the traffic simply will not pass.
- The boring but necessary line: a VPN changes who can see your IP, not what you are allowed to do. Only download or share content you have the right to use, and follow the laws where you live.
Windscribe Setup First
With BitTorrent Classic, the order of operations matters more than any in-client setting, because your safety net is the Windscribe app, not the client. Set up the VPN before the client ever opens.
A word on why the Firewall, and not a "kill switch": a kill switch is reactive. It only cuts your connection after it notices the VPN dropped, and in that gap, packets can still escape over your real IP. Windscribe's Firewall is proactive. With Always On selected, the Always-On Firewall is designed to block traffic outside the VPN tunnel, including if the app exits, crashes, or the computer restarts. In the trade this is called failing closed. For torrents you leave running unattended, that property is the entire point.
The correct sequence, which mirrors Windscribe's own torrent best-practice guidance:
- Open the Windscribe app. Go to Preferences > Connection and set Firewall Mode to Always On.
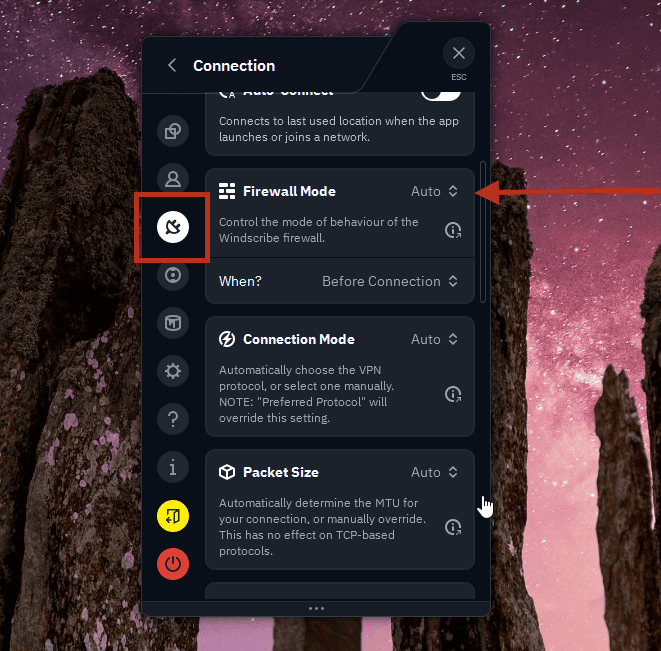
Firewall Mode set to Automatic (default)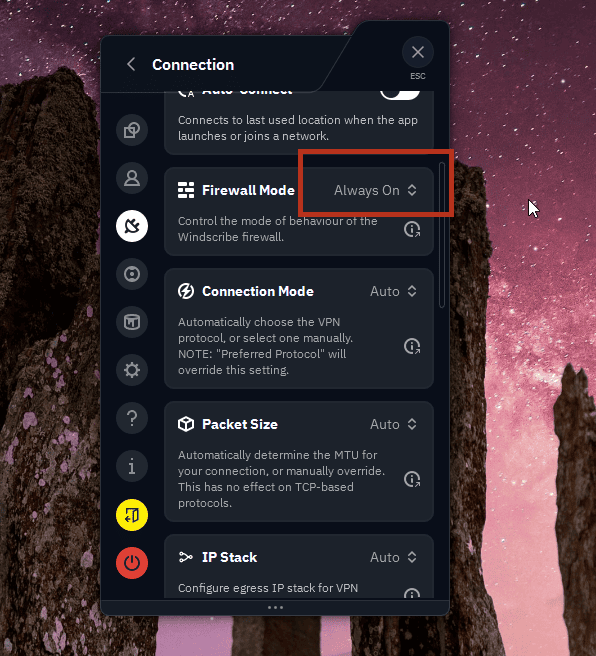
Firewall Mode set to Always On (what you want) - Connect to a peer-to-peer-enabled location and wait until the app shows CONNECTED. Do not skip the wait.
- Only now open BitTorrent Classic. Opening it before the VPN is connected risks announcing your real IP to trackers and peers.
- Add your torrent and download.
- When the download finishes, if you do not want to keep seeding, right-click the torrent and choose Stop. Remove it from BitTorrent Classic only if you no longer want it listed in the client. (If you do want to keep seeding over the VPN, just leave it running.)
- Fully quit BitTorrent Classic (File > Exit), not just close the window.
- Only after the client is closed should you disconnect Windscribe. If you do not want Always-On Firewall enabled outside torrenting, turn it back off afterward.
BitTorrent Classic Settings
There is less to configure here than you might expect, and that is by design: the VPN app is doing the protecting.
Proxy
Options > Preferences > Connection. You will see a Proxy Server section with a Type dropdown (SOCKS4, SOCKS5, HTTP, HTTP Connect). Leave it set to (none). Windscribe no longer runs hosted SOCKS5 proxy servers, so there are no Windscribe proxy credentials to enter here. For a Windscribe setup, the supported path is the VPN app plus the Always-On Firewall, not an in-client proxy. Only touch this section if you run your own separate proxy, which is outside the scope of this guide.
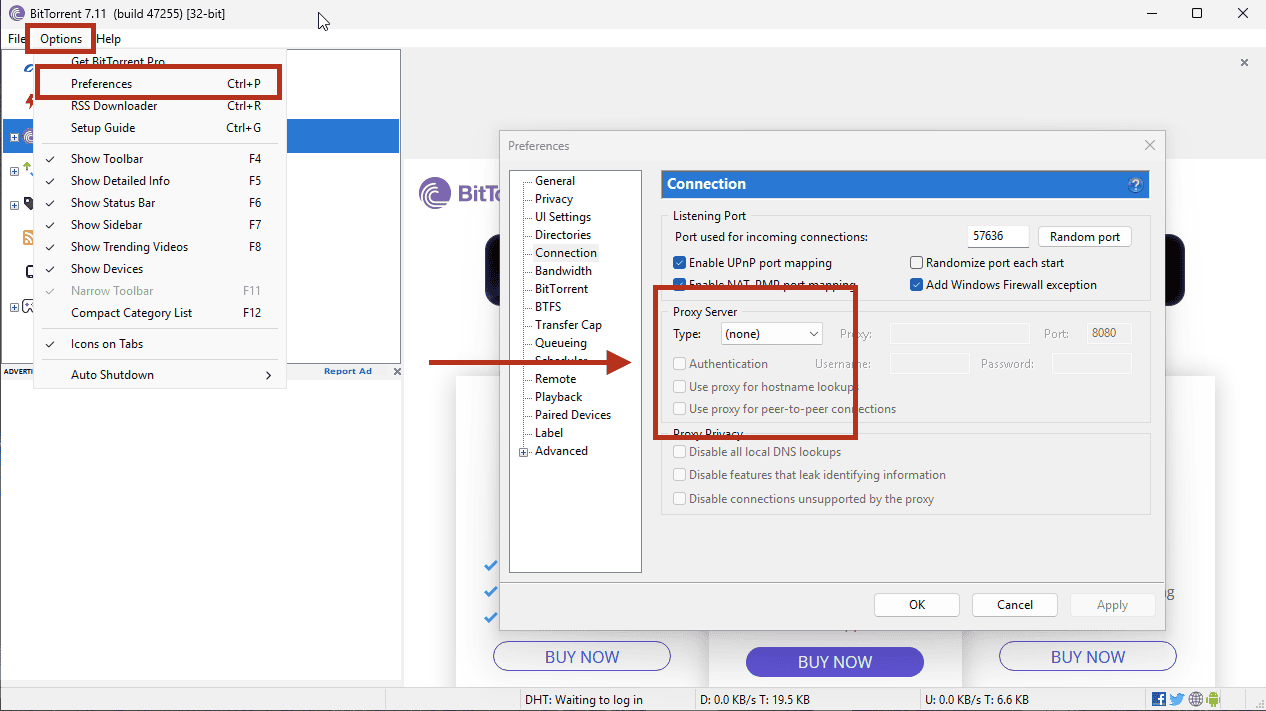
BitTorrent Classic's Options > Preferences > Connection panel, Proxy Type set to (none)
A Note on "Binding"
Some torrent clients let you lock the client to a specific network adapter so it refuses to send traffic whenever the VPN interface is down. Clients like qBittorrent expose this directly, and where a client supports it, binding to the VPN interface is a good extra layer. If you do not see a clear adapter/interface binding option in BitTorrent Classic, rely on Windscribe's Always-On Firewall instead.
Optional: Port Forwarding (Advanced)
Optional advanced section: only use this if you care about seeding performance or connectability. It is not required for privacy, and beginners can skip it entirely. Port forwarding can help with inbound connections, connectability, and seeding ratios, but it is optional. Here is what Windscribe offers, by plan:
- Pro users: ephemeral port forwarding, requested from your account page. It is included at no extra cost and lasts seven days at a time, after which you re-request it.
- Build-a-Plan and free: no ephemeral port forwarding. Build-a-Plan can carry peer-to-peer traffic on the paid peer-to-peer-enabled locations in your plan, but ephemeral port forwarding is a Pro-only feature.
- Permanent port forwarding: requires a purchased Static IP.
One hard rule regardless of plan: do not buy a Residential Static IP for torrenting. Residential Static IPs are not peer-to-peer enabled, so seeding through one will not work. If you want a Static IP for seeding, use a Datacenter Static IP in a peer-to-peer-enabled location.
If you do reserve a port, pick a fixed listening port in BitTorrent Classic (it lives in the same Options > Preferences > Connection panel as the proxy settings), and disable the option that randomizes the port on startup. Use that listening port as the internal port when you create the Windscribe port forward; Windscribe will then show you the external port that peers actually connect to. While you are in that panel, turn off UPnP and NAT-PMP so the client does not try to map a different port on its own.
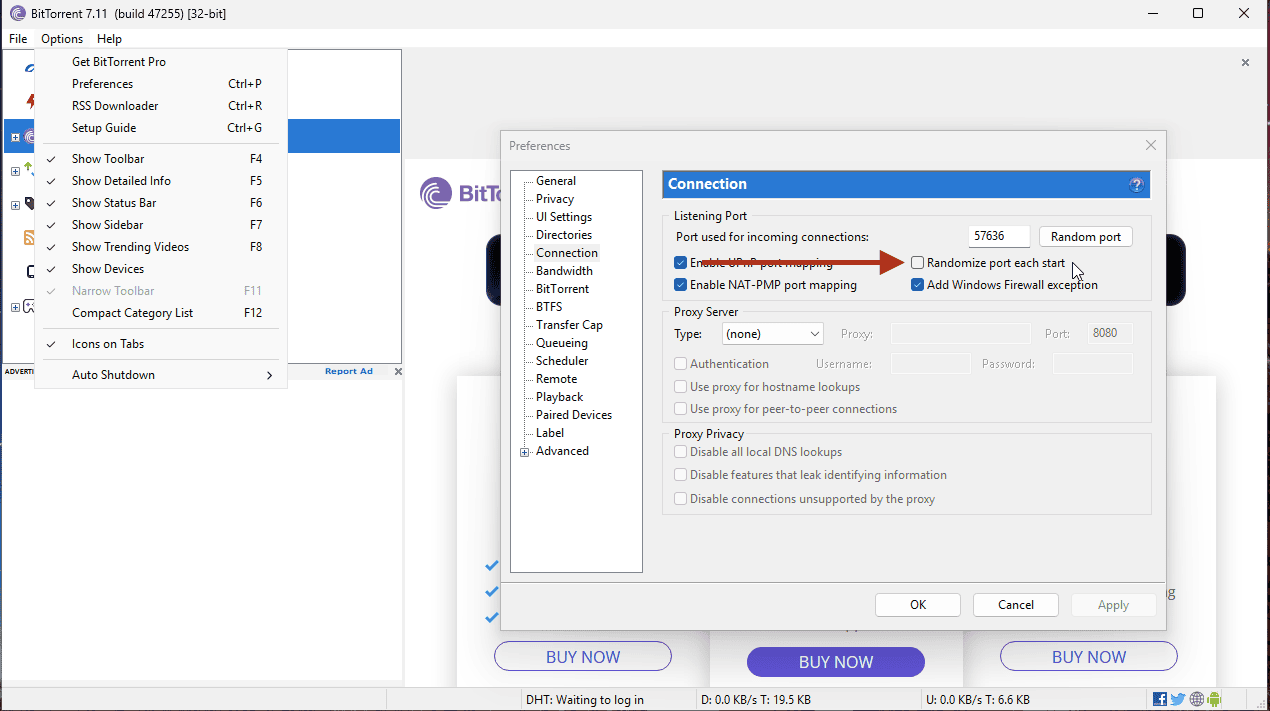
Disable "Randomize port each time BitTorrent starts" before creating a port forward
Verifying the Secure Connection
A browser leak test proves nothing about your torrent client, because the client and the browser can take different routes. Verify the client directly.
- With Windscribe connected, check your IP address in a browser using Windscribe's what is my IP page. This is the VPN address you will expect the torrent checker to match.
- Add a torrent IP-checking magnet or .torrent from a third-party service such as ipleak.net. It does not download actual content; the tracker simply records and reports the IP your client announces, which is the whole point of the test.
- Confirm the IP the torrent checker reports matches the VPN address you saw in step one. They must match. If your home IP appears, stop, confirm the Firewall is set to Always On and the app shows CONNECTED, then try again.
If the torrent checker shows the Windscribe IP and your real address appears nowhere, BitTorrent Classic is routing through Windscribe as intended.
Optional troubleshooting: trackers will not connect
If the client connects but specific trackers refuse to, check R.O.B.E.R.T., Windscribe's server-side domain blocker for ads, trackers, malware, and custom rules. The standard blocklists toggle in the desktop app, but the fuller controls and custom rules live in your account at My Account > Security. If an aggressive blocklist is catching a legitimate tracker domain, add that domain as an Allow rule on the Custom Rules page and restart the client.
Frequently Asked Questions
Can I torrent on Windscribe's free plan?


Do I need to enter SOCKS5 proxy details in BitTorrent Classic?
Does using Windscribe make me anonymous?
Do I need port forwarding to torrent safely?
Which server should I connect to?
My download starts but trackers will not connect. What is wrong?
Get Windscribe
Peer-to-peer needs a paid plan, so grab Full Pro or build the plan that fits your locations, connect to a peer-to-peer-enabled server, and get back to downloading your entirely legal Linux distros.