

How to Set Up & Use Windscribe with DD-WRT


This guide covers configuring Windscribe's OpenVPN client on a router running DD-WRT firmware. Every device that uses that router for internet access will route traffic through the VPN tunnel while the OpenVPN tunnel is connected, assuming no policy-based routing bypasses are in place and IPv6 is correctly handled.
Note on app features: A manual router configuration does not include all features available in Windscribe's official apps. App-level firewall controls, automatic protocol failover, and app-managed leak protection are not available in this setup. Leak prevention must be handled manually, as covered in Part 4.
Estimated time: 15–30 minutes.
Use a wired connection to your router while configuring. Changing VPN settings can temporarily interrupt Wi-Fi.
Firmware note: Always use the DD-WRT build compiled specifically for your exact router model. Installing an incorrect build can render a router unresponsive. Before starting, confirm you know how to perform a factory reset on your device in case connectivity is lost during configuration.
Requirements & Prerequisites
- DD-WRT build with OpenVPN: Confirm the OpenVPN Client section is present under Services > VPN on your router. If that section is missing, your current build does not include OpenVPN. Check the official DD-WRT router database, model-specific wiki and forum threads, and the build notes for your exact hardware revision before flashing a compatible build.
- Windscribe paid plan: Manual OpenVPN configuration requires a Pro or Build-A-Plan subscription. Build-A-Plan can generate profiles only for locations included in the plan; the Free plan does not include the OpenVPN config generator.
- DD-WRT admin credentials: The username and password for your router's admin panel, not your Windscribe login.
- Router admin IP: The default DD-WRT admin address is 192.168.1.1. Use your custom address if you changed it.
About OpenVPN
OpenVPN is a mature, open-source VPN protocol that encrypts traffic between a client device and a VPN server using TLS. Windscribe supports manual OpenVPN profiles on paid plans through the OpenVPN Config Generator. The current generator downloads one .ovpn profile and retrieves OpenVPN credentials separately. A manual DD-WRT setup requires mapping that profile into the router's admin panel.
Part 1: Generate Your Windscribe OpenVPN Profile
Step 1: Open the OpenVPN Config Generator
- Open windscribe.com/myaccount/config-generator#openvpn in a browser.
- Log in with your Windscribe account credentials if prompted.
Step 2: Download the OpenVPN Profile
- In Step 1 of the generator, select Location / IP, Protocol, Port, and OpenVPN Version.
- Choose a location geographically close to you, or one that provides the exit region you need.
- Select your protocol and port. Use a port offered by the generator for that protocol:
- UDP usually offers lower latency and works in most environments.
- TCP 443 is an alternative when UDP is blocked, such as on some hotel or corporate networks.
- If you change protocol later, generate a fresh profile. Do not change only the port in DD-WRT.
- Choose the OpenVPN version that matches your router's DD-WRT build. If you are unsure, follow the generator's version note and use the compatible older option rather than assuming the newest profile will work.
- Click Download Config. This saves one file named like
Windscribe-Location.ovpn.
Step 3: Open and Inspect the OpenVPN Profile
Open the downloaded .ovpn file in a plain-text editor. You will use its values and embedded blocks in DD-WRT:
- The
remoteline provides the server hostname and port:remote [hostname] [port].- The
protoline provides the tunnel protocol. - Note the
dev,cipherordata-ciphers,auth, compression, certificate-verification, MTU, and MSS directives that are present. Match your DD-WRT fields to this generated profile instead of using sample values from another guide.
- The
- Find the embedded
<ca>block. You will copy the certificate contents between<ca>and</ca>into the DD-WRT CA Cert field. - Find the embedded
<tls-auth>block. You will copy its contents into TLS Auth Key and preserve the profile's key direction when your DD-WRT build exposes that setting.
Step 4: Get Your OpenVPN Credentials
Windscribe generates a separate set of OpenVPN credentials distinct from your main account login.
- On the same OpenVPN Config Generator page, use Step 2 and click Get Credentials.
- Copy your OpenVPN Username and OpenVPN Password. These are auto-generated strings, not your Windscribe account email and password. When pasting into DD-WRT, avoid copying extra spaces before or after either value.
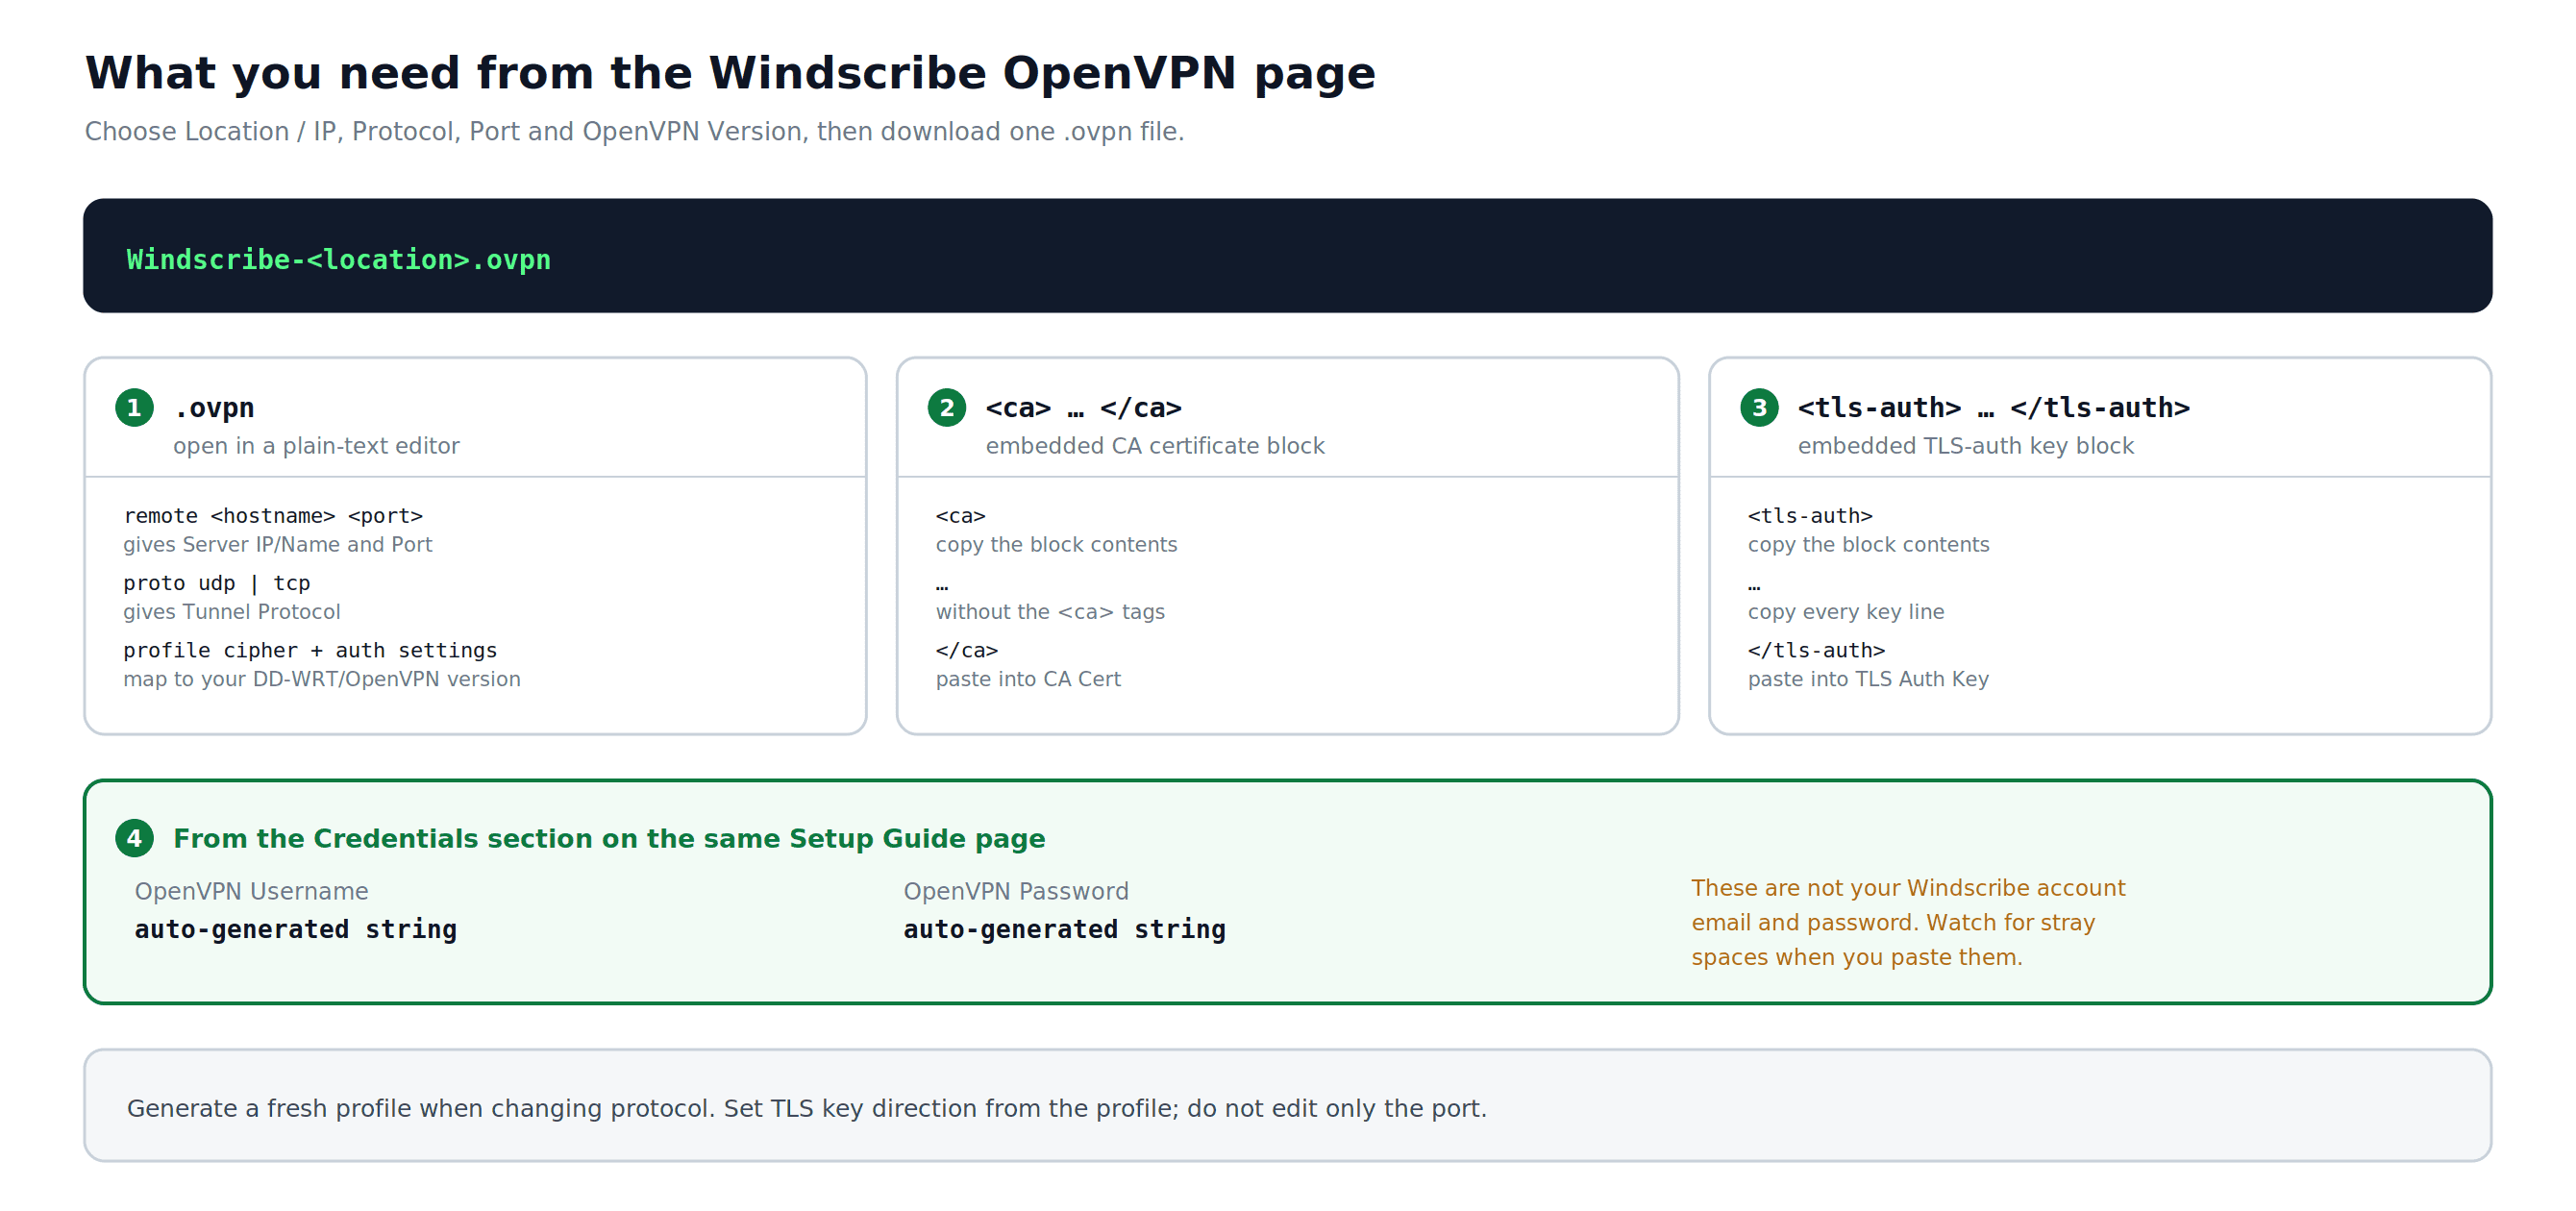
Figure 1: The current OpenVPN generator produces one profile, with credentials retrieved separately. The diagram shows which profile values and blocks DD-WRT needs.
Part 2: Configure the OpenVPN Client in DD-WRT
Step 1: Log in to the DD-WRT Admin Panel
- Open a browser on a device connected to your router.
- Go to http://192.168.1.1 (or your custom admin IP).
- Enter your DD-WRT admin username and password.
Step 2: Navigate to the OpenVPN Client Settings
- Click Services in the top navigation bar.
- Click the VPN tab.
- Scroll down to the OpenVPN Client section.
Step 3: Enable the OpenVPN Client
Before enabling: Go to Administration > Backup and save a copy of your current DD-WRT configuration. If the VPN setup breaks connectivity, you can restore this backup after resetting or regaining access to the router.
Set Start OpenVPN Client to Enable. Additional configuration fields will appear below.
Step 4: Enter the Core Settings
Use the values copied from your .ovpn file in Part 1, Step 3 and your OpenVPN credentials from Part 1, Step 4.
DD-WRT field names vary by build. Match conditional fields to your generated profile and exact router build. If a field is absent, do not invent an equivalent or copy a sample value from another profile.
- Server IP/Name: Exact hostname from the remote line in your .ovpn file
- Port: Exact port from the remote line in your .ovpn file
- Tunnel Device: Match the profile's
devdirective. Current Windscribe router profiles use a routed TUN device. - Tunnel Protocol: Protocol from the proto line in your .ovpn file, or the protocol selected in the Windscribe config generator (UDP or TCP)
- Encryption Cipher / Data Ciphers: Match
cipher,data-ciphers, and any fallback directive present in your profile. Do not assume one algorithm applies to every OpenVPN version. - Hash Algorithm: Match the profile's
authdirective. - User Pass Authentication: Enable
- Username: Your Windscribe OpenVPN username (from Part 1, Step 4)
- Password: Your Windscribe OpenVPN password (from Part 1, Step 4)
Older builds: If your DD-WRT build does not show Username and Password fields after enabling User Pass Authentication, use a DD-WRT build for your exact model/revision that includes OpenVPN username/password fields. Leaving authentication fields blank will prevent the connection from authenticating.
Step 5: Set Advanced Options
Set Advanced Options to Enable. This reveals the full set of configuration fields.
- TLS Cipher: Match any
tls-cipherortls-ciphersuitesdirective in your profile. Otherwise keep your DD-WRT build's default. - Compression: Match
compressorcomp-lzoonly when it appears in the generated profile. Otherwise keep compression disabled. - NAT: Enabled
- Firewall Protection: Enabled
- IP Address: Leave blank
- Subnet Mask: Leave blank
- Tunnel MTU Setting: Match
tun-mtuwhen the profile specifies it. Otherwise keep the build default and change it only for a tested path-MTU problem. - Tunnel UDP Fragment: Match
fragmentonly when present; otherwise leave blank. - Tunnel UDP MSS-Fix: Match
mssfixwhen present. Change it only for a tested MTU or fragmentation problem. - Certificate verification: Preserve
remote-cert-tls,verify-x509-name, or a legacyns-cert-typerequirement using the corresponding control or Additional Config field available in your build.
Step 6: Enter the Additional Config
Use Additional Config only for directives from your generated .ovpn that do not have a matching DD-WRT field:
- Copy only required profile directives that are not already represented by the fields above.
- Do not add
reneg-sec 432000; the current Windscribe generator intentionally removes that directive from downloaded profiles.
Do not paste complete sample blocks from screenshots or older guides. If you cannot map a directive safely, leave the field unchanged and verify it against your generated profile and exact DD-WRT build.
Step 7: Paste the CA Certificate
- In your
.ovpnfile, find the<ca>block. - Copy only the certificate contents between
<ca>and</ca>, including the complete-----BEGIN CERTIFICATE-----and-----END CERTIFICATE-----lines. - Paste the copied certificate into the CA Cert field in DD-WRT.
Step 8: Paste the TLS Auth Key
- In your
.ovpnfile, find the<tls-auth>block. - Copy the complete static-key contents between
<tls-auth>and</tls-auth>, including the actual header and footer lines from your file. - Paste the copied key into TLS Auth Key. Preserve
key-directionor the direction value from the<tls-auth>tag when your DD-WRT build exposes that control.
Step 9: Leave the Client Certificate Fields Blank
Leave Public Client Cert and Private Client Key empty unless your generated .ovpn contains <cert> or <key> blocks. Current username/password Windscribe profiles do not require per-client certificate fields.
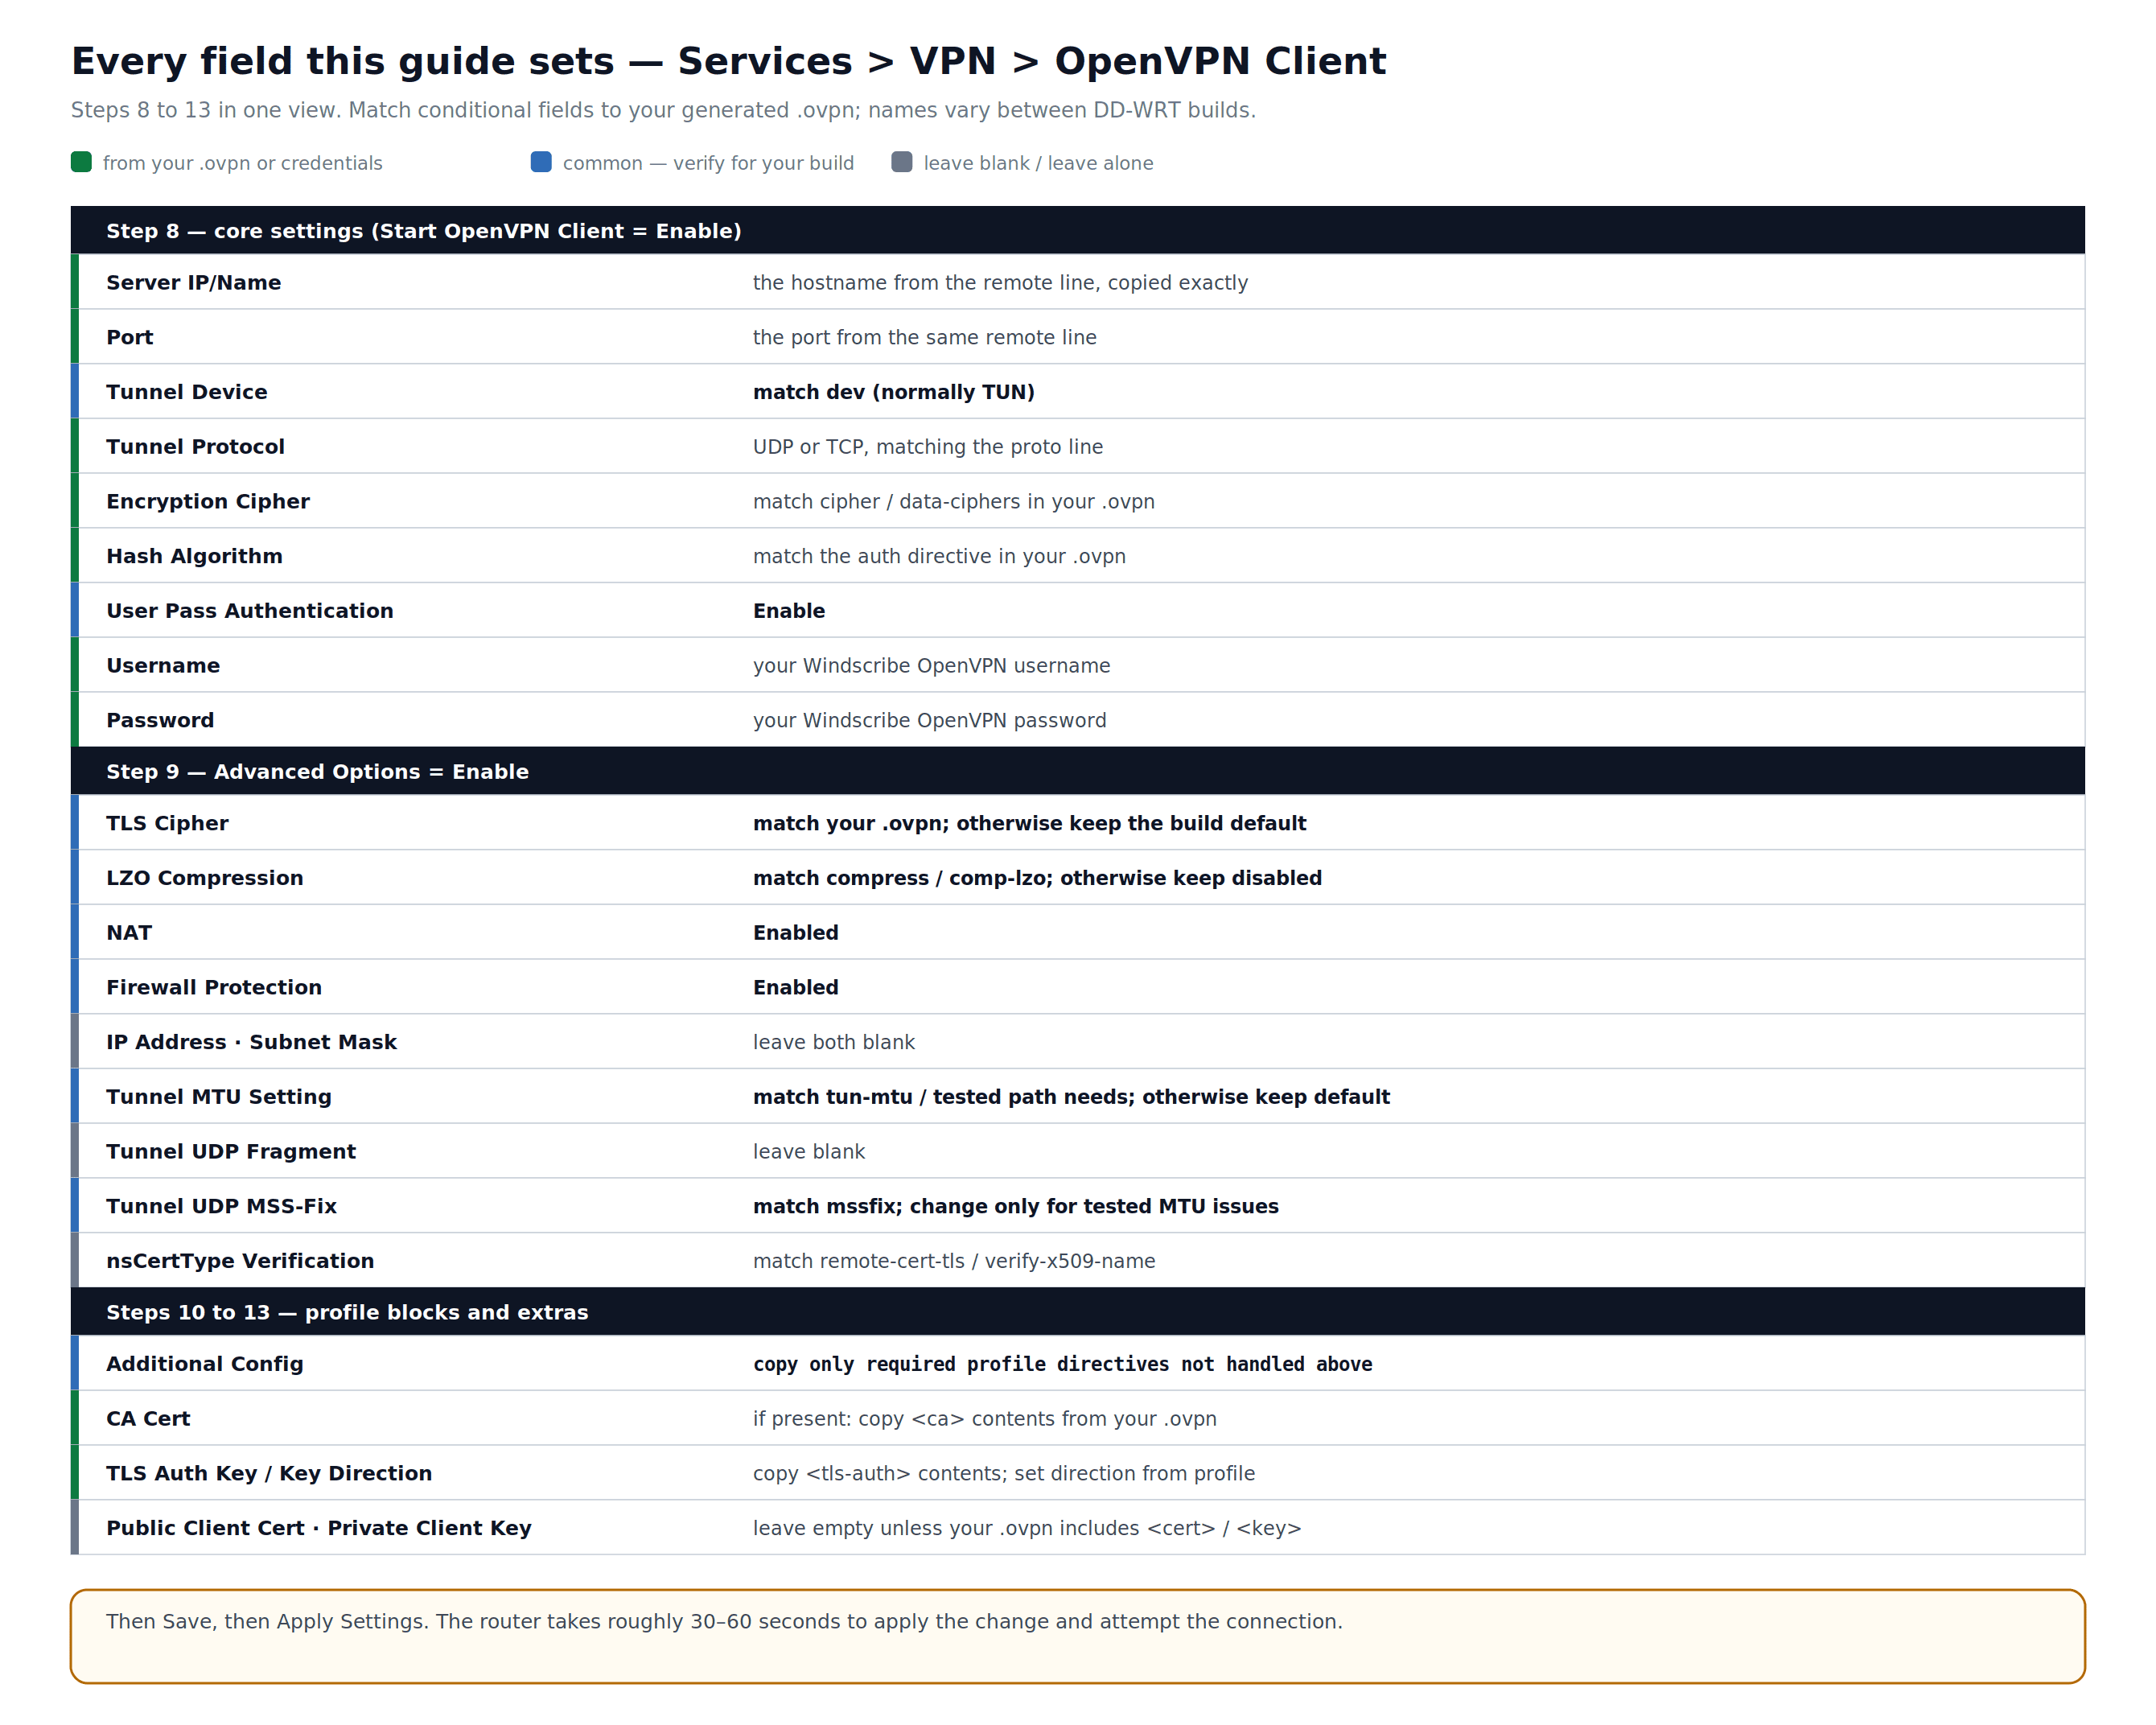
Figure 2: The OpenVPN Client fields used in this guide. Green values come from your profile or credentials; conditional fields must match your generated file and exact DD-WRT build.
Step 10: Apply the Settings
Click Save at the bottom of the page, then click Apply Settings. The router usually takes about 30–60 seconds to apply the changes and attempt to connect.
Part 3: Verify the Connection
Step 1: Check the VPN Status in DD-WRT
- In the DD-WRT admin panel, go to Status > OpenVPN.
- Check the State field:
- A successful connection typically shows CONNECTED SUCCESS (exact wording may vary by DD-WRT build).
- If still showing CONNECTING after two minutes, or cycling to RECONNECTING, see the Troubleshooting section.
- The Local IP field shows the tunnel IP address assigned by the Windscribe server.
Step 2: Confirm Your Public IP Has Changed
- On a device connected to this router, open Windscribe's IP checker or ipleak.net.
- Confirm the public IP is not your ISP address and is broadly consistent with the VPN region you selected. IP-geolocation databases can show a nearby city or stale location, so treat the provider and region as the useful signals.
- In the DNS section of the same test, check for unexpected resolvers. DNS verification is completed in Part 4, Step 1.
Part 4: Verify DNS & IPv6 Leak Protection
Manual VPN configurations do not automatically block all leak vectors. Complete both steps below before relying on this setup for privacy.
No kill switch: This guide does not add a router-level kill switch. Without separately tested fail-closed firewall and routing rules, a typical default-route DD-WRT setup can return traffic to the regular WAN when the OpenVPN tunnel drops. DNS settings alone do not prevent that fallback.
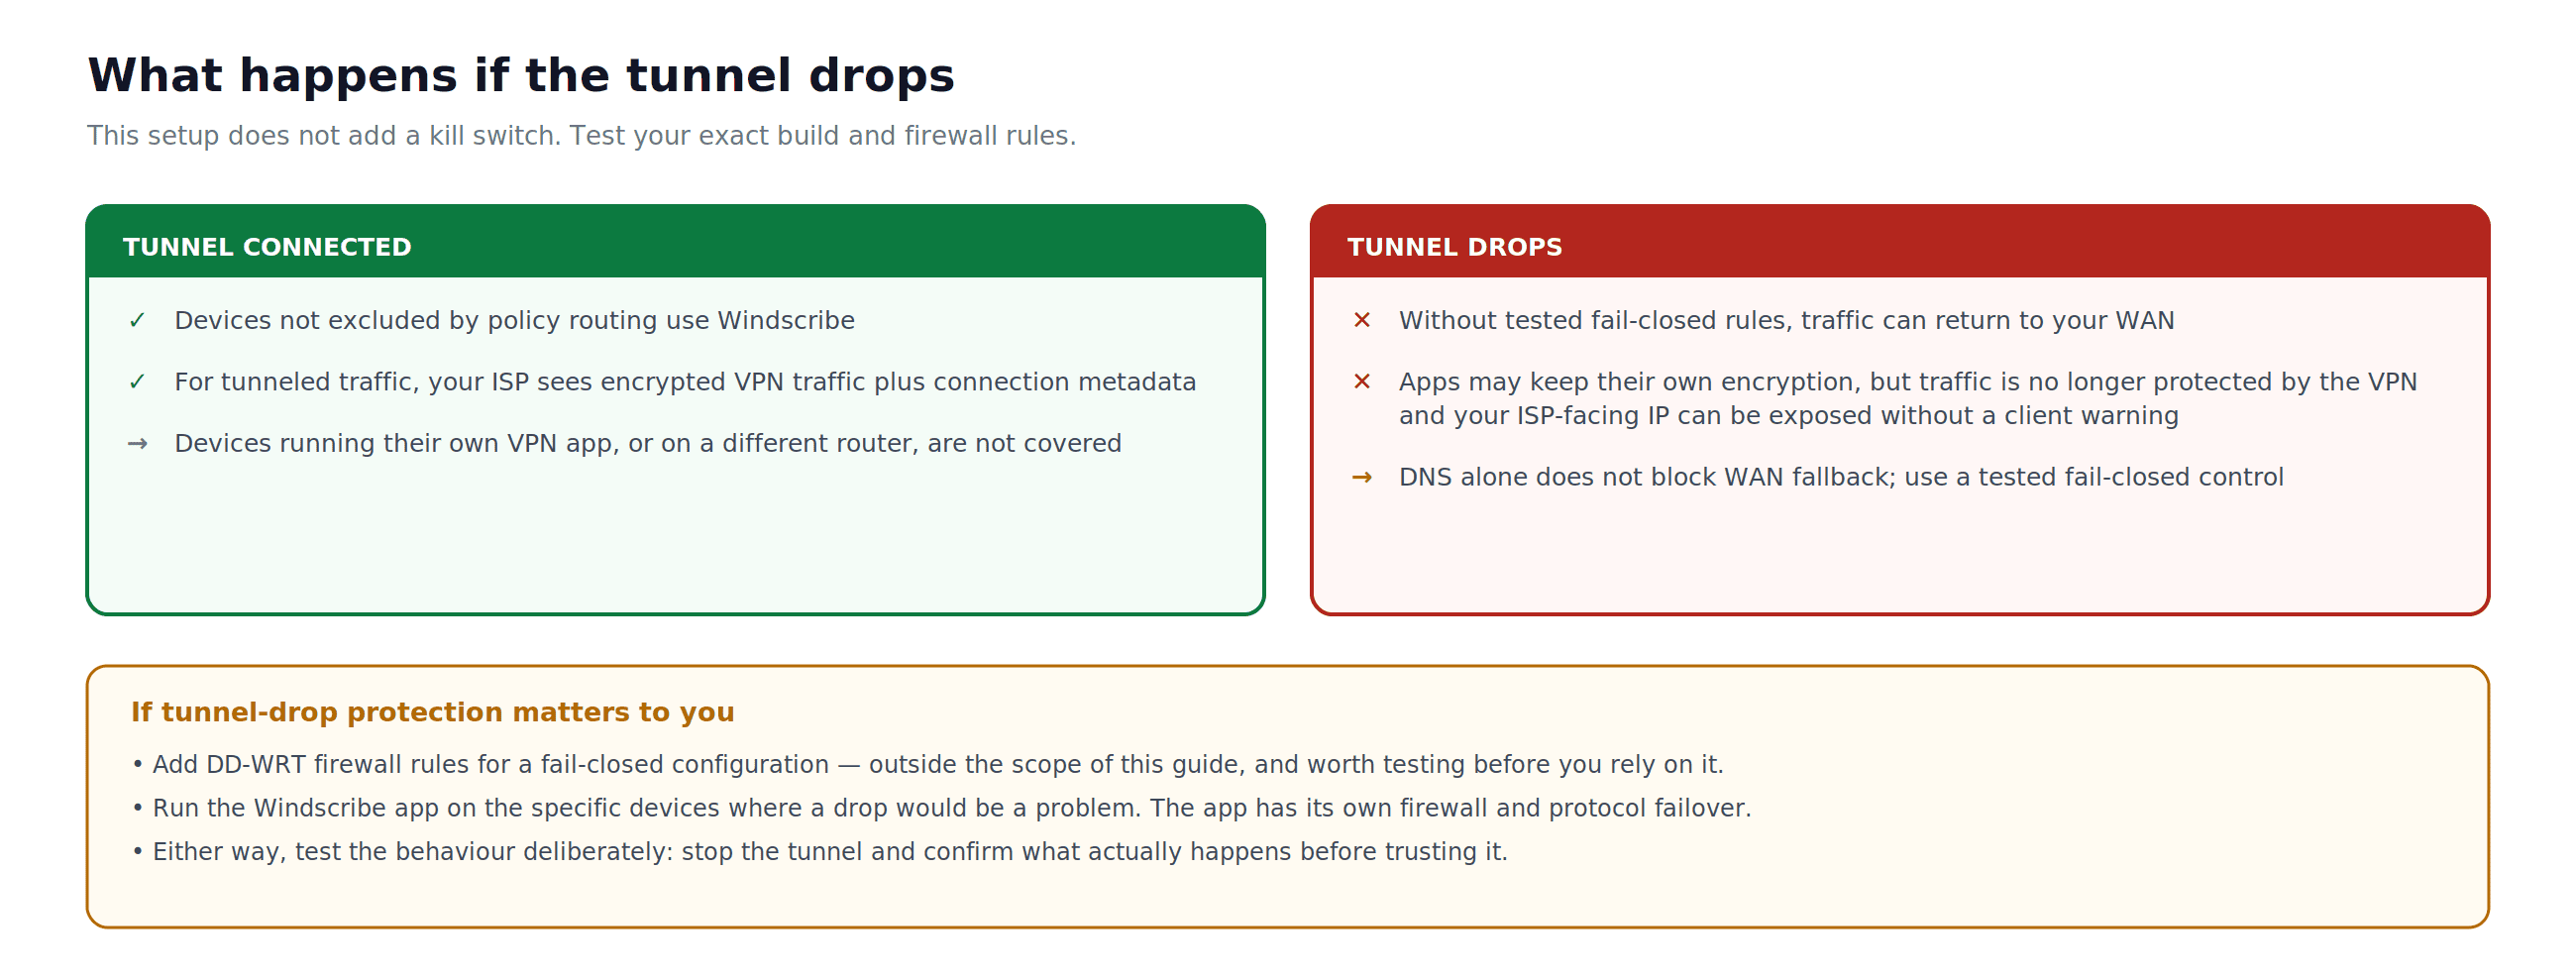
Figure 3: The tunnel-drop failure mode for this setup. Without separately tested fail-closed rules, traffic can return to the normal WAN and expose the ISP-facing IP.
Step 1: Test for DNS Leaks
- On a connected device, go to ipleak.net or dnsleaktest.com.
- Check for unexpected ISP resolvers. Resolver labels can be incomplete, browser secure DNS can bypass router DNS, and a resolver that is not owned by your ISP is not automatically the intended Windscribe path. Use this result together with the router settings and repeated tests.
If unexpected resolvers appear, do not rely on the setup until the DNS path is corrected and retested.
The current OpenVPN generator says some consumer routers do not accept server-pushed DNS. If that applies to your DD-WRT build, configure Windscribe DNS manually as follows. This reduces DNS leakage; it is not a traffic kill switch:
- In DD-WRT, go to Setup > Basic Setup.
- Under Network Setup, locate the Static DNS fields.
- Set the first Static DNS server to
10.255.255.1. This is an internal Windscribe address and works only while connected to Windscribe. - Set Use DNSMasq for DNS to Enable.
- Set DHCP-Authoritative to Enable only if this DD-WRT router is the primary DHCP server on your network.
- Click Save, then Apply Settings.
- Reconnect clients if needed, then retest at ipleak.net. Also check whether a browser or device is using its own secure-DNS setting.
Step 2: Disable IPv6 or Confirm There Is No IPv6 Leak
Treat this OpenVPN router setup as IPv4-only unless you have explicitly verified that your generated profile and DD-WRT build route IPv6 through the tunnel. Windscribe's automatic IPv6 handling in the official apps does not configure DD-WRT for you.
- In DD-WRT, go to Setup > IPv6. The menu name may vary by build.
- Set IPv6 to Disable when this profile is IPv4-only.
- Click Save, then Apply Settings. Reconnect client devices so stale IPv6 configuration is cleared.
- Go to ipleak.net and confirm the tested client has no globally routable ISP IPv6 address. A link-local address such as
fe80::/10is not internet-routable.
If you require IPv6, do not rely on this setup until you have verified the generated IPv6 route, DNS path, and tunnel-drop behavior on your exact DD-WRT build.
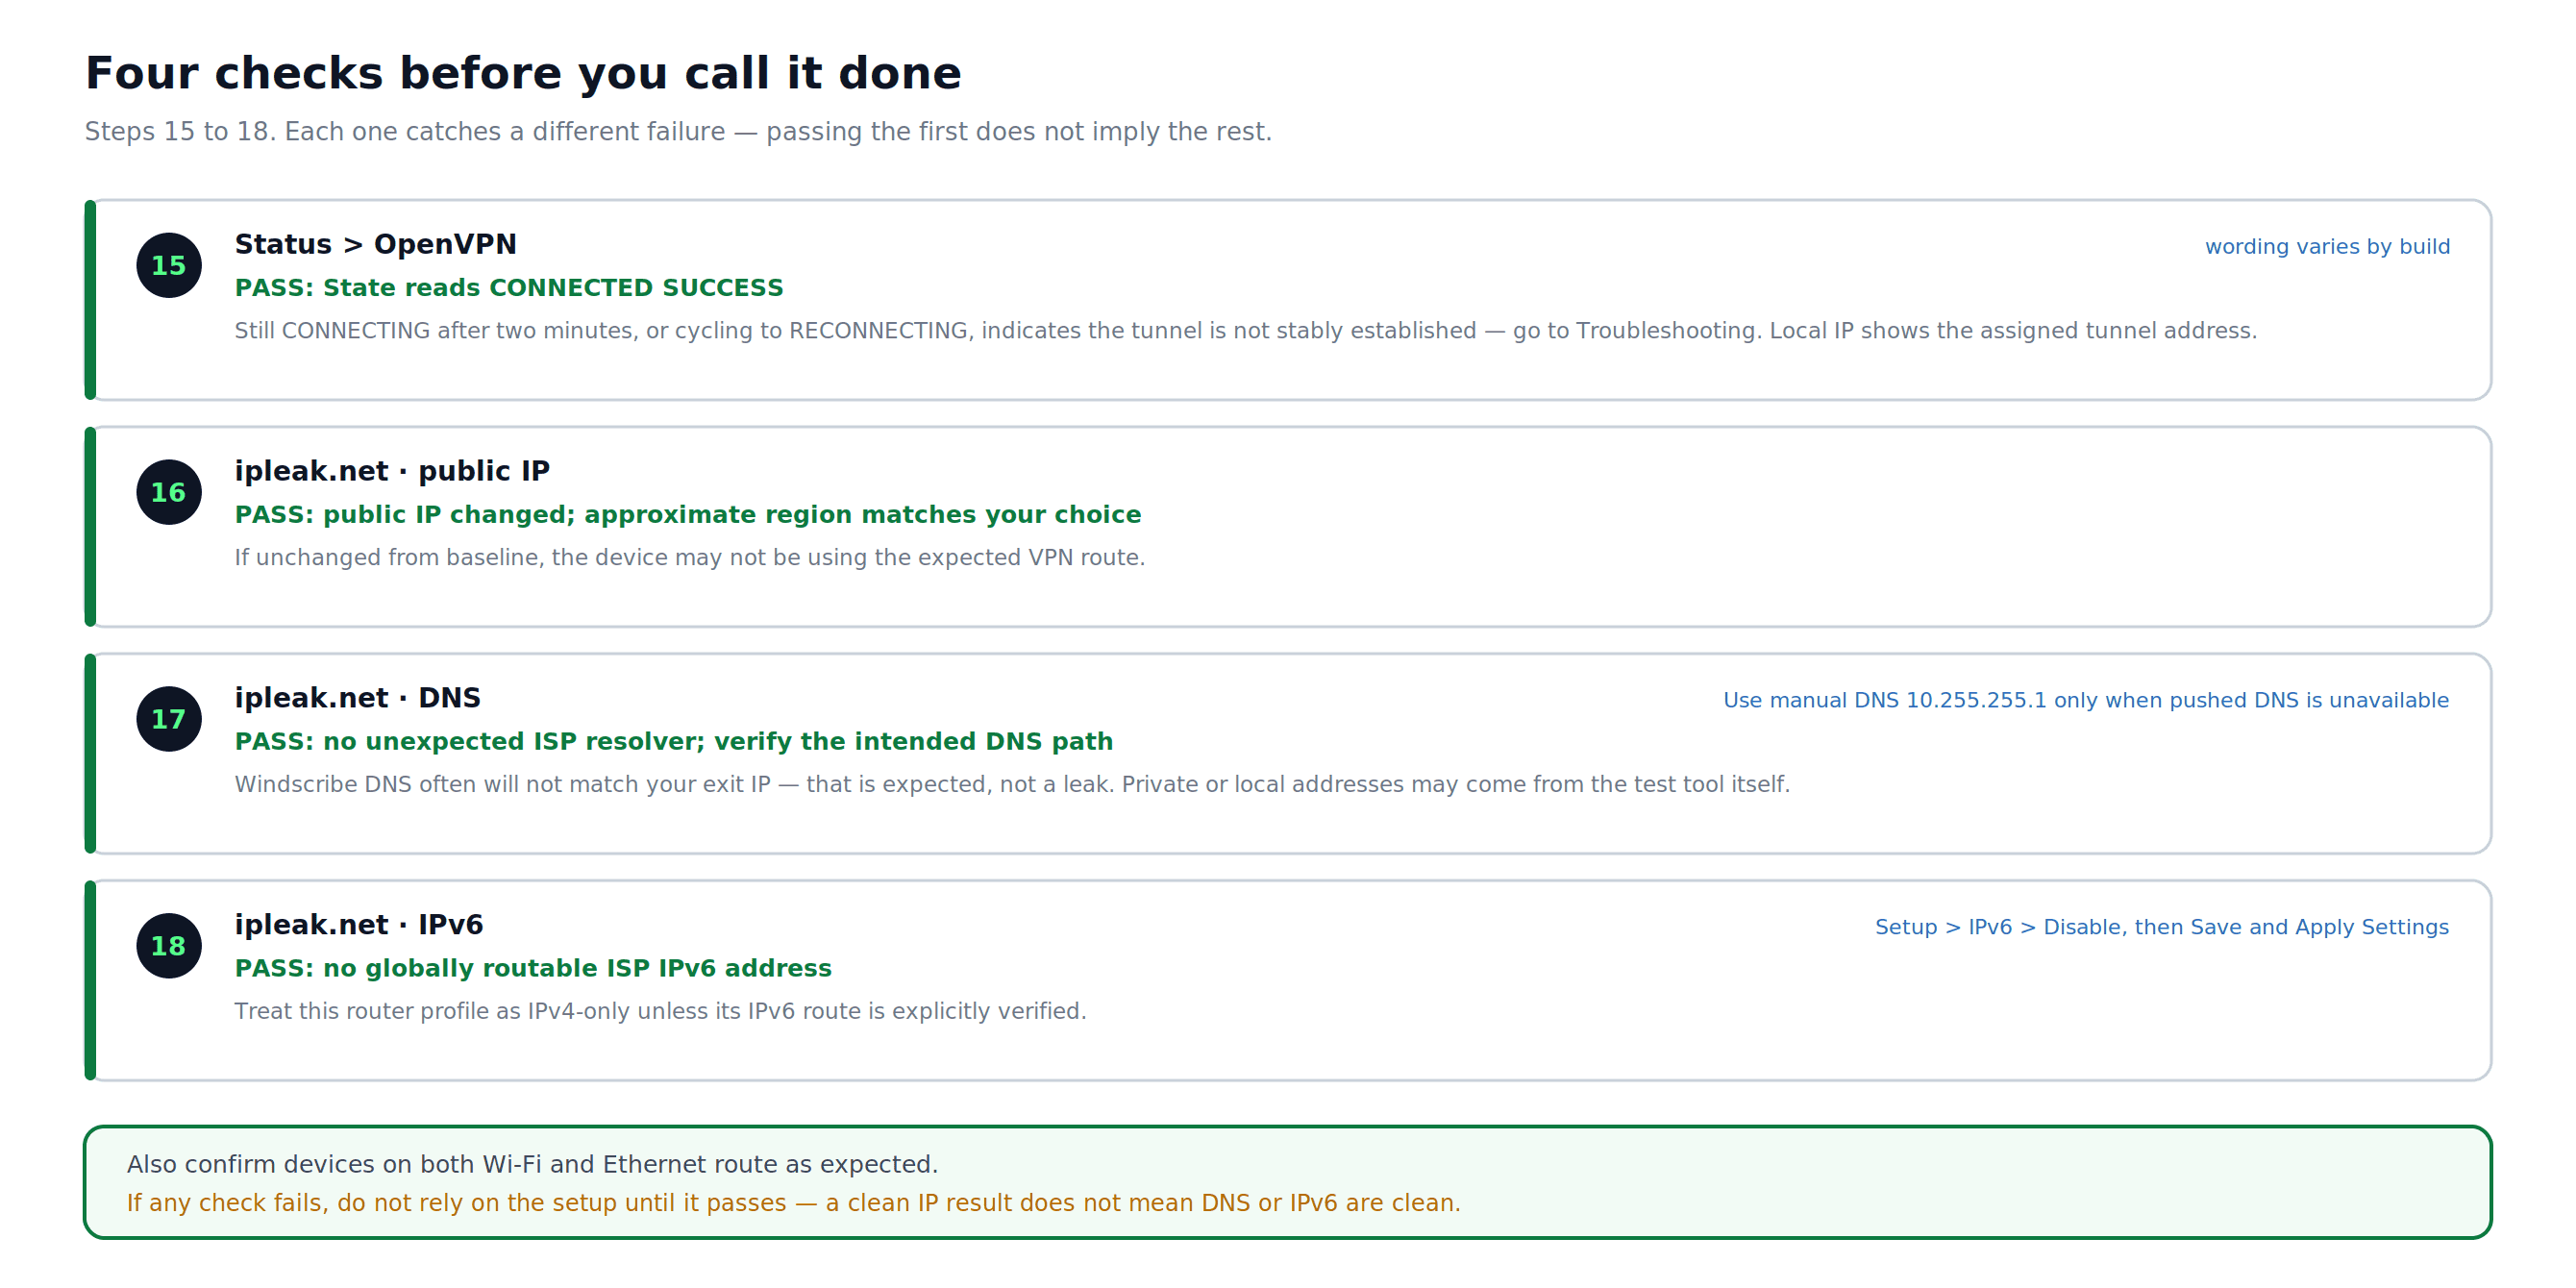
Figure 4: Four independent checks for tunnel status, public IP, DNS, and IPv6. Passing one does not prove the others are safe.
Setup Completion Checklist
- OpenVPN status shows CONNECTED SUCCESS or the equivalent success state for your build.
- The tested client's public IP is not its ISP address and is broadly consistent with the selected VPN region.
- DNS testing shows no unexpected ISP resolver and the intended DNS path is verified.
- The tested client has no globally routable ISP IPv6 address for this IPv4-only setup.
- Devices on Wi-Fi, Ethernet, guest networks, VLANs, and policy-routed segments you intend to protect route as expected.
If the connection and leak checks pass, deliberately stop the tunnel and confirm the expected fail-closed or WAN-fallback behavior before relying on the setup.
Switching Server Locations
- Return to the OpenVPN Config Generator and generate a fresh
.ovpnprofile for the target location. - Open the new profile and note its
remote,proto, cipher/auth, certificate-verification,<ca>, and<tls-auth>values. - In DD-WRT, go to Services > VPN > OpenVPN Client.
- Update every changed field and block in DD-WRT. Do not change only Server IP/Name, Port, and Tunnel Protocol if the new profile differs elsewhere.
- Click Save, then Apply Settings.
Troubleshooting
VPN state shows "CONNECTING" or "RECONNECTING"
- Confirm the server hostname and port in DD-WRT match the remote line in your .ovpn file exactly, and the Tunnel Protocol matches the proto line.
- Confirm the complete contents of the
<ca>and<tls-auth>blocks were copied without missing lines. Preserve the TLS key direction. - If UDP is blocked, generate a fresh TCP profile from the OpenVPN Config Generator and remap all changed values.
- Confirm the router date and time are correct under Setup > Basic Setup or Status > Router. An incorrect clock causes OpenVPN certificate validation to fail.
VPN connects but traffic is not tunneled
- Confirm NAT is set to Enabled in the Advanced Options (Part 2, Step 5).
- Confirm Firewall Protection is set to Enabled.
- Confirm Tunnel Device is set to TUN, not TAP.
- If your DD-WRT build has a policy-based routing section, confirm no rules exclude the test device or bypass the VPN tunnel.
Credentials rejected
- Your Windscribe OpenVPN credentials are separate from your account login. Return to the OpenVPN Config Generator, use Step 2, and copy them exactly as shown.
DNS leak test still shows ISP resolvers
- Go to Services > Services in DD-WRT and confirm DNSMasq is set to Enable.
- Set Use DNSMasq for DNS to Enable.
- If this router does not accept server-pushed DNS, set the intended router DNS to
10.255.255.1. Do not treat this DNS setting as a kill switch. - Click Save, then Apply Settings, reconnect clients if needed, and retest at ipleak.net.
WireGuard: A Performance Alternative
If your DD-WRT build supports WireGuard, it can perform better on lower-power routers than OpenVPN. Look for Setup > Tunnels. If it is absent, your build does not include WireGuard. For setup instructions, use Windscribe's recommended DD-WRT WireGuard guide.
Frequently Asked Questions
Do I need a paid plan to use Windscribe on a router?
Yes. Manual router profiles require a Pro or Build-A-Plan subscription. Build-A-Plan can generate profiles only for locations included in the plan; the Free plan does not include the OpenVPN config generator.
Does this setup protect every device on my network?
It covers devices that use this router as their internet gateway while the OpenVPN tunnel is active, unless another router, VPN app, guest network, VLAN, or policy-based routing rule sends them elsewhere. Without tested fail-closed rules, traffic can return to the regular WAN if the tunnel drops.
Do the official Windscribe apps work the same way?
No. The official apps include the Windscribe Firewall, automatic protocol failover, and automatic IPv6 handling. A manual router profile does not configure those app features. R.O.B.E.R.T. filtering depends on the account and the router actually using Windscribe DNS; verify the DNS path instead of assuming it.
What happens if the VPN tunnel drops?
Without separately tested fail-closed firewall and routing rules, a typical default-route DD-WRT setup can return traffic to the regular WAN. Application traffic may still use HTTPS or other encryption, but it is no longer protected by the VPN tunnel and the ISP-facing IP can be exposed.
Does this DD-WRT OpenVPN setup support IPv6 through the VPN?
Treat it as IPv4-only unless the generated profile and your exact DD-WRT build explicitly route IPv6 through the tunnel and pass IPv6, DNS, and tunnel-drop tests. Otherwise disable IPv6 as described in Part 4, Step 2.
Can I use a Static IP with this setup?
Yes. In the OpenVPN Config Generator, select your Static IP under Location / IP. If prompted, select the correct Static IP device before retrieving credentials.
My speeds are noticeably slower with the VPN on. Normal?
On routers with older or lower-power CPUs, yes. OpenVPN encryption is CPU-intensive. If your DD-WRT build supports WireGuard, that protocol is significantly lighter on hardware.
Can I switch server locations without redoing the whole setup?
Yes, but generate a fresh .ovpn profile and compare every relevant value and embedded block. Do not assume that changing only the hostname, port, and protocol is sufficient.
Get Windscribe
Manual router profiles require a Pro or Build-A-Plan subscription. Build-A-Plan can generate profiles only for locations included in the plan.
Already set up and something is still broken? The Windscribe community on Reddit and Discord have seen just about every router configuration problem that exists.