

How To Use Windscribe With Deluge


Here is the plain-English, beginner-friendly way to set up Deluge with Windscribe so your downloads stay yours, plus a quick test to confirm it actually worked.
Introduction and Scope
Running Deluge over a plain ISP connection means every other person in a torrent swarm can see your real IP address, and your ISP can see the torrent-related traffic and metadata coming off your connection. Internet providers treat your browsing habits as inventory to be logged, shaped, and occasionally sold, so handing them a live feed of your P2P activity is not the move.
Crucial warning before you begin
This guide is written specifically for Deluge. The steps below, interface binding and the startup sequence, are tuned exactly to how Deluge handles its network connection. Do not copy these exact settings into your web browser, your email client, or some other torrent app and expect them to behave the same way. In the best case they will do nothing. In the worst case you will break that app's connection or create a leak while believing you are protected.
The Firewall Rule vs. the Kill Switch
You will see the words "kill switch" thrown around by every VPN on earth. Windscribe ships something it calls the Firewall, and the difference is worth thirty seconds of your attention.
- Standard kill switch: think of a standard kill switch as a security guard who only reacts after someone has already walked through the door. Traffic leaks out, the guard notices the VPN dropped, and then he slams the door shut. Better than nothing, but the leak already happened.
- Windscribe Firewall: the Windscribe Firewall works the other way around. It is a guard who keeps every door locked by default and only opens the one door that leads into the VPN tunnel. Traffic that is not going through Windscribe simply has nowhere to go.
Nothing leaks out while the system scrambles to react, because there is no reactive scramble: anything outside the tunnel is blocked before it can move. For torrenting, where a single exposed moment can put your real IP in front of a swarm, "blocked by default" beats "dropped after the fact."
Step-by-Step Configuration Guide
The goal here is to tie Deluge to your Windscribe connection so that it refuses to send or receive anything unless the VPN tunnel is up. This is called interface binding. In plain terms, you are telling Deluge: "You are only allowed to use this one specific door (the VPN), and if that door is closed, you sit still and do nothing."
Pre-Requisites
Make sure the Windscribe desktop app is installed and you are signed in. Interface binding is your second layer of protection. The Firewall (the next section) is the first, and it does most of the heavy lifting.
Configuration Steps
- Connect to P2P: open the Windscribe desktop app and connect to a location that allows P2P. Locations that do not allow torrenting are marked with a crossed-out "P2P" label, so pick anything without that mark.
- Optimize protocol: for best speed and security, open the app's Preferences, open Network Options, select your current network, turn on Preferred Protocol, and choose WireGuard or OpenVPN.
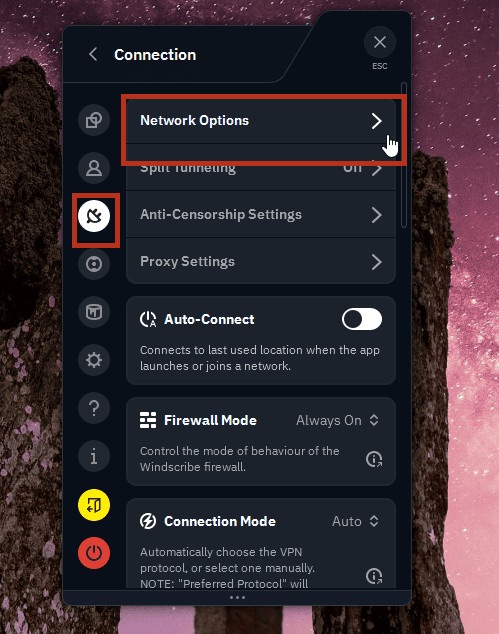
Open Network Options in the Windscribe app
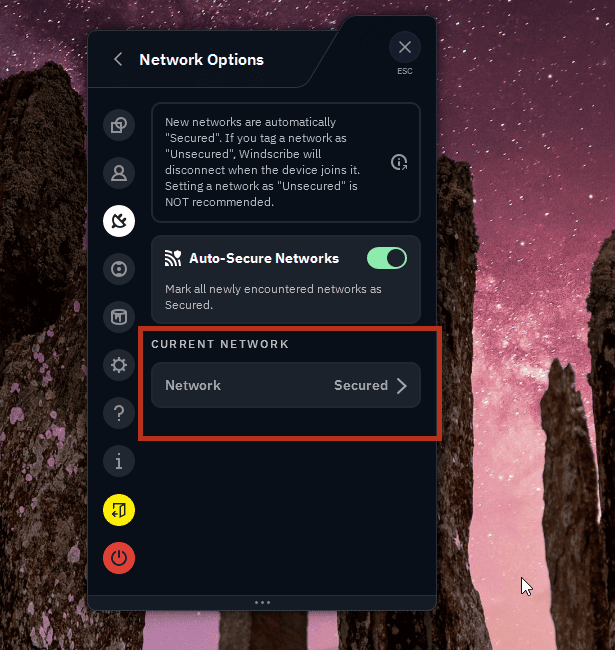
Select your current network
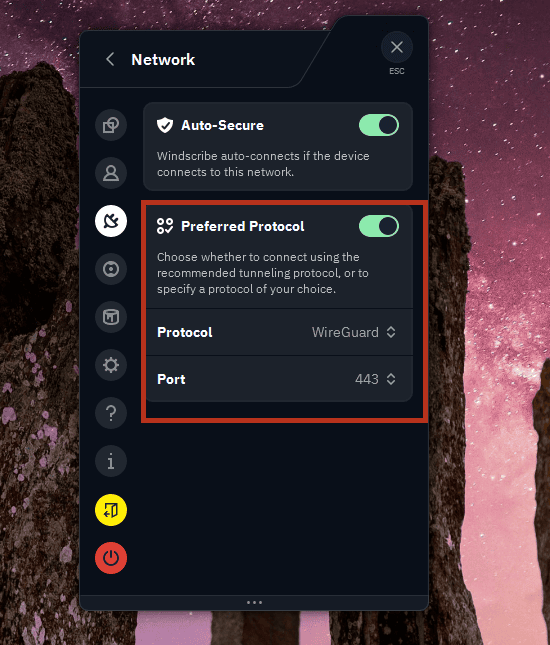
Set Preferred Protocol to WireGuard
- Find your network details: while connected, find the Windscribe VPN adapter/interface and its local VPN address.
- Windows: you can see this in Settings > Network & Internet (open the Windscribe/WireGuard adapter's details).
- macOS: go to System Settings > Network.
- Note down both the adapter/interface name and its local VPN address, since you may need to try either one in a later step.
- Access Deluge settings: open Deluge. Go to Edit > Preferences. Click the Network tab on the left.
- Bind the outgoing interface: find the Outgoing Interface field. This is the critical field for preventing Deluge from reaching out over the wrong route. Deluge accepts either an IP address or a network interface name here, but the best value can vary by operating system and VPN protocol. Start with the Windscribe interface/adapter name if it is clearly available. If Deluge does not transfer at all after you restart it, try the adapter's local VPN IP address instead.
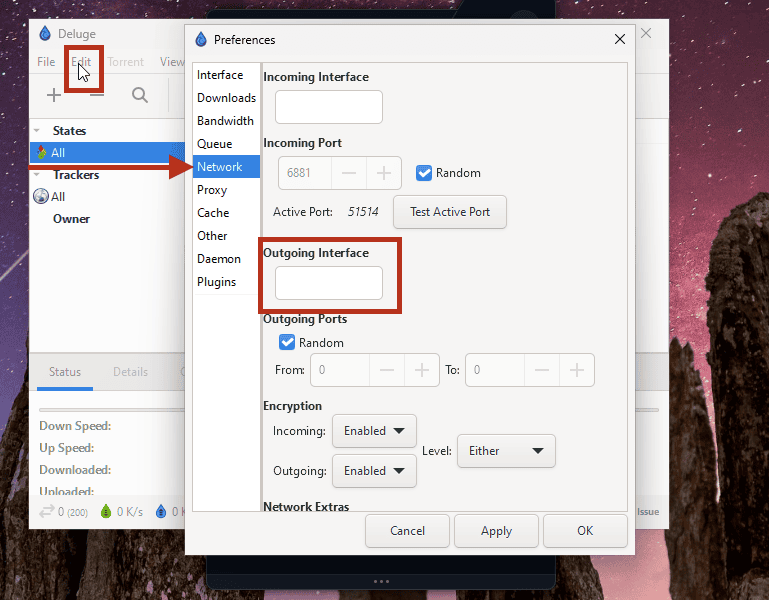
Deluge's Network preferences: locating the Outgoing Interface field
Avoid wildcards: do not use a wildcard IP such as 10.5.3.* unless Deluge officially documents support for that in the version you are using. And if you bind by IP and your VPN address changes after reconnecting, switching protocol, or changing location, come back and recheck this field.
- Bind the incoming interface (optional): set the Incoming Interface field (sometimes shown as "Incoming Address") to the same value you confirmed working in the previous step. That field governs the connections peers make to you. The Outgoing Interface is the one that matters most for keeping Deluge on the tunnel.
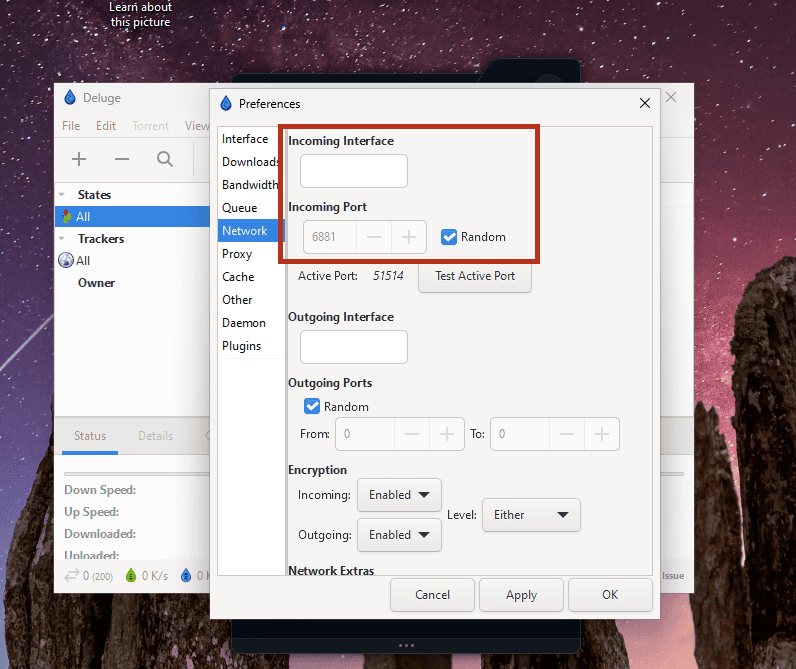
Deluge's Network preferences: locating the Incoming Interface field
- Save and restart: click Apply, then OK, and restart Deluge so the change takes full effect.
From now on, if the VPN is not connected, Deluge has no valid door to reach out through and its transfers will stall instead of quietly falling back to your bare ISP connection.
Linux, FreeBSD, or advanced split-tunnel users: this GUI binding is the simple route, and it is mainly aimed at Windows and Mac users running the Windscribe app. If you would rather route traffic at the operating-system level, Deluge maintains its own VPN guide with more advanced operating-system-level routing approaches at deluge-torrent.org/userguide/vpn.
The Safe Execution Sequence
Interface binding and the Firewall are powerful, but they only work if you run things in the right order. Treat this as a loop you repeat every single time. The whole point is to never leave a gap where Deluge is awake but the tunnel is not.
Starting Up
- Open the Windscribe app and set the Firewall to Always On. (Preferences > Connection > Firewall Mode > Always On.)
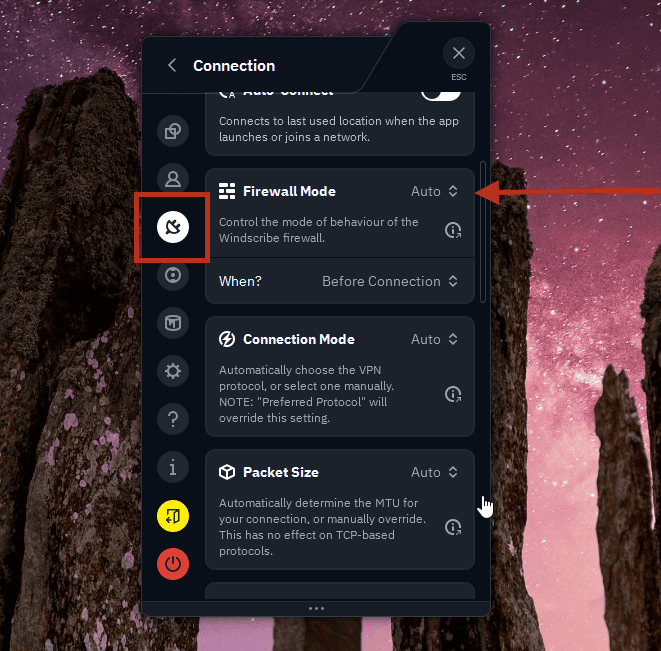
Firewall Mode set to Auto (default)
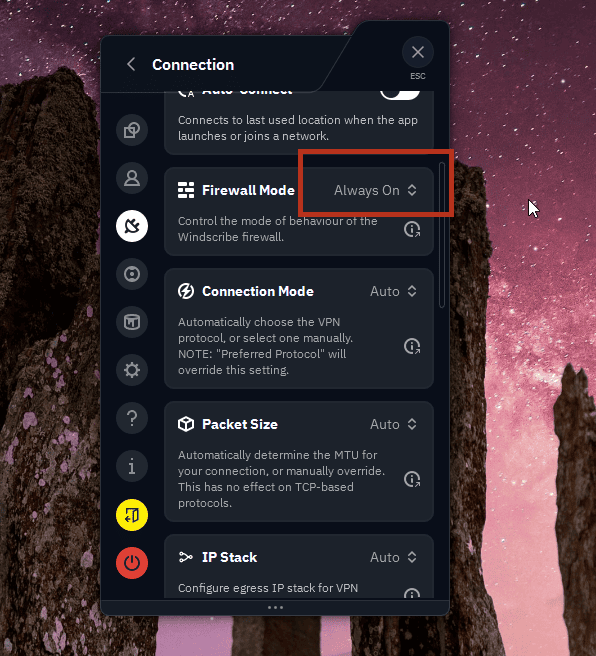
Firewall Mode set to Always On (what you want)
- Connect to your chosen P2P location and wait until it shows a successful connection.
- Only then open Deluge and start your transfers.
Shutting Down
- Fully quit Deluge first. Closing it to the system tray does not count, so exit it completely.
- Then disconnect the Windscribe VPN.
The rule to memorize: the VPN is the first thing on and the last thing off. Deluge never gets to be awake while the tunnel is down. Do it in this order and there is no window for a leak.
Verifying the Secure Connection
You do not have to trust that any of this worked. You can check it in under a minute using a torrent IP-check tool (sites built for exactly this will give you a small "magnet" link to add to your client).
- With the VPN connected and Deluge running, add the check tool's tracking magnet or torrent to Deluge.
- The tool reports back the public IP address that your torrent client is actually announcing to the swarm.
- Confirm the result: verify that the reported IP belongs to Windscribe or its hosting provider, and not your ISP. If it shows your real home or ISP address instead, stop torrenting immediately: something in the binding or the sequence is off, and you should recheck the Configuration and Safe Execution Sequence sections before continuing.
A Quick Note on R.O.B.E.R.T.
R.O.B.E.R.T. is Windscribe's built-in blocker that stops ads, malware, and web trackers at the DNS level (DNS is essentially the internet's address book that turns names into numbers). By default, the trackers it targets are advertising and analytics trackers, not the BitTorrent trackers that help Deluge find peers, so it usually leaves your torrents alone.
The catch is custom rules. If you have added your own block rules to R.O.B.E.R.T. and Deluge suddenly cannot find any peers or your trackers will not resolve, check the settings in your Windscribe account (My Account → Security → Custom Rules) and confirm a custom rule is not accidentally blocking the domain your tracker lives on. Add an Allow rule for it there and the connection should come back.
Frequently Asked Questions
Why can't I just paste my main Windscribe account password into a proxy setting?


Would a SOCKS5 proxy encrypt my traffic the way the desktop app does?
What happens to my downloads if the Windscribe app crashes mid-torrent?
Get Started
You can try Windscribe's general service for free, which gives you 10GB of data a month to test out the app and see how you like it.
For Deluge specifically, you will need a paid plan, as P2P only works on Windscribe's P2P-enabled locations (the ones without the crossed-out "P2P" mark). Full Pro lets you use any of those allowed P2P locations with unlimited, uncapped data. Build-a-Plan users can torrent only on the locations included in their plan. Either way, the free locations have P2P switched off, so a paid plan is the requirement for torrenting.
One last thing, because it matters: only download or share files you actually have the rights to use. A VPN protects your privacy, it does not change the law. Using Windscribe to get around copyright or to infringe on someone else's work is against Windscribe's Terms of Service and is not what this setup is for.