

How To Use Windscribe With qBittorrent


Here is the plain-English, beginner-friendly way to set up qBittorrent with Windscribe so your downloads stay yours, plus a quick test to confirm it actually worked.
Introduction and Scope
Every time you load a torrent on a plain ISP connection, you are quietly handing your real IP address to every other peer in the swarm. Meanwhile, your internet provider can see enough connection metadata to make the whole thing far less private than you probably want. A VPN helps prevent this by routing that traffic through one of our locations, so the swarm sees our IP instead of yours, but only when the client is configured correctly.
One quick, important note
BitTorrent itself is perfectly legal technology. This guide assumes you are only downloading and sharing files you actually have the right to use. What you move through it is on you.
A firm word before you change a single setting: this guide is written for qBittorrent and qBittorrent only. The network interface binding described below is specific to how this client handles its connections. Apply the same idea blindly to a browser, a game launcher, or another torrent app and you can break that app's connection or, worse, create a leak that defeats the reason you set up a VPN in the first place.
The Firewall Rule vs. the Kill Switch
Most VPNs ship with a "kill switch." It watches your connection and, the moment it detects that the VPN has dropped, it cuts your internet to stop your real IP from getting out. The catch is timing: a reactive kill switch can leave a brief window between the tunnel failing and the switch cutting in. On a busy torrent connection, that window can be enough to matter.
Windscribe's Firewall is built the other way around. Set to Always On, it blocks every connection that is not travelling through the VPN tunnel by design, so there is no fallback route for your traffic to slip down in the first place.
- The smoke detector (kill switch): handy, but it acts in response to something that has already begun.
- The sealed door (Windscribe Firewall): the only way out of the room is the one approved exit. For torrenting, where you are connected to hundreds of strangers at once, that difference is worth understanding.
You will switch this on in a moment, under Preferences > Connection > Firewall Mode > Always On.
Step-by-Step Configuration Guide
There is one clean, beginner-friendly way to lock qBittorrent to your VPN: bind it to the Windscribe network interface.
"Interface binding" sounds technical, but the idea is simple. You are telling qBittorrent it is only allowed to use one specific door to reach the internet (the VPN connection). If that door is closed because the VPN is off, qBittorrent just sits there doing nothing, instead of quietly falling back to your real connection.
- Connect the Windscribe desktop app to a P2P-enabled location first. The interface will not appear in qBittorrent's list until you are connected.
- Open qBittorrent. Go to Tools > Options (on macOS, this lives under the qBittorrent menu rather than Tools).
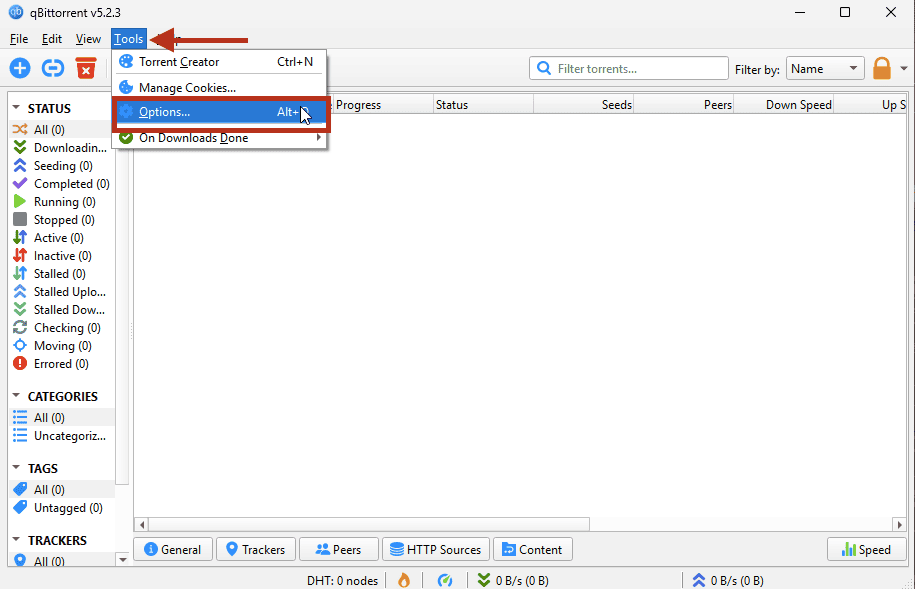
Selecting Tools > Options in qBittorrent - In the left sidebar, click Advanced.
- Find the dropdown labelled Network Interface.
- Select the Windscribe adapter. Its exact name depends on your system (it often shows as "Windscribe," "Wintun," a "utun" entry on Mac, or a "wg" / "tun" entry on Linux). If you are unsure which is which, the Windscribe adapter is the one that only appears while the VPN is connected.
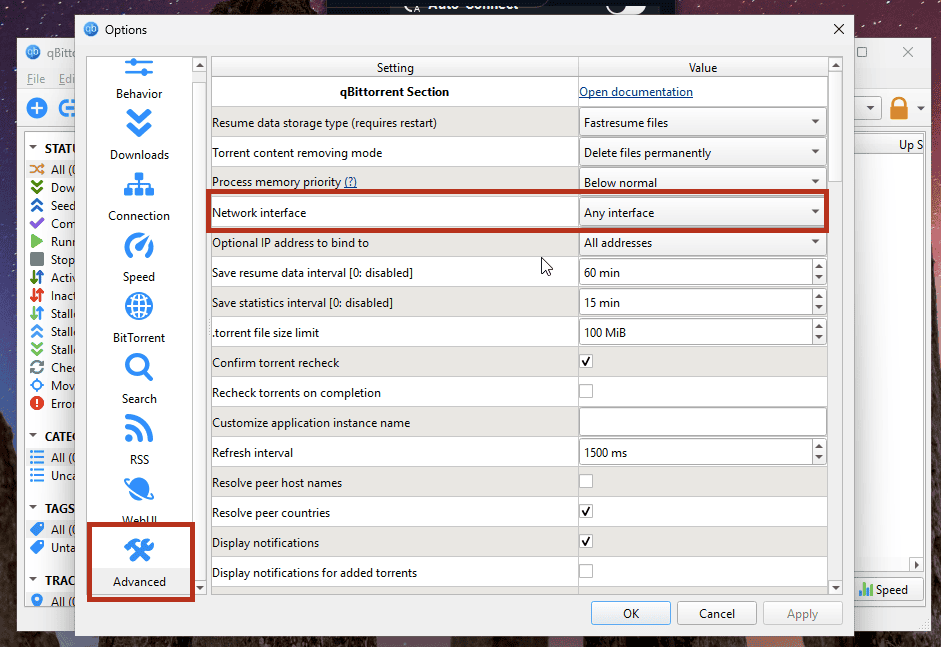
Advanced tab: locate Network Interface before selecting the Windscribe adapter - Leave Optional IP address to bind to set to All addresses.
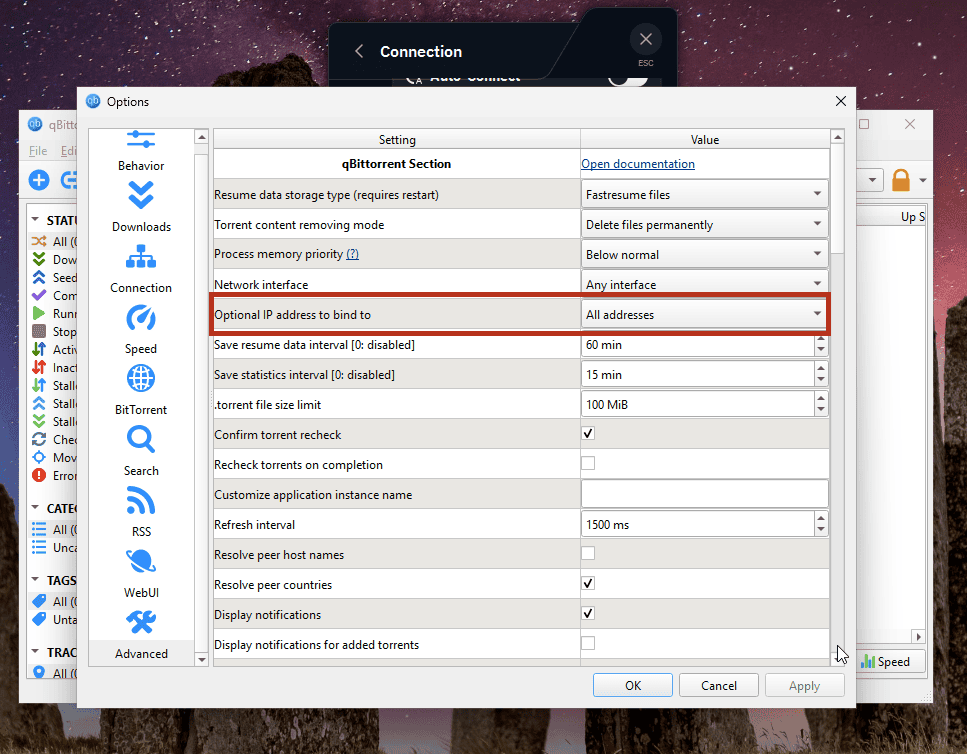
Optional IP address to bind to, left set to All addresses - Click OK, then fully restart qBittorrent so the change takes hold.
From now on, if the VPN is not connected, qBittorrent will refuse to move any data. That is exactly what you want.
Advanced note (optional, skip this if you are new): qBittorrent also lets you bind to a single specific IP address rather than the whole interface. It sounds stricter, but it tends to backfire. Your tunnel's IP address can change when you reconnect, switch protocol, or change location, and a hardcoded IP will simply stop working the moment it does. Binding to the interface by name (the step above) avoids that headache entirely.
The Safe Execution Sequence
Configuration is only half the job. The order in which you start and stop things is what keeps the setup tight. Run this loop every time, in this order:
- Firewall on: open the Windscribe app, go to Preferences > Connection > Firewall Mode, and set it to Always On.
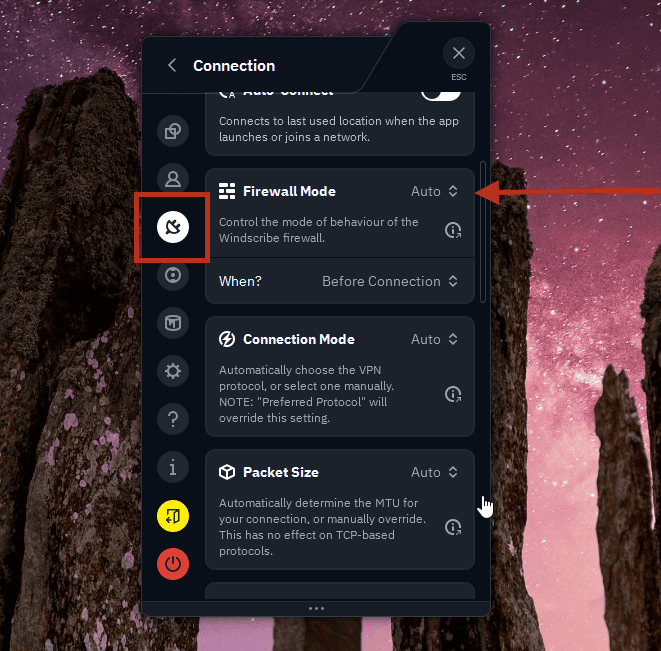
Firewall Mode set to Auto (default)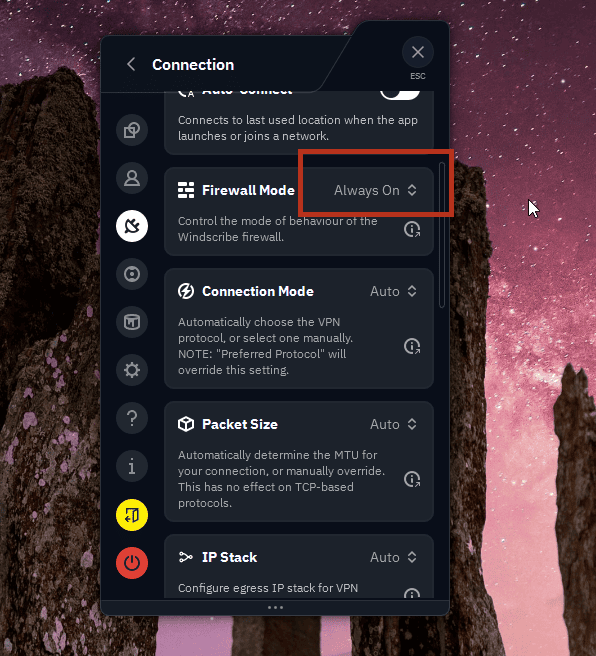
Firewall Mode set to Always On (what you want) - Connect: connect to a P2P-enabled location and wait until the app clearly shows the CONNECTED status. Do not rush this step. Opening qBittorrent before the tunnel is up is the most common way people leak their real IP.
- Open the client: now, and only now, launch qBittorrent and start your downloads.
- Close the client: when you are finished, remove completed torrents you no longer wish to seed (right-click the torrent > Delete/Remove), then fully exit qBittorrent via File > Exit. Check your system tray to confirm it has actually closed and is not just minimized.
- Disconnect: with qBittorrent completely shut down, you can disconnect the VPN and set the Firewall back to Automatic or Manual if you want normal internet again.
The one rule to remember: the torrent client opens after the VPN and closes before it.
Verifying the Secure Connection
Here is the step most people skip, and it takes about thirty seconds. A normal "what is my IP" website only checks your browser, not qBittorrent, so it tells you nothing about whether your torrents are actually routed through the VPN. You need a check that the torrent client itself answers.
- While connected, note your Windscribe location's public IP. The Windscribe app shows it on the main screen.
- In your browser, go to ipleak.net and scroll down to the section called Torrent Address detection.
- Click the button to activate the test. It generates a special magnet link.
- Copy that magnet link, switch to qBittorrent, and add it via File > Add Torrent Link (paste it in).
- Wait a few seconds, then look back at the test page. It will display the IP address your torrent client is announcing to the swarm.
The test should show your Windscribe location's IP, not your home IP. If it shows your real address instead, stop torrenting and recheck your interface binding.
A Quick Note on R.O.B.E.R.T.
If qBittorrent connects to peers fine but your trackers refuse to resolve (you see them stuck as "Not working," "Stalled," or "Unreachable"), the cause could be sitting in your privacy settings. R.O.B.E.R.T. is our DNS filter, and it can block domains that match an active blocklist or custom rule. Once in a while, a blocklist or a custom rule can catch a tracker domain and stop it from loading.
To check, log into your account and head directly to My Account > Security to review your active blocklists and custom rules. If a tracker domain is being blocked, add it as an Allow rule on the Custom Rules page, then reconnect so the change applies.
Frequently Asked Questions
Do I still need to bind qBittorrent if the Always-On Firewall is already on?


Does binding qBittorrent to the VPN interface encrypt my downloads?
Can I do this on the free plan?
Get Started
Torrenting on Windscribe requires a paid plan, because P2P is turned off on the free locations. For P2P, you have two routes:
- Full Pro: unlimited data, with P2P available across our P2P-friendly locations.
- Build-a-Plan: pick and pay for only the locations you want, and P2P works on those paid locations. Each paid location has a monthly data cap, which torrenting can use quickly.
Some locations do not allow P2P traffic and are marked in the app. If a download refuses to start, simply switch to another P2P-friendly location.