

How To Use Windscribe With Vuze


Here is the plain-English, beginner-friendly way to set up Vuze with Windscribe so your downloads stay yours, plus a quick test to confirm it actually worked.
Introduction and Scope
Running torrents over a plain internet connection means every peer you swarm with can see your real IP address, and your Internet Service Provider (the company you pay for internet) can see your BitTorrent traffic and connection metadata, which they tend to treat less like private activity and more like a marketable asset.
A VPN helps prevent this by routing torrent traffic through an encrypted tunnel. Peers see the Windscribe IP instead of your home IP, while your internet provider sees a connection to Windscribe rather than plain torrent traffic.
One firm warning before you touch a single setting
This guide is written only for Vuze. The interface-binding steps below are specific to how Vuze handles network settings. Do not paste these instructions into your browser, your email client, or some other torrent app and expect them to work. At best they will do nothing. At worst they will break that app's connection or leak traffic you assumed was protected. If it isn't Vuze, this guide isn't for it.
The Firewall Rule vs. the Kill Switch
Most VPNs ship with a "kill switch," and Windscribe has something stronger called the Firewall. The difference matters, so here is the plain version.
- A kill switch is reactive. It waits. When your VPN connection drops, the kill switch notices a moment later and then scrambles to cut your internet. In that small gap between the drop and the cut, packets carrying your real IP can slip out the front door.
- Windscribe's Firewall is proactive. Think of it like this: instead of posting a guard who reacts after someone sneaks out, you brick up every exit in the building except the one VPN tunnel. There is no gap to exploit, because there is no other way out to begin with.
If the tunnel collapses, nothing escapes, because nothing was ever allowed to escape in the first place. Engineers call this behavior "failing closed," and it helps prevent leaks outside the tunnel. This is exactly the property you want for torrenting, where a one-second leak is enough to expose you to an entire swarm.
Step-by-Step Configuration Guide
You will configure two things: Windscribe's Firewall, and Vuze's interface binding.
Interface binding sounds intimidating but the idea is simple. Your computer has several “doors” to the internet (your Wi-Fi, your ethernet cable, and, once the VPN is running, a virtual VPN door). Binding tells Vuze: "You are allowed to use this one specific VPN door and no other." If that door is shut, Vuze just sits there quietly instead of wandering off through your regular connection.
Part A: Set the Windscribe Firewall
- Open the Windscribe desktop app.
- Click the hamburger menu (the three stacked lines, usually top-right) and choose Preferences.
- Go to the Connection tab.
- Find Firewall Mode and set it to Always On.
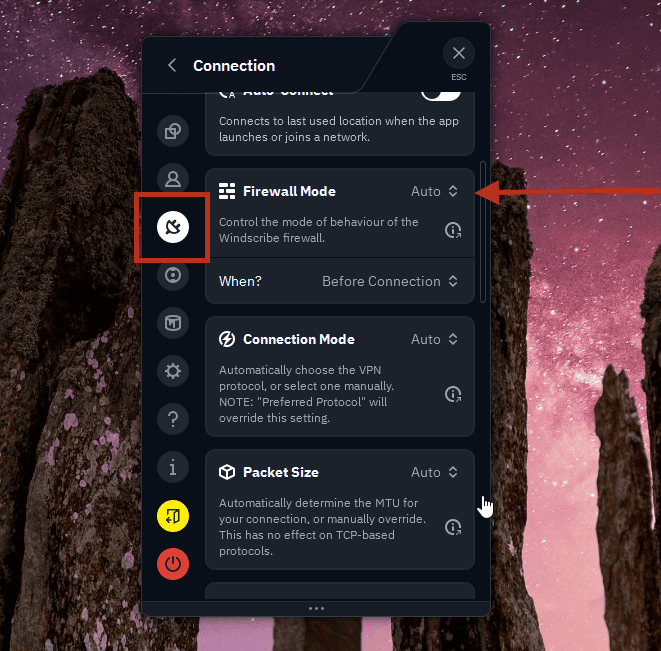
Firewall Mode set to Auto (default)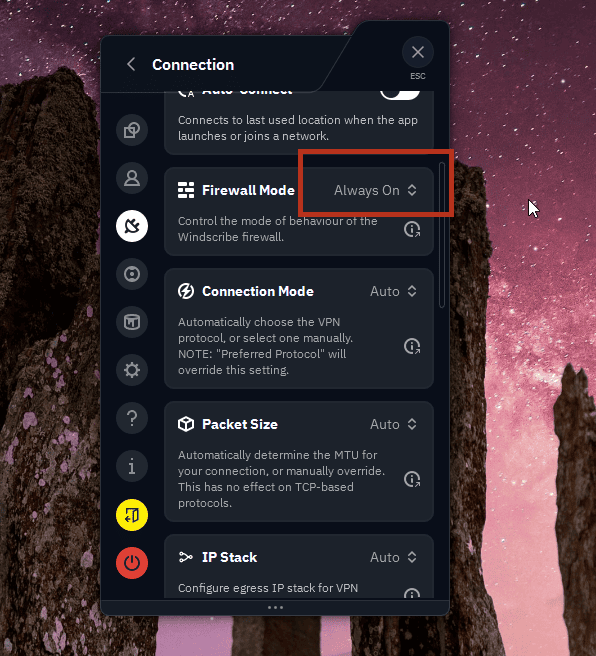
Firewall Mode set to Always On (what you want)
That is it for Windscribe. "Always On" means your internet is disabled entirely unless you are connected to a Windscribe location, even if the app crashes, even if you close it, even after a reboot, because it operates at the operating-system level.
Part B: Connect First, Then Bind Vuze
The VPN's virtual door only appears in your list of network interfaces while the VPN is actually running. So:
In the Windscribe app, connect to a P2P-enabled location, and leave it connected. Two things to know here: P2P only works on paid Windscribe locations (free locations block it), and some locations disallow P2P regardless of plan. Pick a paid location that is not marked No-P2P. Windscribe keeps the current restricted-location list in its P2P support article, so check that list if you are unsure.
Part C: Bind Vuze to the Windscribe Interface
- Open Vuze. Go to Tools > Options (or just press Ctrl + ,).
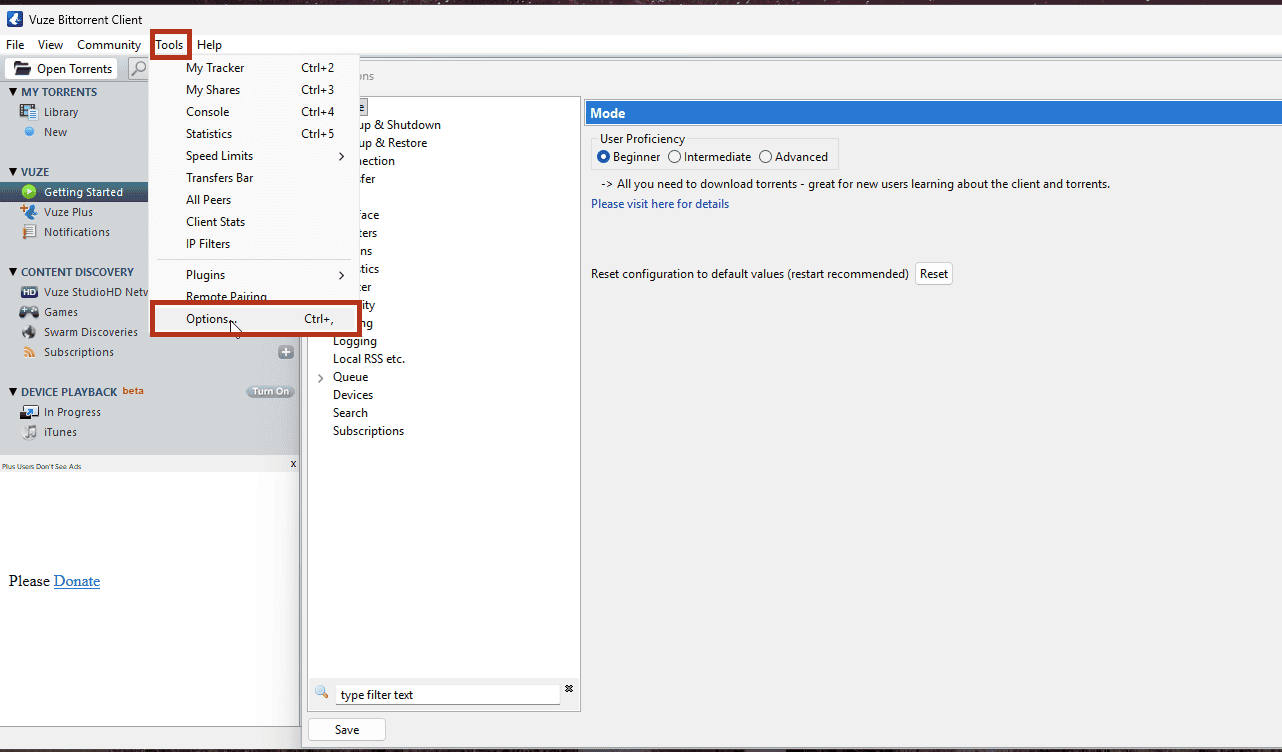
Opening Tools > Options in Vuze - In the left pane, click Mode. Set the user proficiency to Advanced, then click Save. (The binding option is hidden in beginner mode.)
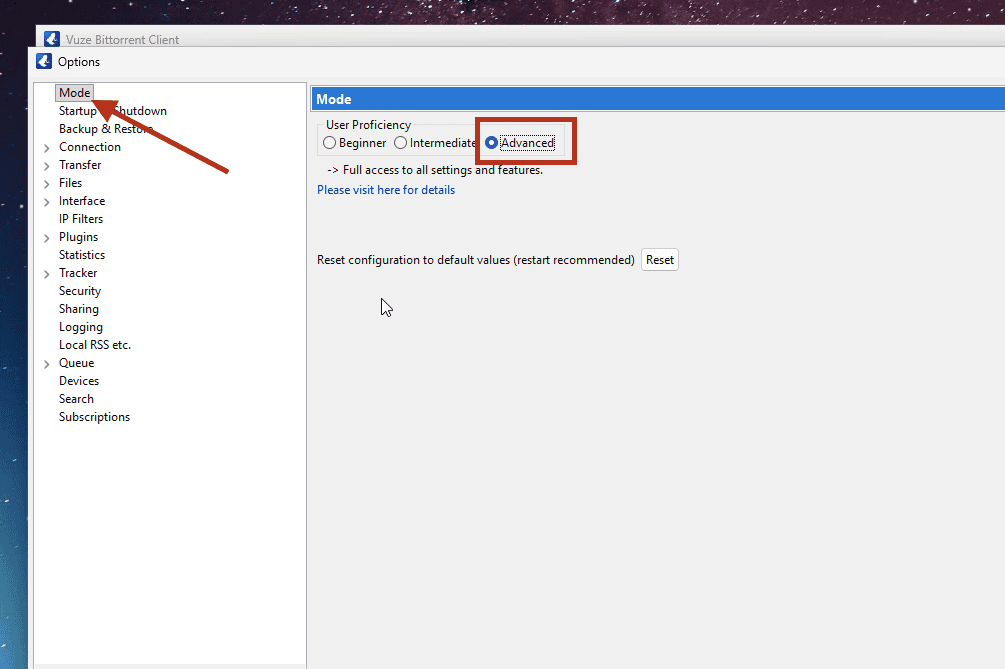
Mode screen: user proficiency set to Advanced - In the left pane, expand Connection and click Advanced Network Settings.
- Look at the list of network interfaces shown on that screen. With Windscribe connected, you will see an entry for the Windscribe adapter (it may appear as "Windscribe," a "Wintun" adapter, or a "TAP" adapter depending on your protocol). Note its exact name.
- In the field labeled Bind to local IP address or interface, type that exact adapter name.

Advanced Network Settings: locating the blank Bind to local IP address or interface field - Scroll down and tick the box that reads Enforce IP bindings even when interfaces are not available. This is the part that makes Vuze stop dead if the VPN drops, instead of quietly falling back to your real connection.
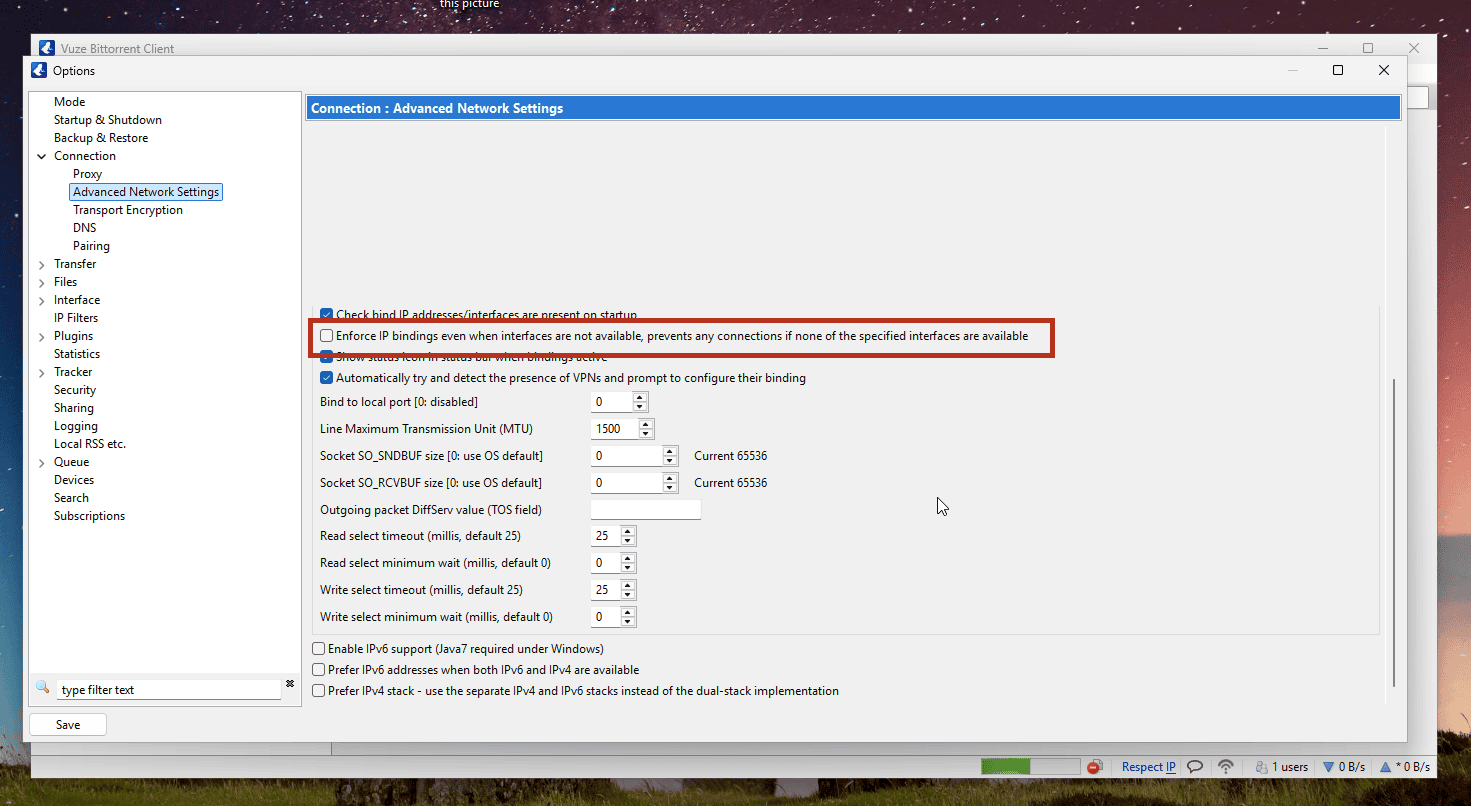
Locating the Enforce IP bindings option before ticking it; local interface details are redacted - Click Save and close the Options window.
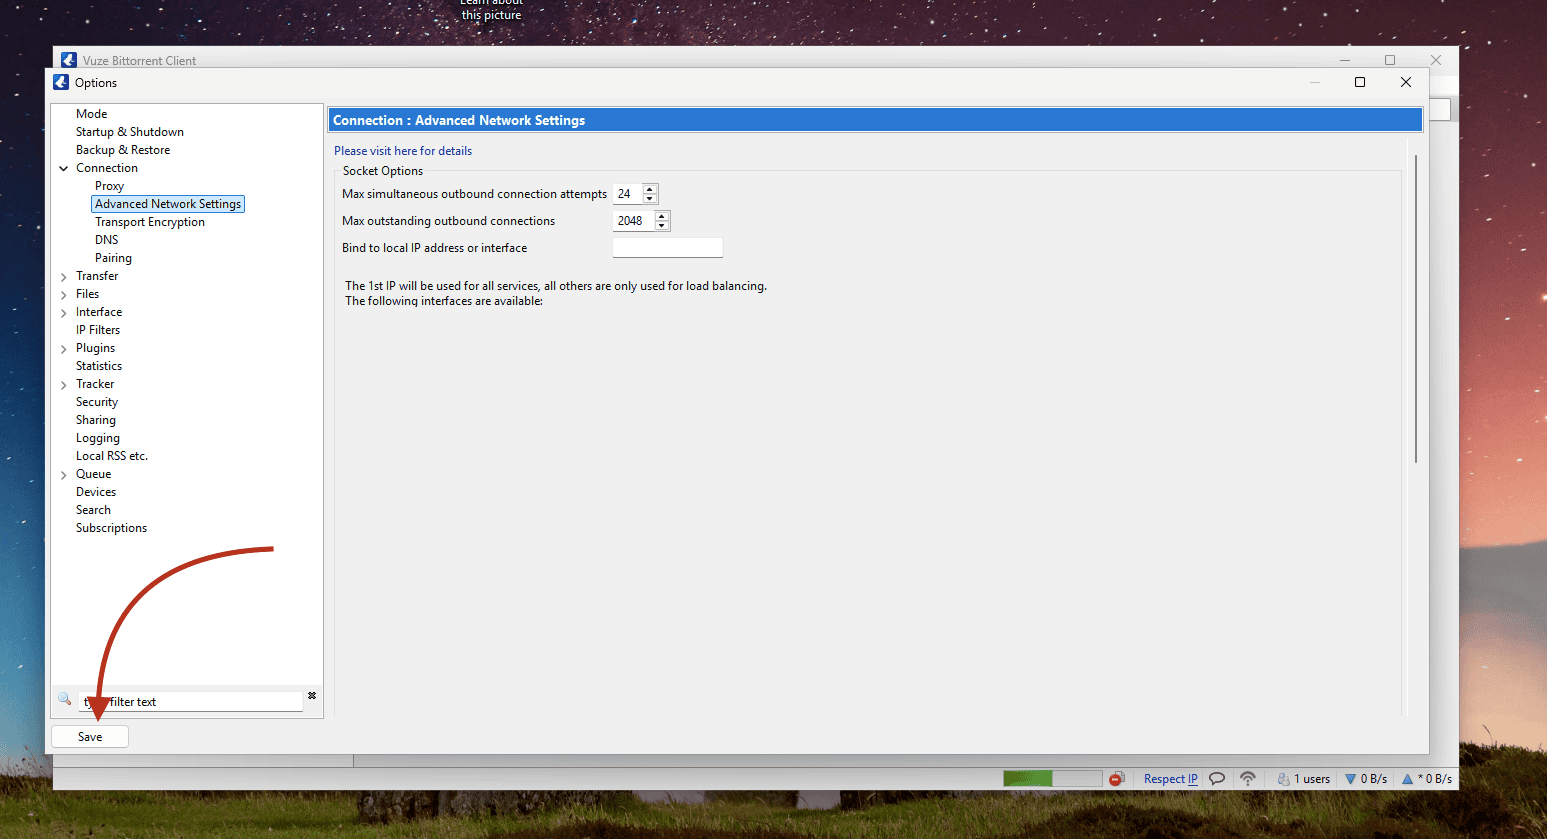
The Save button in Vuze's Advanced Network Settings; local interface details are redacted
Vuze is now locked to the tunnel. No credentials, no proxy ports, no separate login: the binding does the work.
Two Things to Keep an Eye On
- If you change protocol or location later (or the Windscribe adapter name changes for any reason), reconnect Windscribe, reopen Vuze, and recheck that the bound interface in Advanced Network Settings still points at the live adapter. A stale binding can leave Vuze pointed at a door that no longer exists.
- If you use Windscribe's Split Tunneling (a feature that lets you choose which apps skip the VPN), make sure Vuze is not on the excluded list. An excluded Vuze would route around the tunnel entirely, which is the opposite of what you want here.
The Safe Execution Sequence
The settings above are only half the job. The other half is doing things in the correct order, every single time. Treat this as a loop with a fixed start and a fixed end.
Startup (Top to Bottom)
- Confirm the Windscribe Firewall is set to Always On.
- Connect to a P2P-enabled Windscribe location and wait until it reports connected.
- Only now, open Vuze.
Shutdown (Top to Bottom)
- Fully exit Vuze. Not minimized, not closed to the tray: actually quit it so no torrents are still running in the background.
- Then disconnect the Windscribe VPN.
The logic is straightforward. Vuze should never be open while the tunnel is down, not for a second on the way up and not for a second on the way down. Follow the loop and there is no window where Vuze can talk to the internet without the VPN in front of it.
Verifying the Secure Connection
Trust, but verify. There is a free tool built for exactly this: a torrent IP checker.
- With Windscribe connected and Vuze configured, open a browser and go to ipleak.net.
- Scroll to the section called Torrent Address detection and click to activate it. The site gives you a magnet link.
- Add that magnet link to Vuze (File > Open > URL/Magnet URI and paste it).
- Wait a few seconds, then refresh the ipleak.net page.
The site will report the IP address your torrent client is announcing to the world. The pass condition that matters most is simple: the torrent IP should be a Windscribe IP, and never your home internet service provider, your home city, or your real IP. If it shows your real IP or home location, stop torrenting immediately and recheck the binding covered earlier.
Note on browser extensions: if you have the Windscribe browser extension running, or any other proxy active in that browser, the browser IP can differ from the torrent IP even when Vuze is correctly using the desktop tunnel. To avoid confusing yourself, run the check in a plain browser session with no proxy or VPN extension active, or just judge the result on the torrent IP alone using the rule above.
A Quick Note on R.O.B.E.R.T.
R.O.B.E.R.T. is Windscribe's built-in blocker that filters out ads, trackers, and malware at the DNS level. It is genuinely useful, but it blocks by category, and in some cases an aggressive blocklist or custom rule can also catch the domains your torrent trackers use to find peers. It will not always do this, but it is worth ruling out.
If your torrents connect but refuse to find any seeds, go to My Account → Security and check that no blocklist or custom rule is quietly intercepting your tracker traffic. Toggling a suspect blocklist off for a moment is a fast way to confirm whether R.O.B.E.R.T. is the culprit.
Frequently Asked Questions
Why can't I just use my main Windscribe account password to set up the proxy?


Does binding Vuze to the VPN encrypt my traffic the way the desktop app does?
What happens to my torrents if the Windscribe app crashes?
Try It
A quick legal note first: only download or share files you actually have the right to use, and stay within your local laws and Windscribe's Terms of Service. A VPN protects your privacy; it does not change what is and isn't legal to torrent.
On plans: you can install Windscribe and practice this entire setup on the free plan, which gives you 10GB of data a month (confirm your email to get the full amount). That free tier is great for getting the app installed and the Vuze binding dialed in. It will not, however, actually torrent, because P2P traffic is disabled on Windscribe's free locations.
To torrent for real, you need one of the paid options:
- Full Pro gives you unlimited data across Windscribe locations. For torrents you still pick a P2P-enabled location, but you are no longer juggling a data cap or a short location list.
- Build-a-Plan lets you assemble a custom plan. Build-a-Plan users can torrent only on the paid locations included in their plan.